


This is an archived tutorial from the kirupa.com legacy collection. It covers software that may no longer be available, but it is kept online because the ideas still hold up.
This tutorial should teach you a little bit about integration between Flash, PHP and MySQL. We will learn how to parse text into a HTML-formatted textbox from an external Actionscript file. It will use a PHP file to parse text from a MySQL database into a kind of code which the AS will decode.
As I can't use my own MySQL database here, I will provide
Images showing the examples and Flash screens. Please note
that to complete this tutorial, you need a PHP enabled
server, a MySQL database, and Flash MX (2004).
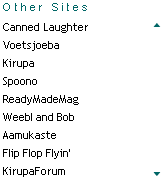
[ an example of what you will create, on my site, displaying external links ]
The following steps will show you how to create a dynamic Flash list.
Create a New Document in Flash, press Ctrl+J (Cmd+J on Mac) and set the stage size to 165px by 200px (You may change the dimensions to suit your needs, but this is what I used).
Create a new layer called Sites and then create a Dynamic Textbox on that layer using the Text tool and name it sites_txt. Make sure that HTML formatting is on!
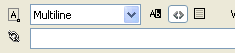
[ the textbox's properties should look like this, HTML formatting is the <> button ]
Now, we need to create the ActionScript file, so create a new Actionscript File by clicking File > New > Actionscript file.
Now for the fun part, the coding! Insert this into the Actionscript file and save it as sites.as, the code will be explained later:
function lv(l, n, t, e, f) {
  if (l == undefined) {
  l = new LoadVars();
  l.onLoad = function() {
  var i;
  n.htmlText = "";
  if (t == undefined) {
  n.htmlText += "<b>"+this["title"+e]+"</b><br>";
  } else {
  for (i=0; i<this.n; i++) {
  n.htmlText += "<a href='"+this["link"+i]+"'>
  "+this["title"+i]+"</a><br>";
  }
  }
  };
  }
  l.load(f);
}
lv(sites_txt, "cycle", null, "sites.php");
As you can see, the Actionscript file requires a .php file (sites.php) to work, so fire up Dreamweaver/Notepad or any other text editor, and paste in this code:
<?php
mysql_pconnect ("HOST OF YOUR SQL SERVER", "YOUR SQL USERNAME", "YOUR PASSWORD");
mysql_select_db ("THE DATABASE YOU WANT TO USE");
$qResult = mysql_query ("SELECT * FROM sites ORDER BY id ASC");
$nRows = mysql_num_rows($qResult);
$rString ="&n=".$nRows;
for ($i=0; $i< $nRows; $i++){
  $row = mysql_fetch_array($qResult);
  $rString .="&id".$i."=".$row['id']."&"."&title".$i."=".$row['title']."&".
  "&link".$i."=http://".$row['link']."&";
}
echo $rString."&";
?>
As you will see if you run this file, it will not work as we need to make a table named sites in our database, so if you want to, you can use this SQL query code to create one, or create one of your own.
CREATE TABLE `sites` (
`id` int(11) NOT NULL auto_increment,
`link` varchar(100) NOT NULL default '',
`title` varchar(100) NOT NULL default '',
PRIMARY KEY (`id`)
) TYPE=MyISAM AUTO_INCREMENT=19 ;
INSERT INTO `sites` VALUES (5, 'www.kirupa.com', 'Kirupa');
INSERT INTO `sites` VALUES (4, 'www.voetsjoeba.com', 'Voetsjoeba');
INSERT INTO `sites` VALUES (3, 'www.cannedlaughter.net', 'Canned Laughter');
INSERT INTO `sites` VALUES (6, 'www.spoono.com', 'Spoono');
INSERT INTO `sites` VALUES (7, 'www.readymademag.com', 'ReadyMadeMag');
INSERT INTO `sites` VALUES (9, 'www.weebl.jolt.co.uk', 'Weebl and Bob');
INSERT INTO `sites` VALUES (10, 'www.aamukaste.org');
INSERT INTO `sites` VALUES (12, 'www.flipflopflyin.com', 'Flip Flop Flyin''');
INSERT INTO `sites` VALUES (15, 'www.kirupaforum.com', 'KirupaForum');
INSERT INTO `sites` VALUES (16, 'www.razyr.com/blog', 'Razyr');
INSERT INTO `sites` VALUES (17, 'senocular.com', 'Senocular');
INSERT INTO `sites` VALUES (18, 'www.may1reboot.com', 'May 1st Reboot');
Now you are all set up, so let's include the AS file into our Flash document. Go back to your Flash timeline, create an Actions Layer, and in the first frame enter the following code:
#include "sites.as";
 |
Note |
| If this tutorial does not work, please check that you have a server that is capable of PHP and MySQL, if you do, feel free to contact me about it! | |
While your example should work well, I still haven't explained what all of this code does! In the next section I will explain how and why all of these sections of code work together to create a working example!
In the previous section, you created a flash animation that accessed a PHP file that retrieved data from a MySQL database. In this page, I will explain the code that helps connect all three separate sections into a final product.
Let's start with the MySQL code first:
CREATE TABLE `sites` (
`id` int(11) NOT NULL auto_increment,
`link` varchar(100) NOT NULL default '',
`title` varchar(100) NOT NULL default '',
PRIMARY KEY (`id`)
) TYPE=MyISAM AUTO_INCREMENT=19 ;
INSERT INTO `sites` VALUES (5, 'www.kirupa.com', 'Kirupa');
INSERT INTO `sites` VALUES (4, 'www.voetsjoeba.com', 'Voetsjoeba');
INSERT INTO `sites` VALUES (3, 'www.cannedlaughter.net', 'Canned Laughter');
INSERT INTO `sites` VALUES (6, 'www.spoono.com', 'Spoono');
INSERT INTO `sites` VALUES (7, 'www.readymademag.com', 'ReadyMadeMag');
INSERT INTO `sites` VALUES (9, 'www.weebl.jolt.co.uk', 'Weebl and Bob');
INSERT INTO `sites` VALUES (10, 'www.aamukaste.org');
INSERT INTO `sites` VALUES (12, 'www.flipflopflyin.com', 'Flip Flop Flyin''');
INSERT INTO `sites` VALUES (15, 'www.kirupaforum.com', 'KirupaForum');
INSERT INTO `sites` VALUES (16, 'www.razyr.com/blog', 'Razyr');
INSERT INTO `sites` VALUES (17, 'senocular.com', 'Senocular');
INSERT INTO `sites` VALUES (18, 'www.may1reboot.com', 'May 1st Reboot');
The code above is pretty much the straightforward format for adding values to a MySQL database. You first create the table, called sites, that will hold the various data "cells". If you want to see the above data in a more familiar, table-like format, it would look like this:
| sites | ||
| id | link | title |
| 5 | www.kirupa.com | Kirupa |
| 4 | www.voetsjoeba.com | Voetsjoeba |
| 3 | www.cannedlaughter.net | Canned Laughter |
| 6 | www.spoono.com | Spoono |
| 7 | www.readymademag.com | ReadyMadeMag |
| 9 | www.weebl.jolt.co.uk | Weebl and Bob |
The above MySQL data is directly accessed by the PHP file. Let's take a look at the code in the PHP file:
mysql_pconnect ("HOST OF YOUR SQL SERVER", "YOUR SQL USERNAME", "YOUR PASSWORD");
mysql_select_db ("THE DATABASE YOU WANT TO USE");
Before gaining access to a MySQL database, you first need to create a connection to the database. For security reasons, you are required to input the hostname of your SQL server (usually 'localhost'), your username, and your password. Since you may have multiple databases, you use mysql_select_db to tell PHP the name of the database you are planning on using.
$qResult = mysql_query ("SELECT * FROM sites ORDER BY id ASC");
$nRows = mysql_num_rows($qResult);
$rString ="&n=".$nRows;
for ($i=0; $i< $nRows; $i++){
  $row = mysql_fetch_array($qResult);
  $rString .="&id".$i."=".$row['id']."&"."&title".$i."=".$row['title']."&".
  "&link".$i."=http://".$row['link']."&";
}
echo $rString."&";
The code above looks confusing, but it's really simple. What I am trying to do, is extract the data from our MySQL table and display it for Flash to be able to read it.
I first use mysql_query to send a, well, query to the database we currently have a connection open to. If you are familiar with Flash, this is similar to instantiating an object prior to using it in Flash.
In order to retrieve the data from the table, an efficient way would be to use a loop - a for loop in our case. A for loop always requires a starting point, an ending point, and an increment value that will take you from your starting point to your ending point.
Our starting point is zero, as specified by $i =0. Our ending point should be the number of rows of data that are in our MySQL table. In order to retrieve the row information, you can use the mysql_num_rows(data) function that returns a number based on the 'data' passed to it:
$nRows = mysql_num_rows($qResult);We simply pass in the value from our mysql_query as our data for mysql_num_rows in order to determine the number of rows of data we need to loop through:
Getting back to our loop, we now have our starting point,
our ending point ($nRows), and the increment value:
$i++.
Now that our loop structure is done, we can simply retrieve
the data from our database:
for ($i=0; $i< $nRows; $i++){
  $row = mysql_fetch_array($qResult);
  $rString .="&id".$i."=".$row['id']."&"."&title".$i."=".$row['title']."&".
  "&link".$i."=http://".$row['link']."&";
}
echo $rString."&";
The above code is analogous to accessing data from an
array. The value if $i increments from 0 to the number of
rows, and that number acts as an index position value that
concatenates (adds to) $rString
with the id, title, and link from our database.
All of the above code returns a long string of data stored in the $rString variable. Flash will see the data from the $rString variable because that is all that is output by the browser. Speaking of which, let's talk about the last piece of the puzzle, the Flash code:
function lv(l, n, t, e, f) {
  if (l == undefined) {
  l = new LoadVars();
  l.onLoad = function() {
  var i;
  n.htmlText = "";
  if (t == undefined) {
  n.htmlText += "<b>"+this["title"+e]+"</b><br>";
  } else {
  for (i=0; i<this.n; i++) {
  n.htmlText += "<a href='"+this["link"+i]+"'>
  "+this["title"+i]+"</a><br>";
  }
  }
  };
  }
  l.load(f);
}
lv(sites_txt, "cycle", null, "sites.php");
The above code is very self-explanatory. The main noteworthy aspect you should get out of the above code is that I am taking all of the data and placing it in the text field I created in the previous section. Since I enabled HTML for the text field, I can use HTML formatting to give the text a URL value and make it, essentially, a hyperlink.
The loop structure is very similar to the loop structure I explained in the PHP code. The section on loadVars is addressed by Kirupa's tutorial on that very topic: Displaying Data from an External File.
You are now finished! I have provided the source file for the Flash and PHP portions of this tutorial
So, hopefully you have learnt a little something about Flash and PHP and its possibilities, so go forth and make something wonderful!
If you have any questions, feel free to contact me or post on the forums!
 |
Ben Smith a.k.a Ωmega |
 |
Just a final word before we wrap up. What you've seen here is freshly baked content without added preservatives, artificial intelligence, ads, and algorithm-driven doodads. A huge thank you to all of you who buy kirupa's books, became a paid subscriber, watch the videos, and/or interact on the forums.
Your support keeps this site going! 😇

:: Copyright KIRUPA 2026 //--
