|
by
kirupa | 27 April 2008
One of the most common
things you can do to make your application more
dynamic is load content from an external source. The
most common of which is an XML file or a XML-based
file such as those from various RSS feeds.
There are two major
topics when it comes to using XML in Silverlight.
One topic is how to load data from a separate XML
file. Another topic is how to actually read the
contents of our XML file using LINQ. This tutorial
will primarily focus on the former where we discuss
how to load your XML data into your Silverlight
application.
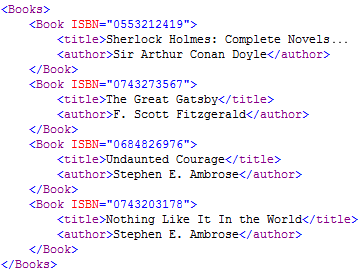
The XML file you load
will look like the following:
You can view this XML
file by clicking on the
following link.
Before we can start
to actually load the XML data, let's get your
project set up appropriately. If this is your first
time creating Silverlight 2 content on your
computer, be sure to read my
Getting Started with Silverlight 2 article that
explains everything you need to get up and running.
Ok, let's get started:
-
First, launch
Visual Studio 2008 and create a new Silverlight
2 application. After entering your name and
location, you will be prompted with a dialog
asking if you want to create a Web site for
hosting your app:

[ create a new VS2008 Silverlight 2 project ]
-
From this dialog,
go with the default choices which should be "Add
a new Web to the solution for hosting the
control". Click on the OK button to close this
dialog and to create both your Silverlight
application and your Web site:

[ your solution will contain both a Web Site as well
as a Silverlight 2 project ]
To
learn more about this separation between your web
site and Silverlight application, the
following article should help you out.
-
Ok, great, your
project has now been created. What you need is
an XML file to load. Download the
Sample XML file to your
computer by right clicking on the link and
choosing the equivalent of Save Target As:

[ save your sampleXML.xml file to your computer ]
-
Once you have the
sampleXML file downloaded to your computer, you
need to add it to your Web site project. More
specifically, you want to add it in your ClientBin
folder. There are several ways you can do that.
The easiest way would be to drag and
drop this XML file into your ClientBin folder.
An alternative would be to right click on your
ClientBin folder and choosing to Add Existing
Item:

[ drag the XML file into ClientBin or Add Existing
Item ]
A file
picker will appear, and from this window you can
browse to where your XML file was and have it be
added to your solution. In the end, regardless of
which approach you took, you should see your XML
file inside your ClientBin directory:

[ in the end, your sampleXML file will be added to
your ClientBin folder ]
Ok, now that you have
your project setup and your XML file ready, all that
remains is adding the code and figuring out why the
code works the way it does.
Onwards to the
next
page!
|


