 Wireframe
Text
Wireframe
Text
by
kirupa
With all of Swift 3D's 3D-to-Flash abilities,
you do not see many uses of the ultimate cool effect: three
dimensional text. Why do you not see many examples of
animated 3D text? The primary reason is file size. The word
"kirupa" rendered in Swift 3D can easily take up about
50k-60k in simple Arial font. Text, unlike shapes, has far
more detailed lines, curves, and edges that need to be
converted to the Flash format.
There is a solution to the file size
problem: wireframe text. Wireframe text is a method of
exporting your animation without any shadows and fills. All
you will see is the basic outline of the text. By displaying
only the outline, the file size for text is considerably
less, and the animation can look quite "cool".
You will create something similar to the
spinning text in the following animation.
[ the
animation has been modified in Flash MX ]
Setting Up Text
What does wireframe text need? Text of course! The
following instructions will help you to add text in Swift 3D
v2:
-
Create a new document. Once the new document has been
created, press the Create Text tool:

[
the Create Text tool ]
-
You will see the words "Text" displayed in your work area.
Select the word "Text" with your mouse pointer. The left
panel will change to reflect the two text options - font
and text:
[
the text panel ]
-
In the Text field, replace the word "Text" with the words
"wireframe":
[
replace 'text' with 'wireframe' ]
-
You may notice that the word wireframe is far too large to
fit in the work area. Right click on the wireframe text
and drag the mouse back. You are, actually, scaling
down the wireframe text:

-
Once the text has been scaled down, you are almost ready
to export the wireframe model of the animation. We still
need to reduce extraneous curves and lines that might
inflate the file size.
-
Make sure the "wireframe" text has been selected and press
the Bevels option on your top left. You will see various
Beveling options displayed in the left-middle of your
screen. In the Depth field, enter a 0 for the depth:
[
enter a value of '0' in the Depth field ]
-
Removing the bevel by setting the depth value to 0 makes
the text look a little bit flatter. While it may not be
aesthetically pleasing, the file size will be less than if
bevels were applied.
-
The finish off the text, add a simple animation. Click the
Show animations button on your bottom-right panel and
apply the first preset animation: Horizontal Left (you
drag the animation from the regular spins panel and drop
it on the "wireframe" text):
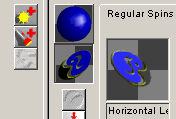
[
apply a horizontal spin to the wireframe text ]
Exporting the Wireframe Text
The final steps involve exporting the movie into the
Flash SWF file format:
-
Click the Preview and Export Editor tab near the top of
your window.
-
In the Output Options panel on your top-left, click the
Fill Options selection. Uncheck the Fill Object checkbox:
[
uncheck the fill object checkbox ]
-
Next, click the Edge Options selection in the Output
Options panel. Check the Include Edges box (if it is not
already checked).
-
Ensure that Include Hidden Edges and Include Detail Edges
are unchecked. Those two options greatly add to file size:
[
the edge options ]
-
Press the Generate Entire Animation button and you are all
set to exporting the SWF file into Flash or directly to a
Web site!
The above tutorial should
have helped you to learn how to create Wireframe text by
using Swift 3D. As you can tell, the wireframe text is not
really an 'effect', but it is merely an effect that takes
advantage of Swift's Exporting features!
Just a final word before we wrap up. What you've seen here is freshly baked content without added preservatives, artificial intelligence, ads, and algorithm-driven doodads. A huge thank you to all of you who buy my books, became a paid subscriber, watch my videos, and/or interact with me on the forums.
Your support keeps this site going! 😇

|


