 Swift 3d in Flash
MX Rollovers - page 2
Swift 3d in Flash
MX Rollovers - page 2
by Iammontoya
Piece of cake, so far! Now, let's create a quick animation
sequence. First, let's go back to our working area in Swift
3D.
-
Click on the Scene Editor
tab.
-
If it's not already selected,
Select the Torus on the Scene. At this point, we want to
flip the ring down. In order to do this properly (for the
animation in this tutorial), we need to change the pivot
point of the Torus.
-
Click on the Animate button at
the top right of your screen.
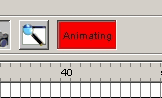
[ the
animating button ]
-
Click the number 20 in the
timeline.
-
In the left panel. Click to
select Position.
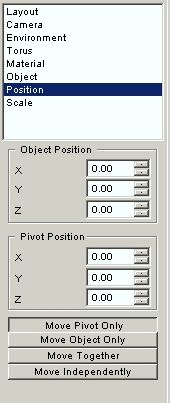
[ adjusting
the position ]
-
Go to the button section below
and
Click to select the Move Pivot Only (see image
above). This will allow us to move the red and green
crosshairs to the location we want without disturbing the
object. This is slightly similar to the registration point
in Flash.
-
Position the Pivot point on
the bottom edge of the Torus.
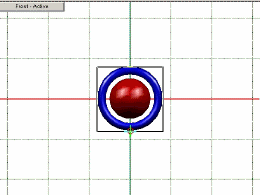
[ arranging
the objects in our 3d space ]
-
As soon as you do that, the
lower left panel which controls object rotation will show
you the object in relation to it's pivot point. Click on
Lock Vertical.

[ the lock
on vertical tab enables you to shift your object vertically
]
-
With the vertical axis locked,
use the globe in the lower left panel to drag down. You
want to drag down far enough so you can see through the
Torus. Whew! Gotta love it! Your screen should look
similar to the next illustration:
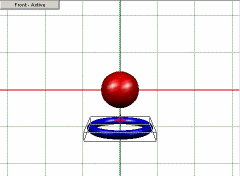
[ the torus
after it has shifted in its axis ]
-
Click on the Play button
underneath the timeline. Pretty cool, and easy as pie.
-
That will complete our rollover(mouseover) effect. Let's save and export it to
Flash. You're almost done!
-
Click on File. Click
on Save.
-
Click on the Preview and
Export Editor tab.
-
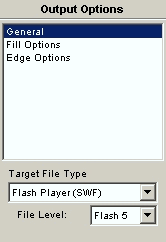
In the Output Options section,
click on General. Now, click to the right of Adobe
Illustrator, and make your Target File Type to be Flash
Player(swf).
[ the output
options panel ]
-
Click on Generate Entire
Animation. (The render engine for Swift is killer fast!
However, rendering speeds vary depending on the speed of
your system. Mine took about 9 seconds.)
-
Click on
Export Entire Animation...
-
Give it a file name (I called
it Hoop.swf), and click Save. Exit Swift.
On to Flash to finish this puppy!
-
Open a new file in Flash. Movie
Size should accommodate your image. Mine is set at the
default 550x400 with a white background and 12 fps. Yours
will look different than the one below if you're using Flash
5.
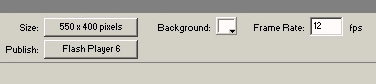
[ modify the
movie properties ]
-
In your menu (above) click on
Insert. Click on New Symbol. Select
Movie Clip and click OK.
-
Click on File. Click
on Import and select hoop.swf and click
Open. Voila! We have our movie. Click on
Scene1 to return to the scene.
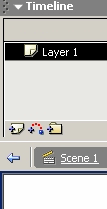
[ the scene1
tab ]
-
Click on File. Click
on Import.
-
Select the hoop.ai file and
then Click OPEN. Click OK. If you don't see
your drawing, try scrolling up. Sometimes Flash puts the
imported image off the screen. If the image is off the
screen, select the image and bring it down to your scene.
-
With the drawing still
selected,
use the F8 key on your keyboard, or click
on Insert, Convert to Symbol.
-
In the Behavior Section, choose
Graphic. We do this because we don't need all the paths
from Illustrator, we just want a straight image. Click OK.
-
With your graphic selected, Hit F8
again. This time, we will convert our newly converted
graphic to a button. Select Button from the Convert
to Symbol panel and click OK.
-
Double click on the button you
just created (your graphic is now a button) to edit your
button.
[ the button
in Flash MX ]
-
Click on the onion skin button. Onion skin
will help us with placement.

-
Right click on the white space
underneath the Over area in the button timeline.
 Select Insert Blank Keyframe.
Okay.. when will this thing be over? Well,
in about 4 steps. Here we go.
-
Hit F11 on your keyboard. This
will bring up the library.
-
Select the movie clip (looks
like a cogwheel)...

...and drag onto the scene. You should place the movie
clip so that it is EXACTLY over the onion skin graphic.
-
Turn off Onion Skin by
clicking on the same button you clicked on in step
-
Click on Scene1.
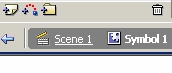
[ the scene
1 tab ]
-
Drum Roll.... Click on Control.
Click on Test Movie.
Whew! Wasn't that fun! Swift is not the
best for modeling, but it will do great with simple stuff
like this.
Hope you enjoyed the tutorial. If you have
any questions or comments, please drop me a note or post on
the forums.
created by.. Montoya.
"My name is Indigo Montoya. You killed my
father.. prepare to die.."
[email protected]
|


