 Placing
Objects on Stage
Placing
Objects on Stage
by kirupaBecause Swift 3D is
a three-dimensional vector editing/creating program, you can
create and edit objects in all three dimensions (x, y, z).
Because it is difficult to visualize a three dimensional
plane on a 2D monitor, Swift provides you with different
camera angles for you to work in. Learning to use the camera
angles to your benefit will make you a better "swifter" in
the end!
This tutorial will help you to grasp
positioning objects in a three-dimensional space in Swift
3D. The final source and a sample
animation that I created combining Swift 3D and
Flash will be provided towards the end of this tutorial!
Problem: I want to create the
illusion of looking through a series of rings using Swift
3D.
Here's the Solution:
-
Launch Swift 3D and create a new document.
-
Ensure that the Show Secondary Camera button is selected.

[ the show secondary camera
button ]
-
You should see two empty panels display in your window.
One panel should be tabbed "Front-Active" and the other
panel should be tabbed "Top".
-
Press the Create Torus button from your main toolbar:

[ create torus button ]
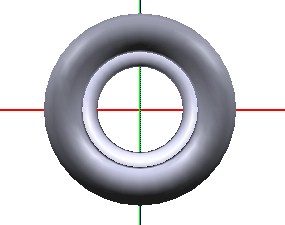
-
You should now see a large hollow circle display in your
Front-Active camera panel; likewise, you will see a
top-down view of your hollow circle (torus) in the Top
panel on your right.
-
Select the torus from the Front panel. Copy the object by
pressing Ctrl + C (Edit | Copy). After copying the object,
press Ctrl + V (Edit | Paste).
-
Now, in your Top panel, click on the torus (it
should simply be a thick line) and drag the torus up two
horizontal lines. Your top panel should look like the
following image:
[ the top
panel ]
-
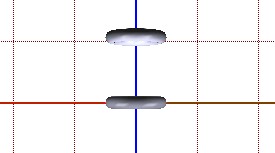
When you moved the torus further up in the Top panel, you
should have noticed that the torus is also moved behind in
the Front panel:
[ you see
two torus'es' ]
-
Now, go back to your Top panel. Copy the torus near
the top. Paste the torus and drag it up a few more
notches. Right click on an empty spot and drag back to
zoom out to see more of your shapes.
-
Keep repeating the copy and paste method until you have
achieved our original goal of looking through rings. The
following image shows you how my front panel looks after I
had completed my frenzied copying and pasting:

[ note: I
colored all the toruses to a lighter shade of gray ]
Camera Angles
I'm writing this in the hope that I do
not confuse you any further :-) The Front and Top panels in
Swift are nothing more than camera panels. Imagine that
there are two video cameras taping your every movement. One
camera is directly in front of you while another camera is
directly above you. You see the images from both cameras on
your computer.
As you move backward, you notice that in
the Top panel, the top of your head seems to move backward -
while in the Front panel you seem to get smaller as you move
away from the camera. The equal but different motion you see
of yourself is the same way Swift works.
That is the best way for me to
explain how the camera angles work in Swift. For every
movement you make in one camera panel, an equal change
occurs in another camera panel. The camera panels fulfill
their goal in making it easier to place and arrange objects
in a 3D plane. It is very difficult to place an object
behind by using only the Front panel, but if you use the Top
panel, you can place objects easily on a horizontal plane.
The following is a sample animation I
created using the technique discussed in this tutorial.
Instead of using a torus shape, I used rectangles for a
smaller file size:
Being the kind, benevolent guy that I am,
I have provided the source files for the above animation and
tutorial. Click on the following links to download:
With the download links mentioned above,
this tutorial comes to a close. I have not explained how to
create the animation featured in the tutorial, but the
animation does show how organizing objects in a three
dimensional space is useful.
Just a final word before we wrap up. What you've seen here is freshly baked content without added preservatives, artificial intelligence, ads, and algorithm-driven doodads. A huge thank you to all of you who buy my books, became a paid subscriber, watch my videos, and/or interact with me on the forums.
Your support keeps this site going! 😇

|


