 Photo Gallery
Using XML and Flash
by
kirupa |
2 September 2004
This is page two of this tutorial, so if you
stumbled here without having completed the previous page, click
here to catch up
on all the exciting stuff that you missed in the
previous page.
Make sure you have opened the FLA file
you downloaded in the previous page. Now,
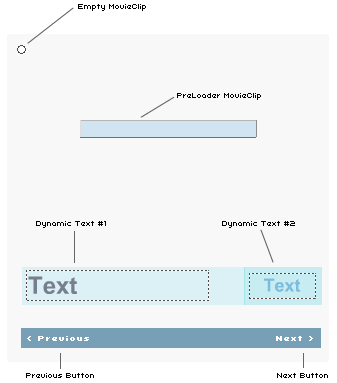
you should see the following six objects:

Your task is to assign each of
those six objects an instance name. I will explain how to add an
instance name to one object first, and you should be able to
apply an instance name to all of the
other objects.
-
Select the Empty Movie Clip with your mouse
pointer.
-
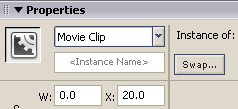
Look towards the bottom-left of your screen
in the Properties panel. Find the text field that says <
Instance Name >:

[ the <Instance
Name> text field ]
-
Click on the < Instance Name > text field
and enter the word picture.
You have successfully given your
empty movie clip the Instance Name picture. Now, you will
need to repeat the above steps for the 5 remaining objects.
The following list...lists the
object and the instance name I want you to give that
object.:
-
Empty Movie Clip = picture
(already done)
-
Preloader Movie Clip =
preloader
-
Dynamic Text #1 = desc_txt
-
Dynamic Text #2 = pos_txt
-
Previous Button =
previous_btn
-
Next Button = next_btn
If you don't know which object
corresponds to the instance name, check the image towards the
top of this page. Now, all of your objects have an
instance name associated with them. The last thing that remains
is for you to add the code.
Adding the Code
Select the empty keyframe in your Actions layer. Press F9 to
display your Actions panel. Copy and paste all of the following
code into your Actions panel:
- function
loadXML(loaded)
{
- if
(loaded)
{
- xmlNode
=
this.firstChild;
- image
=
[];
- description
=
[];
- total
=
xmlNode.childNodes.length;
- for
(i=0;
i<total;
i++)
{
- image[i]
=
xmlNode.childNodes[i].childNodes[0].firstChild.nodeValue;
- description[i]
=
xmlNode.childNodes[i].childNodes[1].firstChild.nodeValue;
- }
- firstImage();
- }
else {
- content
=
"file not loaded!";
- }
- }
- xmlData
= new
XML();
- xmlData.ignoreWhite
= true;
- xmlData.onLoad
= loadXML;
- xmlData.load("images.xml");
-
/////////////////////////////////////
- listen
= new
Object();
- listen.onKeyDown
=
function()
{
- if
(Key.getCode()
== Key.LEFT)
{
- prevImage();
- }
else if
(Key.getCode()
== Key.RIGHT)
{
- nextImage();
- }
- };
- Key.addListener(listen);
- previous_btn.onRelease
=
function()
{
- prevImage();
- };
- next_btn.onRelease
=
function()
{
- nextImage();
- };
-
/////////////////////////////////////
- p =
0;
- this.onEnterFrame
=
function()
{
- filesize
=
picture.getBytesTotal();
- loaded
=
picture.getBytesLoaded();
- preloader._visible
=
true;
- if
(loaded
!=
filesize)
{
- preloader.preload_bar._xscale
=
100*loaded/filesize;
- }
else {
- preloader._visible
=
false;
- if
(picture._alpha<100)
{
- picture._alpha
+=
10;
- }
- }
- };
- function
nextImage()
{
- if
(p<(total-1))
{
- p++;
- if
(loaded
==
filesize)
{
- picture._alpha
=
0;
- picture.loadMovie(image[p],
1);
- desc_txt.text
=
description[p];
- picture_num();
- }
- }
- }
- function
prevImage()
{
- if
(p>0)
{
- p--;
- picture._alpha
=
0;
- picture.loadMovie(image[p],
1);
- desc_txt.text
=
description[p];
- picture_num();
- }
- }
- function
firstImage()
{
- if
(loaded
==
filesize)
{
- picture._alpha
=
0;
- picture.loadMovie(image[0],
1);
- desc_txt.text
=
description[0];
- picture_num();
- }
- }
- function
picture_num()
{
- current_pos
= p+1;
- pos_txt.text
=
current_pos+"
/ "+total;
- }
Now, save this file. Go to File |
Publish Preview | HTML. You will now see a working example of a
photo gallery! In the
next page I will explain how to add new images, remove
existing images, etc.
In case you are wondering, don't
worry! I will try to explain every line of code that you pasted
above later.
Onwards to the
next page!
 |
page 2 of
9 |
 |
|