 Film
Grain
Film
Grain
by
kirupa
| 1 April 2004
A very cool defect I notice on older movies
and films is the film grain effect caused by the aging of
the actual film reels. While most would consider that to be
a flaw, I take the converse of that view and think it is a
really nifty effect. After all, one person's perception of a
flaw is another person's idea for a Flash MX 2004 tutorial.
The following animation shows the film
grain effect (or defect?) applied to a picture from Easter
Island:
[ the film
grain effect ]
The tutorial isn't too
complicated, but it does require one to pay attention to
minor details to help make a really convincing film grain
effect. Here's how:
-
Create a new document in Flash MX 2004. Set your movie's
width and height to 300 by 200.
-
For the sake of simplicity, set your movie's background to
a dark color such as black or gray as opposed to using a
image.
-
Now, select your Pencil Tool from your toolbox on the
left. Below the toolbox, you will notice a small section
marked Options. Click that and select Ink:
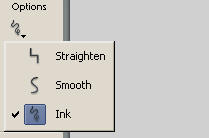
[ select the
Ink option for the Pencil Tool]
-
Once you have selected the Pencil Tool and set its options
to Ink, take a gander at your Properties panel and make
sure the Stroke color is a pale gray color.
-
With all of the above done, using your mouse, draw small,
random dots and dashes in your drawing area:
[ random
dots and dashes ]
-
Now, select all of the dots you made and press F8. The
Convert to Symbol dialog box will appear. Select Movie
Clip and press OK (the symbol name doesn't really matter).
-
Right click on your dots - now a giant movie clip - and
select Edit in Place. You should now be in your movie
clip's timeline. Now, insert a new keyframe on Frame 2 by
right clicking on Frame 2 in your timeline and selecting
"Insert Keyframe."
-
Make sure your timeline slider is over the Frame 2
keyframe. Now, move the dots and dashes around a little
bit to create the illusion of movement. After you have
moved your dots and dashes around quite a bit, right click
on Frame 3 and select "Insert Keyframe."
-
In Frame 3, shuffle the dots and dashes around a little
bit. You can also delete all of your dots and dashes and
draw new ones to make it truly random. Keep adding
keyframes and moving the dots and dashes around. About 9
or 10 keyframes' worth of random movements should be good.
-
Save your file and preview it in a browser. The film
grains you drew should appear and continue looping once
they reach their end.
 |
Drawing
the Vertical Lines |
|
Foreseeing questions about the topic
of the vertical lines, I will briefly mention the
tricks behind the moving vertical lines that occur
randomly. What I did was create another movie clip
and draw a thin, vertical white line. Once the line
was drawn, I simply created a motion tween where the
line changed position. I
created about 5 or 6 sequences of motion tweens
where the line was oscillated around the screen in
an erratic fashion. I inserted blank keyframes
between the motion sequences to create a slight
blinking effect:
[ my
timeline: notice the blank keyframes between the
tween sequences ]
You can copy and paste the frames in random sequences throughout your movie
clip. For more info, take a look at my FLA provided
below. |
|
Well that's all there is to
this effect. Adding an actual image would make the effect
stand out even more. If file size is no concern, you may
even want to incorporate actual video files.
I have provided the source
files for your use:
Just a final word before we wrap up. What you've seen here is freshly baked content without added preservatives, artificial intelligence, ads, and algorithm-driven doodads. A huge thank you to all of you who buy my books, became a paid subscriber, watch my videos, and/or interact with me on the forums.
Your support keeps this site going! 😇

|


