Shared
Objects: Flash MX Cookies
written by ilyas usal a.k.a. pom
Shared Objects are a new feature of Flash MX. They are used
to store data on the user's machine, the same way cookies
would. Hopefully, the data can only be read by movies
originating from the same domain that created the Shared
Object, which means that it can't be read by just anybody.
The amount of data that you can store depends on you, of
course, and on how much data the user will accept (see the
technotes at the end of this tutorial). Shared objects can
be used to remember names and address, save a score, a
drawing, anything. Pretty cool, hue ?
In this tutorial, we'll see how to store a name; the first
time the user comes, he'll have to enter his name, and the
next time he comes, he will be recognized by the
application. Then we'll see how to save a drawing.
The following is an example of the List Box you will create
by following this tutorial:
[ fill the form, go somewhere else on the site and
come back ]
The tutorial
Before we start, please download the partial source. Don't worry, the partial
source will not have the key elements to make it work...you'll do that with
the information found in this tutorial. Click here to download the source.
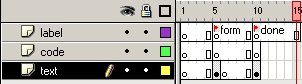
Once you have opened the file that you've
just downloaded, you will see that it contains four layers: background,
which is totally unuseful, text which contains all the textbox,
label and code. The last two layers are empty for the moment.
In the text layer, you can see that there is text in frame 5 and in
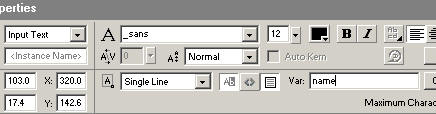
frame 10. In frame 5, there are two input box, one for the surname, one for
the first name. Click on the first one, and in the Properties panel, enter
in the field var: name. Select the other and enter
firstname.
[ properties panel ]
Now go to frame 10. There are two
dynamic box, the first one with Welcome Ilyas Usal in it, the second
with Your computer sucks big time in it. You will name the first one
message, the other one with os in it. Last thing before we
code, we need to label the timeline. In frame 5, enter the label form,
and in frame 10 the label done.
[ the timeline ]
It's time to code a bit. The first part is the detection of
the existence of the Shared Object. If it exists, then we'll go directly to
the done frame, but it it doesn't, it will take us to a form where we
can enter the data. Put it in the first frame of the code layer:
Let's see how this works.
user = SharedObject.getLocal("user_profile");
This is how we declare our Share Object. The getLocal function takes 2
parameters, objectName and localPath but only the first one is
necessary. It is the name of the object that you create, that is to say the
name of the file (.sol) on the user's computer. These objects will be
located in their own file, so that there won't be problems with overwritting.
This function returns a reference (that we called user here) to a
locally persistent shared object called user_profile that is
available only to the current client.
if (user.data.name == undefined){
_root.gotoAndStop("form");
If the Shared Object already exists, then name has already
been defined. You can access the data contained in the Shared Object like
this : reference_name.data.data_stored.
If the name is undefined, this user has never been here.
if (user.data.name == undefined){
_root.gotoAndStop("form");
}
That's why we take him to the form, where he can enter his name and
everything.
If the name is defined, then we store the data contained in the Shared
Object in variables.
firstname = user.data.firstname;
_root.gotoAndStop("done");
When this is done, we go to the frame lebeled done where we will
display the information concerning the user.
Now let's go to frame 5, that is to say the form. We have two input box
which we named earlier, and on button that we will use to submit the input.
You should now put this code to the button :
on(release){
When the user presses the button...
computer = System.capabilities.os;
We start filling our Shared Object. This function has nothing to do with
Shared Objects though. It just gets the properties of your system, in our
case the operating system. You can find all the other functions in the
Actionscript Dictionnary. We will have something like computer = "Windows
XP" for instance.
user.data.name = name;
We put the value of the input box in the Shared Object.
user.flush();
We save everything in the .sol file and that's it. Everything's saved.
Now you know everything : how to read and how to write in a Shared Object.
The last step should be a walk in the park for you. So go to frame 10. In
the code layer, enter this:
There. That's it for the first part of this tutorial. There
will be more soon, don't worry. If you want more information, you can look
at Macromedia's Tech notes:
I hope the information
helped. If you have any questions or comments, please don't
hesitate to post them on the Message Board. I should be
there, along with others flashers to help you.
![0]](http://www.ezboard.com/intl/aenglish/images/emoticons/alien.gif)


