Do you remember what kept you standing in
front of an arcade machine every day after school during the
days of frogger, pong, and galaxian? Unless you are a geek
who likes the warmth of radiation emanating from the 4-color
arcade screens, you were probably interested in beating the
high score set by khhga.
While this tutorial will not cover how to
create a killer game like galaxian, tetris, or pacman, this
tutorial will introduce you to the world of scoring in
Flash. Click on the green and red circles in the following
animation for an example of what you will create in this
tutorial:
[ click the green and red circles to
increase/decrease the total score ]
Adding/Decreasing Score: The following steps will guide you in
creating something very similar to the above animation:
For this tutorial, you will edit a movie
that I already created. The partial source file will
contain the basic interface and nothing else. You will add
all the good ActionScript and text fields yourself by
following the instructions below. Click here: Download Partial
Source.
Once you have downloaded and opened the partial source
file in Flash MX, let's move on, shall we? We first need a
method of displaying the score; that's where a text field
will comes in.
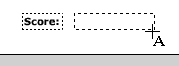
Click the Text Tool icon and draw a text box to the right
of the Score caption in the drawing area:
[ draw a text field to
the right of the score caption ]
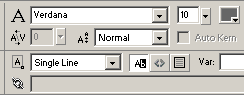
Once the text field is drawn, look at the Properties panel.
Make sure the text field you just drew is selected, and
select the Dynamic Text selection from the drop-down menu.
From the Properties panel, again, set the font to Verdana
size 10. Select a dark-gray color from the color picker.
Your Properties panel should look like the following image:
[ draw the
text field ]
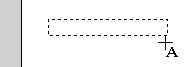
Now that you have your Input text field drawn, let's modify
it's properties. Select the Input text field you just drew.
The Properties panel should appear with options for you to
work with. From the Properties panel, ensure that the font
is Verdana size 10.
[ the
properties panel for the dynamic text field ]
We are not quite done modifying the text properties for the
dynamic text field. From the Properties panel, locate the
Var input field. In that box, enter the word: total
[ add the value of 'total' in
the Var field ]
With the text field done, it is time to add the actions.
Right click on the green button and select Actions. The
Actions-Button dialog box will appear. Copy and paste the
following code into the right panel:
Now, right click on the red button and select Actions. The
Actions-Button dialog box will appear again. Copy and
paste the following code into the right side of the
Actions-Button dialog box:
You have just added to sections of code for both of the
buttons. Test your movie out and see how it works.
Pressing the green button causes the total score to
increase by 100 while pressing the red button causes the
score to decrease by 75.
Why the Animation Worked the Way it
Worked
Even though the code and animation are quite
self-explanatory in their use in the grand scheme of this
tutorial, I will furnish you with a brief run-down of what
occurs in the animation.
When the
animation loads, the user sees the two buttons and clicks on
the red button. When the red button is pressed, the
on (release) handler of the
button becomes activated. The code it contains also becomes
activated. The line _root.total....
subtracts 75 from the value for _root.total
which is, by default, zero.
The value of
_root.total becomes
displayed in the text field with the var name of total. So
where the _root part come
from? _root basically points
to the location in the animation that the variable
total is stored.
_root is the very lowest
level of hierarchy in the animation. All animations start
from _root and move onto the various movie clip levels such
as _root.movie.animation.
The code in the
red button is called a "decrementer" because the initial
value decreases by a certain amount (in this case 75). The
code in the green button is called an "incrementer" because
the value of the variable total
increases (in this case by 100).
If you were stuck during any
portion of this tutorial, I have provided a partial source
file for you to compare my version of the animation to that
of yours:
Just a final word before we wrap up. What you've seen here is freshly baked content without added preservatives, artificial intelligence, ads, and algorithm-driven doodads. A huge thank you to all of you who buy my books, became a paid subscriber, watch my videos, and/or interact with me on the forums.