Creating some code for a
forum member, I came up with this idea. It uses the
Grid tutorial
by Ilyas Usal. It can be used as effect on images, it can fade from left to
right and from bottom to top, and it can even be used for preloaders. But how do
you create it ? You're about to find out.
[ click the start button to see
the effect ]
Steps to Create Animation
The following steps will help you to create the animation you see above:
Create a new Flash
document. Choose File | Import, and select the image you want to use. It will
now appear on the stage.
Resize the movieclip
to your needs using the Info Panel (Window | Info) or the Transform Panel
(Window | Transform).
Important
Make sure both height and
width can be divided by the same number. This number will be the width and the
height of the box later, so if the width of the image can't be divided by the
width of the box, the grid will be larger or smaller than the image. The
sample swf above uses 304.7 x 221.6, which can both be divided by 27.7.
Select the image, and
choose Insert | Convert to Symbol or hit F8
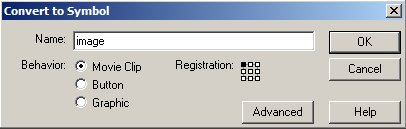
In the window that
pops up, click the option Movie Clip, give it the name image and click the top
left box from the square of boxes.
[ set the movieclips
registration poin to the top-left ]
Click OK.
Now, the image is a movieclip. Select the movieclip, and give it the instance
name image (in the Properties Panel, on the left right under the dropdown
box).
The image is now
ready.
On to the next part: creating the box. Create a new layer and
give it any name. Now, select the Rectangle Tool, set fill to white and lines
to none, and create a box.
[ create a white
box on a new layer ]
Select the box (if it
is not visible on a white background, drag the selection box over the area
where it was created) and open the Info Panel (Window | Info). Remember that
number from the important notice in the beginning ? Here is where we use it.
In the Info Panel, change the width and the height of the box to that number.
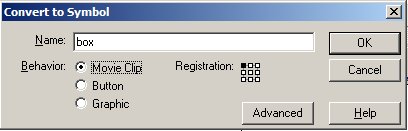
Choose Insert |
Convert to Symbol or hit F8 to convert the box to a movieclip. Click the
option button, give it the name box and set the registration point to the
top-left.
Now give the brand
new movieclip the instance name box, and we're finished with the box. On the
next page, we set up the border and the ActionScript.
This tutorial continues on the next page with more instructions and
information on creating the fading grid effect.