 Date
Countdown Timer
Date
Countdown Timer
by senocular
Here you will learn to create a countdown
timer which counts down from the current date and time to a
specific date and time in the future. This example will use
days, hours, minutes, seconds and even milliseconds
retrieved from Flash's Date object to calculate that
countdown. But, not only will you learn what is needed to
calculate that countdown; you will also learn how to
incorporate custom images to represent your numbers in that
countdown.
Here is an example of what I am referring
to:
[ counting down till
Christmas! ]
There are two parts to this tutorial:
- First there's making the graphics, which doesn't
seem that difficult (though there's some tricks
in helping with that.)
- Then there's the coding to make it all
work, which actually has some tricks of its own as well.
I'll explain the creation
of the graphics as they were made in Photoshop
and Image Ready before imported in Flash. In Flash
is where the Actionscript is added to make the
timer to use those graphics in displaying the
countdown for your date.
Creating and Importing the Graphics:
The actual making of
the graphics is nothing special. All you really need is 10
numbers of 0 through 9 and any kind of character you want to
use to separate them in the final countdown (if any). This
example uses a period for separation though a colon (:) is
quite common. Other desired graphics you would also want to
include.
-
Open up Photoshop (or your image editing program of
choice) and make your images. Here you can see the
elements I've created in Photoshop for this example:
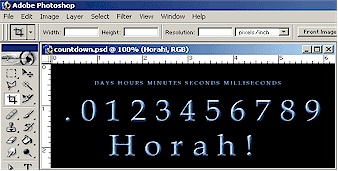
[ the
elements in Photoshop ]
- Next,
switch over to Imageready and slice up your
image into individual elements. You will want
to do this division here and not in Flash as
it will save you a lot in file size in the long
run. Each digit will need to be its own slice
and, to make it easier on yourself later, preferably
all the same size.
The DAYS,
HOURS, MINUTES,
SECONDS and MILLISECONDS
text will also be divided since their positioning
will be decided within Flash. The "Horah!"
text can be its own single slice since it will be alone in
the frame for when the date has been reached:
[ slices in
Imageready ]
Before you start exporting from here,
however, you should consider naming your slices. This will
no only make it easier to determine what is what when
dealing with your images, but you can also make importing
a little easier on yourself.
Each of the numbers for this countdown
will exist in a single movieclip, each in their own frame.
That way, to show a number, we just tell a number
movieclip to go to and stop at the frame corresponding to
that number. Flash, being the crafty program it is, can
recognize image file sequences with similar names and
import them individually frame by frame as if to create a
frame by frame animation of those images directly within
the movieclip they were imported to. That's pretty much
what we'd be after with the number sequence. So, with that
in mind, you will want to give your number slices names
that will create image files something along the lines of:
image_0.gif
image_1.gif
image_2.gif
image_3.gif
etc...
 |
Clarification |
|
The above naming is used so
that Flash will see those images as a sequence
and import them frame by frame into the
movieclip in which they will be imported. The
easiest way to accomplish this in ImageReady
is to just give the slices of your numbers
names which are the number itself. |
|
|
-
Open the Rollovers panel showing all your slices and give
each number the proper name which is simply their number:
[ naming
slices in Rollovers panel ]
-
Now you can exporting those images. Be sure to set up a
custom export settings (Other...) which will let you
specify an export name of some prefix + sliceName + .ext
so the number slices will get proper names relating to
their sequence. If you want, you can select only the
slices you've created and only export selected; otherwise
other non-essential slices will be exported with
everything else. However, since those slices weren't
named, they will be easy to weed out when importing the
wanted slices into Flash.
-
With the imagery finished, you can begin importing them
into Flash. So fire up Flash and begin importing. All
images aside from the numbers 0 - 9 can be imported
directly into the library. Those numbers, however, are
going to be imported as a sequence in their own movieclip.
So make a new movieclip calling it "numbers" and import
your 0 image.
If all goes well and your images are properly named, you
should receive a dialog box stating that this image
appears to be "part of a sequence of images." Select "Yes"
and all of your images of 0 - 9 should be imported frame
by frame into that movieclip as a sequence. Then you
should have 10 frames with frame one with 0 image, frame
two with 1 image etc., up until frame ten where the image
for 9 is:
[ ten frames
of numbered images ]
For the most part, all that really remains graphically is
setting up the countdown clip itself. This clip will consist
of one of these numbers movieclips for each digit it needs
to display in the countdown. Then, as Flash calculates the
countdown, it will tell each of these numbers movieclips to
go to the correct frame representing the number they need to
display. To display 0, for example, a numbers movieclip
would need to go to and stop at frame one, etc.
Now back to Flash...
-
Make a new movieclip and call it something like "counter."
This movieclip will contain those numbers movieclips for
each number in the counter. This example uses 3 digits for
days, 2 for each hours, minutes and seconds and another 3
for milliseconds. Add in the numbers movieclips and any
other graphics symbols you may need such as the
periods separating the numbers.
In importing the numbers we used a trick to
make it easier for those numbers to be automatically
imported frame by frame in Flash making it easier on
importing process. This tutorial will continue to use such
tricks as making life easier is always, I think, a good
thing. That leads us to the big trick of this example
which is the process used in identifying each digit in the
countdown. What this relies on is the names of each of the
numbers movieclips in the counter clip.
-
In naming the numbers movieclip, you'll need to follow the
following format:
(time unit
variable) + underscore + (character number)
For example. The variable which is going to be used
to count the days will be called days. For the first
numbers movieclip making up days in the countdown, it
represents the first character in the days total 3 digits
or, in Flash, 0 - relating to charAt(0). So, the name for
that movieclip will be days + underscore + 0 or days_0.
This trick allows coding to be much easier. You'll see
that later on. Here are all the names of the numbers clips
in this example:
[ naming for
the numbers movieclips ]
-
Now just throw this counter movieclip in frame 1, add the
DAYS, HOURS,
MINUTES, SECONDS
and MILLISECONDS images to label
each part, throw the Hoorah! in frame 2, set your play
head back to frame 1 and begin coding!
You have just finished the graphical
portion of this tutorial. Before you start rejoicing, we
haven't touched the coding aspect of the animation yet. The
coding for your countdown timer will begin on the
next page.
|


