by kirupa | 7 October
2005
Animation in Flash revolves around the timeline. In your
timeline, you can specify a starting point and an ending
point for a particular event. I use the word point as
opposed to time, for the concept of time in Flash is
different than in the real world. In the real world, you
measure the time it takes to do something in seconds or
minutes or hours. In Flash, the primary measure of time
revolves around frames, and the seconds/minutes of an
animation are dependent on your frame rate.
So, where does motion tweening fit into all this? When
you create a simple animation in Flash, you always specify a
starting frame and an ending frame. For example, you could
specify a ball to be at the left end of your stage at Frame
1:

[ your ball on the
left side of the stage ]
You then create a keyframe, for example, on Frame 20 and
move the same ball to the right end of your stage:

[ your ball on the
right side of the stage ]
If you preview your animation, you will see your ball
start at the left end of your stage and suddenly, when you
reach Frame 20, appear at the right. There is no smooth
transition between the beginning and starting positions of
the ball. Here is where motion tweening comes in.
Motion tweening creates a transition between your ball at
Frame 1 and Frame 20. Flash automatically calculates where
your ball's position would be between Frames 2 and 19, so
that when you preview your animation, your ball gradually
moves from its initial left position to its right position.
All you do is specify the beginning and end frames. Flash
takes care of the rest!
In this tutorial, I will try to explain tweening by
helping you create a simple tween with a few twists. The
following animation is an example of what one of your
animations could look like from following this tutorial:
[ a quick motion tween
animation ]
Let's get started:
- First, download and open the FLA I have created.
Don't worry, it only contains the bare minimum of items
so that you don't have to spend time focusing on
nonessential things:
 Download Partial
Source
Download Partial
Source
- After you have opened the FLA, you should see a blue
circle in the middle of your screen...and nothing else.
Right click on Frame 25 in your timeline and select
Insert Keyframe:
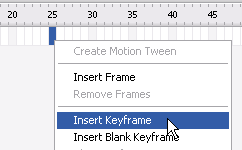
[ insert keyframe
on Frame 25]
- You should see a keyframe on Frame 25. Now, insert a
keyframe on Frame 50 also. Your timeline should have a
keyframe on Frame 1, Frame 25, and Frame 50.
- Let's modify our circle's size. Go back to Frame 25
on your timeline, right click on your circle, and select
Free Transform. The scale and skew boxes should appear
around your circle. Click on any of the boxes on the
corners and drag outward:
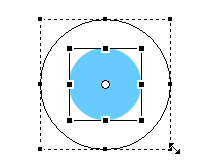
[ scale your circle
larger ]
- If you were to preview your animation by
pressing Ctrl + Enter, you will see that your circle
starts off small, suddenly becomes bigger, and then
returns to its small size again. Let's make this better.
- Select all of the frames in your timeline from Frame
1 to Frame 50. Right click on any of the selected
frame(s) and select the option for Create Motion
Tween.
- Notice that when you preview your animation, the
circle smoothly animates from being small to large and
back again.
Hopefully the above example helps you to visualize what I
was explaining in the first part of this tutorial. It simply
creates a fluid transition between different states of the
object that your trying to animate.
In the next page, I will show you how to improve your
tween by adding some tweening effects, explain some cases
where tweening will not work as expected, and more!
Onwards to the next page!
|


