Hey there! In this tutorial we'll learn how
to achieve this nice looking, yet very simple effect:
Elements
Mask
Tweening
Linear gradients
Mixer alpha
This effect can be applied basically on
anything, from simple pics to gradient text and complex
vector shapes. The one you see above is applied on a
gradient text that was modified a little bit to make that
special looking line... You can decide yourself on what you
apply it on, but in this tutorial we'll cover mainly the
gradient text. You'll might find some similarities from this
tutorial to the "Ray of Light" tutorial by Pom, that's
because both of these tutorial start very similar.
Building the stage
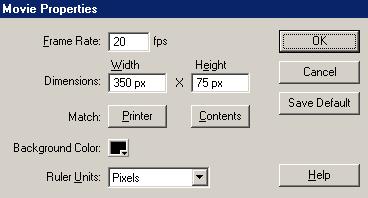
Start out with a blank stage. Choose menu
option Modify | Movie... to bring up the property
sheet for the movie. Set it to 350 by 75, and give it a
black background. A frame rate of 20 fps is fine.
The Movie Properties window with the new changes...
Making the text
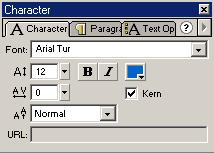
Using the Text Tool start a line of text on
the stage. Type your desired text and adjust it to your
liking using the "Character" panel (Window | Panels |
Character). Choose a font you like but pay attention,
something with a lot of flanges is not going to look as
good as a sharp Arial. The color doesn't matter right now
since we'll be modifying that anyway...
[ The character panel
with a simple Arial font. ]
Now comes the tricky part: Select the text
box you've just created (click on it) and use the keys
Ctrl+B or menu option Modify | Break apart to
break apart the text. Each letter has now become a section
of fill. You cannot edit the text after this point in
time. Select all of the fills by choosing menu option
Edit | Select All (assuming we don't have anything
else on the stage). Or just select them using any other
method you like...
Now we will apply the cool gradient, which
without it the whole effect would look awfully boring!
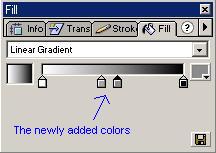
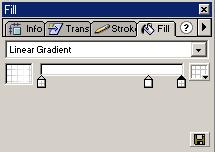
Select your paint bucket tool. Open your Mixer panel, and
your Fill panel. In the Fill panel, choose linear
gradient. A line of color, from black to white appears
below with two tabs. You can also add more color tabs by
clicking just below the gradient line. Add now two more
colors somewhere in the middle.
[ The fill
panel with several gradient colors ]
Click on the black tab. You'll see the
swatch to the right turn to black. Click on that swatch
and choose any color you want.
In the Mixer panel, the swatch has changed from black to
the color you selected. In the "Alpha" field to the right
of the Mixer panel, type in 0% and hit enter. Repeat the
same process with the white tab and change it to the same
color you used on the black one. Change the two other tabs
color to the same color you used with the first two tabs,
but change their Alpha to 80%.
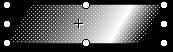
Your text should now have a fill of a
vertical gradient. The problem is that we don't want a
vertical gradient, but a horizontal. Enable "Snap to
Objects" by selecting the menu option View | Snap to
Objects. Make sure all the text is selected and click
on the Paint Bucket Tool. Now click and hold anywhere on
the selected text and drag your mouse horizontally. You
just applied the same gradient to the text, but this time
it's horizontal.
This finishes our text part, select all
the text and click F8 or use the menu option
Insert | Convert to Symbol... . Type a name for your
text and choose behavior Graphic. Click OK.
The Mask
After you converted your text to a symbol,
click on it and convert it to symbol again! This time
choose the behavior Movie Clip and give it a
different name. This symbol will contain all our
animation. Double click on the new symbol to Edit it In
Place.
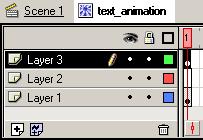
On the timeline, create two more layers by
clicking twice on the white sheet with the plus on it.
Select the text symbol and hit Ctrl+C or use the
menu option Edit | Copy. Click on the first frame
of the top layer and select the menu option Edit |
Paste in Place. We now duplicated the text symbol so
one of them will be the mask and the other will have the
lighting effect on. Both of them must be identical and in
the same place. So it's convenient that we made one symbol
that can be changed at any time.
Now we need to create the lighting itself.
Click on the first frame of the middle layer. On the Fills
panel, choose Linear Gradient. If you still see
four color tabs, delete one of the middle tabs by clicking
on it and dragging it towards the bottom of the panel.
Change the three remaining tabs to a color white. Select
the edge tabs and set their Alpha to 0% like you did
earlier. Move the tabs to a position so you'll get
something like this:
[ The two tabs on the
edges have an Alpha of 0%. ]
Now draw a rectangle using the Rectangle
Tool that will be about half in width size of your text
symbol, and make sure it's not smaller in height
than the text. Delete all of the outlines of the new
rectangle by clicking on each line and hitting Delete.
Select the remaining fill and click on the Rotate
button. Eight white circles will appear around the
rectangle. Click on the top middle circle and drag a
little bit right. We now got this shape:
Select it and convert it to symbol by
hitting F8 or using the menu option Insert |
Convert to Symbol. Choose a behavior of Graphic
and name it to something like "lighting".
Inside the movie clip where we have the
three layers, make sure the lighting is in the middle
layer. Position it to the left of the text symbol (you can
lock the other layers to make it easier. Lock a layer by
clicking on the dot under the lock symbol). Make sure it
doesn't overlap with the text. Also make sure it's on the
same Y level (vertical position). Deselect everything by
clicking on an empty space in the stage and hit F5
or use the menu option Insert | Frame until the
frames reach 40 on the timeline.
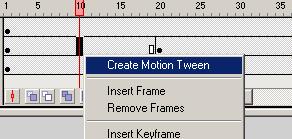
In the lighting layer on the timeline,
click on frame 20 and hit F6 or use menu option
Insert | Keyframe. Move the lighting to the right side
of the text, again make sure it's not overlapping and that
it's on the same vertical position.
Now right-click anywhere on the middle
layer between the first and the middle keyframe and select
Create Motion Tween.
Right click on the top layer's name and
select Mask. The top layer now masks the middle
one.
That's it, you're done! The lighting moves
for a 20 frame duration and then loops after another 20
frames. Of course you can change that by adding or removing
frames. Now that you learned the basics, you can also change
all the gradients to your liking. Have fun!