Flash allows for various
instances (movie clips) to be dragged or made to follow the
mouse. Unlike Flash 4, Flash 5 also allows the entire mouse
pointer to be hidden from the animation itself. That allows
for "custom" mouse pointers in the animation that the effect
is used in. See example below:
Now, to create the previous
animation in Flash 5, first, download the partial source
code that includes the main movie clips all drawn out.
Click Here to download.
Don't worry, the downloaded source code doesn't include all
the best parts of the animation like the coding, etc. You'll
do that on your own by following the instructions listed
below.
Here's
How:
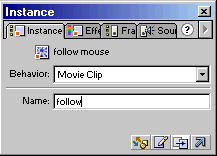
Once you have
opened the source code in Flash, you should see two layers
and the circular movie that you would like to follow in
the drawing area. The first step is to name the circular
movie. Click on the movie clip and go to the Instance
Panel. Under name, type in the word "follow". See image
the image below for more information. If you have
forgotten or would like to know more about "Naming Movie
Instances", please click here.
Ok, now
that the movie clip has been named, it's time to add the
ActionScript code that will make it work. Right click on
the blank keyframe on the Layer marked "Actions". That
should be in your timeline window. You should see a window
that pops up with the title "Frame Actions". For the
coding, you may choose to use the left pane to specify
commands or the Flash 4 style "+" symbol to the top right.
Due to the physical space constraints that including all
that information would do on a HTML page (this one), you
will only see me use the "+" actions. You may choose
either one.
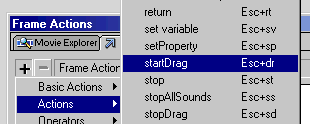
Now that you are on the
Frame Actions page affiliated to the first blank keyframe
on the Layer marked "Actions" (Whew!) we can proceed.
Click on "Actions" and choose the command "Start Drag".
See image below:
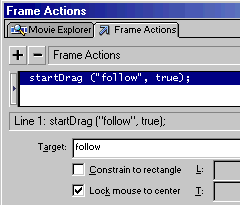
Once
you have done that, you should see the text: startDrag
(""); On that same window, click on the input field
marked "Target:". In that field, type in the word
"follow". That is the name of the movie that was given at
the beginning of the lesson. Then, to complete this
portion of the example, click on "Lock mouse to
center". After you have done all that, the code in your
code window should be as follows: startDrag ("follow",
true); Also, it should look like the image below:
The
final step is to hide the mouse pointer. If you preview
it, the animation should look similar to that of the final
movie with the exception of the mouse pointer being
visible. Let's fix that. Click on the "+" symbol or the
left pane's corresponding unit and follow this path: > Objects > Mouse > Hide.
That should do that trick. See image below:
Now,
the final code inside your ActionScript Editor window
should look as follows:
startDrag ("follow", true);
Mouse.hide();
That completes this tutorial
on making objects follow your mouse on the animation. You
can customize the movie clip that is made to follow into
anything you may wish. If this sounds eerily familiar to
some you more advanced "flashers", that is because with the
OnMouseEvent procedures you can create your own draggable
movie clip. That will be covered in the near future. Before
I forget, here's the final
source code so you can double check to make sure your
animation looks just like the one I created!
Just a final word before we wrap up. What you've seen here is freshly baked content without added preservatives, artificial intelligence, ads, and algorithm-driven doodads. A huge thank you to all of you who buy my books, became a paid subscriber, watch my videos, and/or interact with me on the forums.