 Real
Fake Drag Mask
1.0
Real
Fake Drag Mask
1.0
written by ilyas usal aka pomThere’s one thing I always
wanted to do : drag a mask. Actually, that’s how I got on
kirupa.com first. I found that dragging mask tutorial, that
surely you all completed since it’s very easy and looks
fantastic. But one day, it just hit me in the eye : in that
movie, we’re not dragging the mask ! We’re dragging what is
masked by the letters ! We see the spot through the letters,
but never does the mask move. Suprabeener the Great told me
after that that you CANNOT drag a mask, nor get its
position, scale, or anything else.
So why did you name your tutorial drag mask tutorial, then
?, will you ask me. Good question. That’s because I added
FAKE in front of it. We are going to simulate the drag.
General Idea
So, hum, how could we do that ? If we can’t move the mask,
we’re going to have to move the background. Hold it ! you
say. That’s just what Kirupa did ! Yes, but we are going to
do that a little bit differently. So stop interrupting me
all the time.
So we are going to drag the background. But not only do we
have to drag the background, we are going to have to
simulate the drag of the mask : we are going to put
everything inside a draggable movie clip!!
Here is the effect:
To make this animation easier on you, I have
provided a partial source file that you should use to follow
along. Click the following link to download the source file.
Let's roll now:
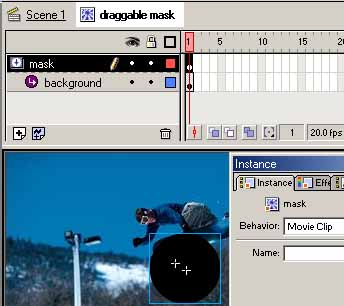
- If you open the source file, you’ll see me, during my
last holyday, warming up in the morning, with a black spot
next to me. If you double click that image, you’ll find
that it is called “draggable mask” (it appears next to
“Scene 1” on the top left of your screen and it means that
you are editing the object called “draggable mask”). There
are 2 layers there : “mask” and “background”. “mask” is
the black spot movie clip (called “mask”), “background” is
the surfer movie clip (called “background foto"). You can
notice that “mask” is centered (see the tutorial “Pool of
square” to see how to use the align tool). We have one
movie clip containing two movie clips.
|
NOTE |
| If
you’ve understood really well the idea behind all this,
you’ll see that we are going to drag the movie clip
“draggable mask”, that “mask” is going to be our mask,
and that it won’t move, and that “background” is going
to have to move somehow. |
- We’re going to do something to show you how
it’s going to happen. If that’s not done, edit the movie
clip “draggable mask”. You should see at the top of your
screen the vignette “Scene 1” and “draggable mask”. Select
the “mask” layer, and set it as a mask (right click >
mask). Click on the vignette “Scene 1”, right click the
movie clip there and open the Actions panel. Write the
code :
- Test your movie. What do you see ? A circle
showing one bit of your picture, and following the mouse.
The code tells Flash that when the clip is loaded, he can
be dragged (this refers to the current object, and true
refers to the fact that it must lock mouse to centre).
- What do we want ? We want to see, for
instance when we go down, to bottom of the background. All
we have to do then is to make the background go up by the
exact same amount !!! We are going to use action script to
do that. Edit the “draggable mask” movie clip. Unlock the
background layer. We need to give the background an
instance name (it has to be a movie clip to do that). Open
the instance panel and name it “back”. Lock the layer
again. Go back to the scene 1.
- The code that you added before needs to be modified:
- So what’s the difference ? When the clip
loads, we initialize 2 variables
posx and posy as
the current position of the movie clip “draggable mask”.
On every new frame, we set the x and y position of the
background to the opposite of what we have moved. If we go
up by 5, we want the background to go down by 5 to
simulate the dragging. Save your work.
| NOTE |
That
last bit of code might look strange to most of you. That
is
much more convenient than the tellTarget() syntax that
we could have used in this situation instead.
Let’s explain a little bit :
The movie clip “back” is located inside the movie clip
where we have put the code, so we access its properties
directly (I mean by that that we don’t have to use any
of the _parent. or _root. things).
Back._x = something ; is equivalent to tellTarget
(“back”) {_x = something ;}
Posx - _x : _x now refers to the location of the current
object, that is to say the “draggable mask” movie clip.
_x is equivalent to this._x here.
|
- Test the fla. Everything should you be working.
There’s something I haven’t been able to figure out though
: if you centre the background and the mask, the masking
isn’t perfect, but when you put the mask somewhere else
that right in the centre, it works nice and smooth.
[ notice the
location of the mask in relation to the center ]
Anyway, that’s it for that very nice effect! To see the
final source code for this animation, click the following
link:
This tutorial is written by Ilyas Usal. Ilyas is also known
as
ilyaslamasse
on the
kirupa.com forums!
I hope the information helped.
If you have any questions or comments, please don't hesitate to post them on the
kirupa.com Forums. Just post your question and I, or our friendly
forum helpers, will help answer it.
The following is a list of related tutorial and help resources that you may find
useful:
|


