For most Web development
applications, with the exception of WYSIWYG editors,
learning how to program code becomes a major part of the
learning curve. Flash, on the other hand, requires no
knowledge of programming beyond a few simple commands to
create great animations. Yet, there are always those
techniques that simply cannot be done without using
programming. The following example uses variables and very
little programming:
[ enter your name and press the green arrow ]
You are going to
learn how to create an animation similar to the example
above in Flash. If you know a programming language such as
C++ or Visual Basic, programming in Flash is extremely
simple. Get ready, you are going to learn about variables,
concatenation, and various text fields!
Creating the Interface A great animation starts with a great
interface! Let's create the interface that will contain the
buttons, labels, etc. The following instructions will help
you to create the interface:
Create a new document
in Flash. Set the movie width to 290 and the movie height
to 125.
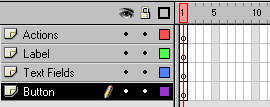
Add a layer in your
timeline and label it Actions.
Add a layer below the
Actions layer and call it Label. Add another layer
below the Actions layer and call it Text Fields.
Now, it is time for the
final layer. Add another layer called Button.
You may optionally
choose to add a background color, but it is not important.
You can if you want your animation to look pretty :-) Your
timeline will look like the following image:
We will now
create the actual button and label. The button will be the
green arrow in the example, and the label will be the text.
Select the first
keyframe in your Button layer. Now, create your button. It
doesn't have to be the arrow that I have in my example.
The button can be as simple as a square.
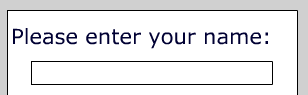
Now, let's add the text
label. Select the keyframe in the Label layer. Click the
Text tool and enter the following text: Please Enter
Your Name. Make the font size a little larger so your
visitors will notice it first.
After entering the
text, drag the text to the upper part of the work area. We
will need some room in the middle to add the text field.
Make sure the button you created is at the bottom right of
the work area. Your work area should look like the
following image:
Text Fields Now that the interface is complete, let's
shift focus to the input box. The Input box is the box in
which the name will be entered into. The following
instructions will explain how to create a input box:
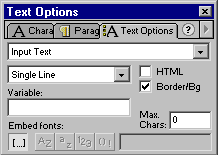
Display the Text Option
window by clicking the Text Option tab. From the Text
Option tab, click the drop-down menu and select the
selection for Input Text. Also from the Text Options tab,
check the Border/Bg checkbox. If you want to make the text
that is entered look smooth at the sacrifice of file size,
click the first icon under Embed fonts:
While Input Text is
selected in the Text Options tab, select the first frame
of the Text Fields layer. Click the Text Tool icon from
the Tools area and draw a small text box below 'Please
enter your name':
[pages/op.htm]
You have just created the
Input Text box. The Input Text box enables your visitors to
enter information. We have not yet set up the mechanism for
which Flash will interpret the data entered and display back
on the screen.
Input boxes are
designed to receive input from the visitor. While Input
boxes can also display data, the data can be modified by the
user. The best method of displaying data that cannot be
modified is by using the Dynamic Text selection. The
following instructions will tell you how to create a Dynamic
Text box.
We need to add about 10
frames to each layer. Place your mouse pointer on Frame 10
of the Actions layer. While Frame 10 of the Actions layer
is selected, drag your mouse pointer straight down until
you reach Frame 10 of the Button layer. While the frames
are highlighted, right click on a highlighted frame and
select Insert Frame.
Insert a blank keyframe
on Frame 10 of the Text Fields layer. Once the blank
keyframe has been inserted, make sure the Text Options tab
is displayed. Click the drop-down menu in the Text Options
tab and select Dynamic Text.
Once Dynamic Text has
been selected, select Frame 10 of the Text Fields layer
and click the Text tool and draw a text box in the middle
of your animation work area.
You have just
finished adding your Dynamic Text box. Now, you will have to
make some minor adjustments. Insert a blank keyframe in
Frame 10 of the the Label layer. Also, insert a Keyframe
(not a blank keyframe) in Frame 10 of the Button layer. Now,
all that is left is for us is to add some ActionScript code.
To make sure
your animation is accurate up to this point, download and
open the partial source code by clicking here.You
will be using this source code for the rest of the tutorial.
Don't worry, the FLA you just downloaded is the exact
replica of the file you should have been creating anyways!
Once the FLA you
just downloaded is open and displayed in Flash, we can
proceed with the coding.
Let's Talk about Code Unlike other tutorials, I won't be
displaying the code for you to simply copy. This lesson will
teach you some important programming concepts that you
should learn. Because data, which will be our name, is being
exchanged, the data needs to be stored somewhere.
That somewhere
is a variable. Simply put, Variables store data. Not only do
the variables store data, variables can also output the data
when asked for (nicely of course). Before variables can be
used in a code, the need to be declared. Unlike in Visual
Basic or other programming languages, variables don't have
to be declared with integer, string, constant, long, etc.
Flash doesn't really care!
You will now
assign variables to the animation we created:
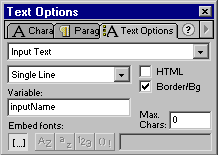
Select the input text
box on Frame 1 of the Text Field layer. From the Text
Options tab, you will see something a default variable
name displayed in the variable field. Delete that variable
name and type in the word: inputName
Select the dynamic text
box on Frame 10 of the Text Field layer to give it a more
appropriate variable name as well. Once the dynamic text
box has been selected, enter the following word into the
variable field: finalName. From the Text Options
box, uncheck the Border/Bg check box. We don't want to see
the border when the dynamic text is displayed.
Adding the Code Now that you have the two text fields
named, we can proceed toward adding the code. Insert a blank
keyframe on Frame 10 of the Actions layer. Once the blank
keyframe has been added, right click on it and select
Actions. The Action window will appear. From the Action
window, press Ctrl + E. This is the Expert mode of the
coding window (as if Normal mode wasn't hard enough!)
The Expert mode
allows you to type in the code more easily and quickly than
in the Normal mode's clunky point and click method. Because
we want take what the user inputted into the input box
(known as inputName) and display it in our dynamic text
field (known as finalName), we need to make them equal each
other.
In the Actions
window, type the following line of code in:
finalName
= inputName
What do you
think will display when you preview the animation? What was
input into the input box. But, we want the word 'Hello' to
precede our name. To fix that, you will be combining pieces
of text and make it equal one big piece of text. This
process of combining text is known as concatenation.
For the Action
you just added, revise it to say the following:
finalName
= "Hello " + inputName
Note: Make sure you add
the space after hello and the quotation mark.
Before you
preview the animation, we have not yet set the button. Add a
Go To and Stop statement for the Button on Frame 1. The
button on Frame 1 on layer Button should have the following
action:
on (release) {
gotoAndStop (10);
}
For the button
on Frame 10, add the following action:
on (release) {
gotoAndStop (1);
}
The actions for
the button you just entered are to make sure that your
visitors can get from Frame 1 to Frame 10 and vice versa. We
don't want the visitor to see Frame 10 without having
actually entered some words into the input box. Speaking of
which, we need to add a Stop action to the first frame.
Right click the
first frame of the Actions layer and select Action. Add a
Stop action by going to Basic Actions | Stop.
Save the
animation and preview it by pressing Ctrl + Enter. Fill out
your name and click the button. You will see your name and
the word 'Hello' before it. To download my final source file
for this tutorial with all the bells and whistles,
click here.
Just a final word before we wrap up. If you have a question and/or want to be part of a friendly, collaborative community of over 220k other developers like yourself, post on the forums for a quick response!