This tutorial is actually two minor
tutorials wrapped into one. This tells you how to display
the time digitally in Flash, and also display the full date.
In order to gain an understanding of arrays, I suggest you
look through the posts in the
Best of
Kirupa.com Forum; there are numerous threads there
that explain the basics of arrays. As usual, I will explain
all of the code at the end of the tutorial. Click here to
download the partial source. To download the partial source, click here.
You will create an animation similar to
the following animation:
[ the
digital clock ]
Here's how:
If you downloaded the partial source then
you are a step ahead, so skip right to step 2. If you did
not download the partial source, then open Flash 5 and
select the text tool. Create a 3 dynamic text boxes by
clicking on the Text Options tab in the Text Tool Box. Name
them “nTime”, “displayDate”, and “displayDay”. They really
could be called anything you like, but for the sake of
organization with the code I have provided I recommend
naming them these names, and adjusting the code for your
personal use later.
Once you make the text boxes, select the box named “nTime”
and press F8 to convert this to a movie clip and name it
whatever you like.. With this done select the other two text
boxes and press F8 to convert them both into 1 movie clip
(just to clear up: you should have 1 movie clip with two
text boxes in it). Again, name these whatever you want to
name them.
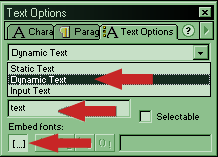
[ the
dynamic text option ]
Select the movie clip that contains the
“nTime” text box and insert the following code. Just copy
the code below and paste it into the Actions Panel of the
movie clip.
Now select the movie clip that contains the
other two text boxes and insert the following code. As with
before just copy and paste into the Actions Panel.
That’s it. There is nothing more to this
effect. Using the Text Tool Box you can change the color,
size, or even the font of the time and date. Below I will
explain the code so you will be able to duplicate this
effect on your own.
Explanation
Time to split the code apart
Time Code:
onClipEvent (enterFrame) {
This part of the code loops
the actions contained within it every time the movie is
accessed.
myTime =
new Date();
This creates the Date Object
that will be used to retrieve the information from your
system.
This if statement allows for the switch of am for pm when
the hour is greater than or equal to 12.
if (hours>=13) {
nHours = nHours-12;
}
Because Flash displays time
in the 24 hour system instead of the 12 hour system, this if
statement is used to subtract 12 from the hour if the hour
is greater than or equal to 13 ( 13 – 12 = 1).
if
(length(nMinutes) == 1) {
nHinutes = "0"+nMinutes;
}
if
(length(nSeconds) == 1) {
nSeconds = "0"+nSeconds;
}
Both of these if statements
are here to add a “0” in front of the seconds and minutes if
their length is equal to one, meaning that the variable is
less than 10.
These are the arrays that are used for the rest of the code.
Arrays are zero-based, so when the following code outputs a
0, January will display, 1 = February, etc… You can edit
these as necessary.
now = new Date()
}
Again, this creates the Date Object that will be used to
retrieve the time information.
onClipEvent (enterFrame){
Again, this loops the animation and performs the actions
every time the movie is accessed.
The last bit of code is used to display the information
within the dynamic text fields that were created earlier.
Again, there are many ways to use this effect, and many ways
to modify the code. This is just the way that I feel most
comfortable with, and the way that I feel is easiest.
That’s pretty much all there is to this effect. There are a
lot of different ways to modify this, and the limit is
basically your imagination. If you have any questions feel
free to e-mail me or post on Kirupa.com’s
Message Boards.