|
by
kirupa | 15 April 2009
For most of the
Silverlight and WPF tutorials on this site, I have
shown you how you can use Expression Blend to easily
create an application. This often involved drawing
out a control, such as a button, and adding some code
to make it do something on your design surface (also
known as the artboard):
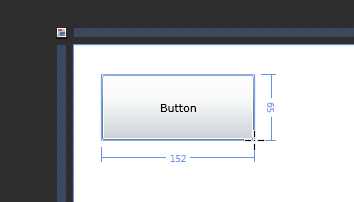
[ look, there is a button! ]
When designing UI,
this is great. You get to visually place and arrange
things that are meant to be visually noticed, and
for anything else behind the scenes, you can write
some code such as making the button do something
when Clicked.
In this article, I am
going to explain something completely different. I
am going to show you how you can use code to add and
use controls and other elements. All you will see in
Expression Blend is a blank slate!
Since I
have already spoken about the button and invited it
to this party, I figure we'll make the most of it
and use it in our examples. First, create a new
Silverlight or WPF project in Expression Blend. Once
you have created your new project, you shouldn't
really see anything on your artboard:
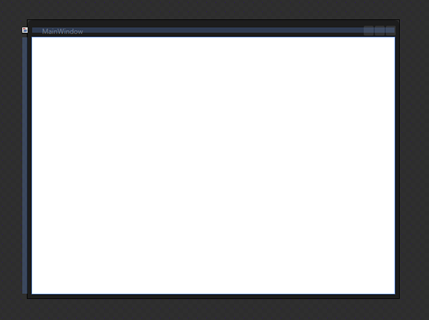
[ a new project creates an eerily empty artboard ]
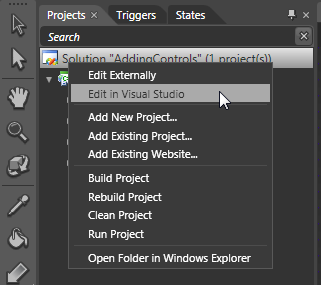
What I want you to do
is open this solution in Visual Studio. Go to your
Projects panel, right click on the Solution icon,
and select Edit in Visual Studio:
Once you have selected
Edit in Visual Studio, a few moments later, Visual
Studio will open this exact same project. From
Visual Studio's Solution Explorer panel, expand
either Window1.xaml or
MainWindow.xaml and open the
C# code file by double clicking on it:
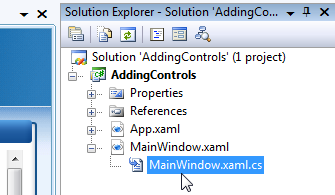
[ open the code-behind file for your XAML file ]
After double-clicking
on the code file, you will see the code that powers
your app. Much like what you saw earlier in Blend's
design surface, there really isn't much to look at
since this is a new project with nothing done to it:
- /// <summary>
- /// Interaction logic
for MainWindow.xaml
- /// </summary>
- public
partial
class
MainWindow
:
Window
- {
- public
MainWindow()
- {
- this.InitializeComponent();
-
- // Insert code
required on object creation below this
point.
- }
- }
Let's fix that by
adding some code. Add the following non-grayed out
lines below the "Insert code required..." text in
your code file:
- public
partial
class
MainWindow
:
Window
- {
- public
MainWindow()
- {
- this.InitializeComponent();
-
- // Insert code
required on object creation below this
point.
-
- Button
clickMeButton
=
new
Button();
- clickMeButton.Content
=
"Click Me";
-
- this.LayoutRoot.Children.Add(clickMeButton);
- }
- }
Don't worry about what
the code actually means. In time all will be
explained to you. Just hit F5 and run your
application. After a few anxious moments where
everything gets built, your application will appear.
Depending on whether you created a WPF or
Silverlight app, you will see one of the following:
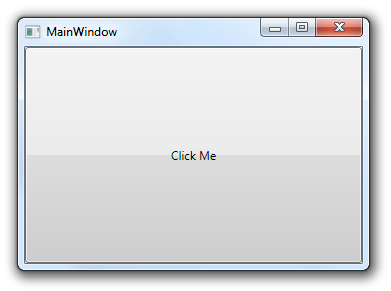
[ a giant button fills your WPF window ]
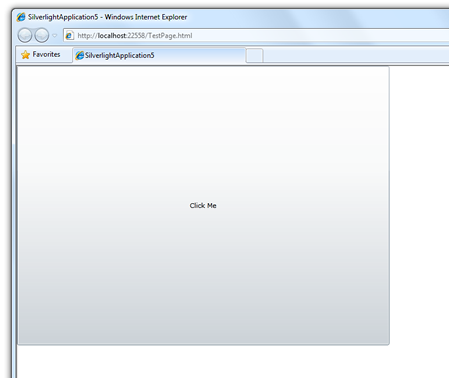
[ a
fairly large button fills up your browser in
Silverlight ]
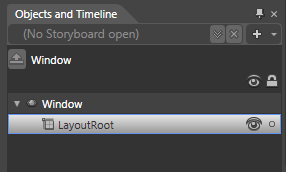
Once you have
marveled at your creation, close your application
window or browser. Jump back into Expression Blend
where the XAML file for the code-behind file you
just edited is open. Notice that you still see the
same thing...which is nothing:
[ despite what you see when previewing your app,
Blend shows nothing! ]
The reason you are not
seeing anything in Blend is because everything you
did was done programmatically via the C# code file.
Your XAML file, the file that Blend primarily edits,
has no idea about what is going on. While this
disconnect between the XAML file and the C# file may
seem odd, they are actually more related than you
may realize. In the next few sections, let's look at
various aspects of programmatically adding a control
such as sizing, positioning, adding event handlers,
and more.
Onwards to the next
page!
It may seem a bit odd at first, but a visual element
such as a Control, UIElement, etc. is
nothing more than a class with some visuals attached
to it. For the sake of simplicity, I am going to
focus primarily on controls, but everything you see
can be applied to any visual element you run into.
Anyway, the syntax you would use for declaring and
initializing a class is the same one you can use
with controls as well. For example, as you may have
seen in the button example, the code for declaring
and initializing my button is as follows:
- Button
clickMeButton
=
new
Button();
I create an object
called clickMeButton, and it its of type Button as
well. Pretty much every control you could ever
imagine using can be programmatically generated this
way such as a CheckBox,
Listbox,
RadioButton,
ScrollViewer, etc.
Simply declaring and initializing your control is
not good enough to have it appear when you run your
application. What you need to do is add it to your
application's visual tree. To explain differently
without mentioning "visual tree", internally,
all of your controls and everything you see in your
app is nested in some hierarchy. This hierarchy
determines the order in which content is drawn, what
appears above what else, and more. This hierarchy is
commonly called the visual tree.
What you need to do is
find the right location in the visual tree to add
your control to. Once you do that, your control will
be visible. This is actually pretty straightforward.
If you look in your Objects and Timeline panel in
Expression Blend, you will see a snapshot
of your visual tree for the elements that have been
defined in XAML:
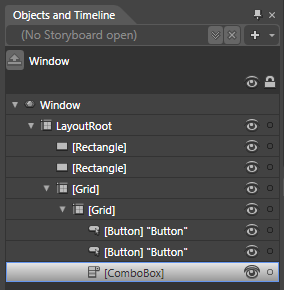
Notice the nesting
that is taking place with controls being placed
inside other controls such as Window, LayoutRoot,
and the two Grids. Those controls that can host
other controls are quite special. Your task is to find a
reference to one of those host controls and add your
control into them.
If you can't think of
any controls that would work, the controls you see
in the Layout menu such as the Grid, Canvas,
Wrap/StackPanel, etc. will work:

[ any layout panel will allow you to add children
elements ]
To get all technical
on you, any control that derives from Panel such as
the controls you see in the above menu will work.
Content controls such as Button will work as well,
but you are limited to only one child.
Anyway, all of this
banter gives you some background, but it probably
doesn't solve your problem. To have your control
appear, first pick which element it will be nested
under. For a new Silverlight or WPF application,
Blend automatically creates a Grid layout panel called
LayoutRoot
for you. You can use LayoutRoot as the parent of a
control you want to add:
[ you can always place your controls into the
LayoutRoot ]
Now that you have
found a control, the next step is to tell your newly
initialized control to add itself to it:
- Button
clickMeButton
=
new
Button();
- this.LayoutRoot.Children.Add(clickMeButton);
Notice, in the above
code, I directly get a reference to the LayoutRoot element,
access its Children collection, and use the Add
method to pass in the name of the new Button object
I created. Once you have done this, when
you run your application, your Button object will be
created, and it will be added to the visual tree
under your LayoutRoot Grid element.
The only thing to note
is that, if you were to add controls in Blend with
the goal of programmatically placing children under
them, you will need to explicitly name them. While
there are ways to access unnamed elements via code,
it is much easier to go
this.ElementName as opposed to
iterating over all elements in the tree.
If you run your
application at this point, you will see the button
displayed. It will probably display at a size and
appear in a position that you probably don't want.
Let's fix that next.
The default size your
controls get when they are added are determined by
either the control's defaults or the panel they get
placed into. For the most part, the default values
are not what you would want. You can easily change
the size of your controls by setting the Width and
Height properties:
- Button
clickMeButton
=
new
Button();
- clickMeButton.Width
=
100;
- clickMeButton.Height
=
30;
-
- this.LayoutRoot.Children.Add(clickMeButton);
Running the
application with the above two lines set, my button
no longer fills up the entire window:

[ my button is a more respectable, presentable size!
]
When you set an
explicit value for Width and Height, the values are
absolute. No amount of window or browser resizing
will cause your control's size to deviate from what
you have specified.
Alas, we get to
the more tricky part of this article - that is, how
do you position an element exactly where you would
want it? Positioning your elements depends greatly
on the panel you are parented under. For Canvas, you
can do the following:
- Button
clickMeButton
=
new
Button();
- clickMeButton.Width
=
100;
- clickMeButton.Height
=
30;
-
- Canvas.SetLeft(clickMeButton,
75);
- Canvas.SetTop(clickMeButton,
100);
-
- this.LayoutRoot.Children.Add(clickMeButton);
The Canvas's SetLeft
and SetTop methods can be used to specify the X and
Y position of your control. In my example, my button
will be positioned at x/y coordinates 75, 100.
For all controls that
are not somehow nested under a Canvas, the above
approach will not work. You will instead need a more
general solution that involves either adjusting the
margins or fiddling with the transforms. I describe
how to adjust the transform in the following blog
post:
http://blog.kirupa.com/?p=64
Properly positioning
elements will require another article of its own, so
I am not going to go into any more detail. The one
thing to note is that the element itself takes care
of some of its positioning, but many layout panels
such as Grid have alignments and columns/rows that
affect the alignment of all of their children as
well. You should not ignore the parent in favor of
the child or vice versa. I guess that is just good
advice for life in general!
information here lacks crispness
The final topic of the day will be events and event
handlers. A common part of your workflow is to
probably draw out your control in Expression Blend,
jump over to the Event list in the Properties
Inspector, enter a name for your event handler from
a list of events, and then be taken into Visual
Studio or the code editor in Expression Blend 3 for
adding the code that will execute when this event is
fired.
Here is a screenshot of the event list for a
Button in Silverlight:
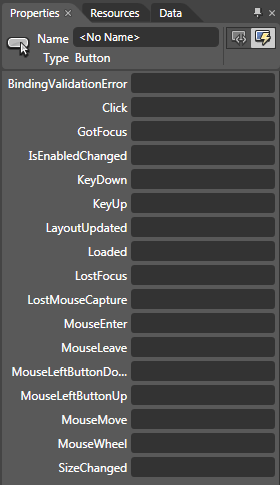
[ the event list for a Silverlight Button in
Expression Blend ]
While this seems like a very UI-friendly task, it
is quite straightforward to actually do all of this
in code itself. The following code shows how you can
take your button and assign its Click event to an
event handler using just code:
- public
MainWindow()
- {
- this.InitializeComponent();
-
- // Insert code
required on object creation below this
point.
-
- Button
clickMeButton
=
new
Button();
- clickMeButton.Width
=
100;
- clickMeButton.Height
=
30;
-
- clickMeButton.Click
+=
new
RoutedEventHandler(DisplayMessage);
-
- this.LayoutRoot.Children.Add(clickMeButton);
- }
-
- void
DisplayMessage(object
sender,
RoutedEventArgs
e)
- {
- throw
new
NotImplementedException();
- }
The amount of code you
have to write is actually far less than what you see
above. The first thing you need to do is find the
event on your control you want to link to an event
handler:
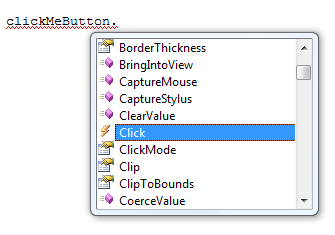
While you don't get a
filtered list of all events the control supports,
such as what you see in Blend, but you can cycle
through all of your control's properties and stop at
the ones that have a lightning bolt icon. Of course,
after some experience with using events, you will
probably have memorized the handful of useful events
and be able to jump directly to what you want
without having to rely on the auto-complete.
Once you have picked
your element, all you have to do to assign an event
handler is type in the the
+= characters:

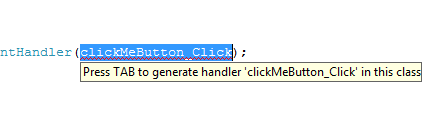
Immediately after you
type in the += characters, a tooltip will appear
giving you an indication of what you need to write.
Of course, you can always do what I do, and bypass
all of the typing by hitting your TAB character like
the tooltip also mentions. Let's actually do that.
Just hit the TAB key. Once you have hit TAB, the
type of the event handler that matches your event
will appear with text selection placed on the name
of your event hanlder:
The default name
provided for your event handlers is often too
generic, so you can just type in your new name since
text selection is on the default name provided:
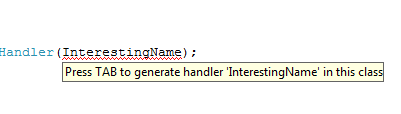
After you enter your
event handler name, hit the TAB key again. This
time, the actual event handler will be created for
you:
- void
InterestingName(object
sender,
RoutedEventArgs
e)
- {
- throw
new
NotImplementedException();
- }
You can erase the line
that throws the NotImplementedException and add the
code that you want executed when this event handler
gets called.
When
you are dynamically creating elements and having
event handlers listen to events on them, knowing
which element fired the event will be important. For
example, let's say I programmatically generate a
grid of buttons as shown below:
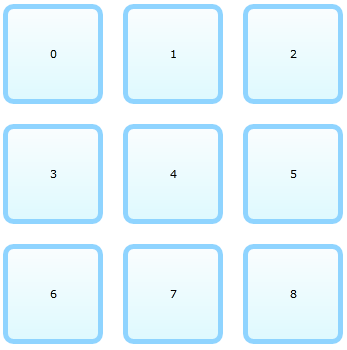
The code for
generating them is similar to what you saw before,
but the difference is that I place it all inside a
for loop so that I
can get nine copies of the element instead of just
one:
- public
MainPage()
- {
- // Required to
initialize variables
-
InitializeComponent();
-
- for
(int
i
=
0;
i
<
9;
i++)
- {
- Button
squareButton
=
new
Button();
- squareButton.Height
=
100;
- squareButton.Width
=
100;
- squareButton.Margin
=
new
Thickness(10,10,10,10);
- squareButton.Style
=
this.Resources["MyCustomButtonStyle"]
as
Style;
-
- squareButton.Content
=
i;
- squareButton.Click
+=
new
RoutedEventHandler(ButtonClick);
-
- SquareHolder.Children.Add(squareButton);
- }
- }
-
- private
void
ButtonClick(object
sender,
RoutedEventArgs
e)
- {
- Button
clickedButton
=
sender
as
Button;
- MessageBox.Show(clickedButton.Content.ToString());
- }
Notice that each
button you create has the Click event wired up to
the ButtonClick event handler. If you had to
visualize how this would look, it would look as
follows:
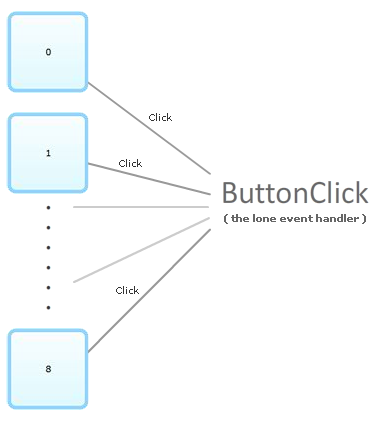
revisit quality of image
Even though you have
nine buttons, you only have one event handler that
gets called each time the button gets clicked. The
problem is, how will you know which button initiated
the click event that caused the event handler to get
called?
The way you do that is by using your event
handler's arguments. The first argument is an object
whose name is sender:
- private
void
ButtonClick(object
sender,
RoutedEventArgs
e)
- {
- Button
clickedButton
=
sender
as
Button;
- MessageBox.Show(clickedButton.Content.ToString());
- }
Each time your event handler gets called, this
sender object contains a reference to whatever
element fired the event. The thing to note, though,
is that sender is of type
object. This is as generic as something can
get in .NET.
What you need to do is actually cast your sender
as something a bit more specialized. If you know
what control all of the clicked items will be, you
can just cast your sender as that control itself. In
our example, because this event handler is only
being called by Button, I can safely cast the sender
as a Button:
- private
void
ButtonClick(object
sender, RoutedEventArgs
e)
- {
- Button
clickedButton
=
sender
as
Button;
- MessageBox.Show(clickedButton.Content.ToString());
- }
You may be wondering why you need to worry about
casting your sender object as the type that you
want. The reason is that, objects in .NET can take
various forms. The form they take dictates what they
are capable of, and more importantly, what they
allow you to access.
Having your Button actually be cast as a generic
object, you only have access to the following
properties:
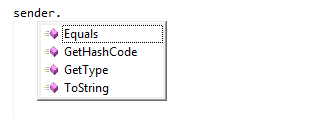
By casting my sender as a Button, I have access
to all properties any Button object would have:
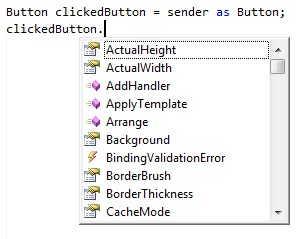
The sender that gets passed in did not change.
What properties the sender actually exposed did change
depending on whether it was cast as an object or as
a Button. You should be careful though. If you cast
your sender into something it isn't, especially if
it is something more specialized, then you will run
into various errors and exceptions.
One of the takeaways of this
article is that everything you can do in Expression
Blend, you can do in code itself. The downside is
pretty obvious. You get no friendly design-time
support. Everything you do only becomes visible when
you run your application in your window or browser,
and that can make designing complicated UIs very
cumbersome.
Instead, what you
should look at is see what makes the most sense for
you. In general, most applications you create will
rarely require you to create visual elements via
code for insertion into a visual tree. In all my
years of fiddling with this in Flash and
Silverlight/WPF, I primarily use this technique for
procedural animations where dynamically adding and
moving things around the screen is really cool.
elaborate
Just a final word before we wrap up. What you've seen here is freshly baked content without added preservatives, artificial intelligence, ads, and algorithm-driven doodads. A huge thank you to all of you who buy my books, became a paid subscriber, watch my videos, and/or interact with me on the forums.
Your support keeps this site going! 😇

|


