Table of Contents

While a lot of us love seeing animations as part of our daily interactions with UIs, there are people out there who don’t share our same affinity for the moving pixel. Yep. That is correct. Some people just don’t like animations. The reasons for why may vary, and some of the reasons are actually very valid.
For some people, not liking animations is simply a preference. They find them distracting and would be happier without them. Others have more practical reasons for not liking them that have nothing to do with preference. They may be on really bad hardware where even the most optimized animation might run really poorly for them. Some people out there want to love animations but can’t due to medical reasons. Our use of animations might make the entire app may unusable for them. That's a serious problem.
In this article, we are going to try to make everyone happy independent of what their views on animations might be. We are going to give our users full control over whether they want to see animations or not, and we are going to do that by employing a few cool technical tricks.
Onwards!
To kick your animations skills into the stratosphere, everything you need to be an animations expert is available in both paperback and digital editions.
BUY ON AMAZONBefore we go further, let us take a look at an example (launch in separate window) of what we will be looking at:
For almost all of you, you should see a blue circle happily bouncing up and down. If you hover over it, you'll see it animate to a larger size and turn slightly. If you uncheck the play animation? checkbox, the animation will stop and hovering over the circle will no longer trigger an animation. On hover, your circle will just jump to its larger and rotated state instantly. Checking the checkbox again will cause everything to animate and behave as you might expect.
Now, I said for almost all of you in the beginning of the earlier paragraph. If you have an OS setting for reducing animations enabled and are viewing in a supported browser (more on this later), the default behavior you will see is the animation disabled with the play animation? checkbox unchecked. You will see something that looks like the following:
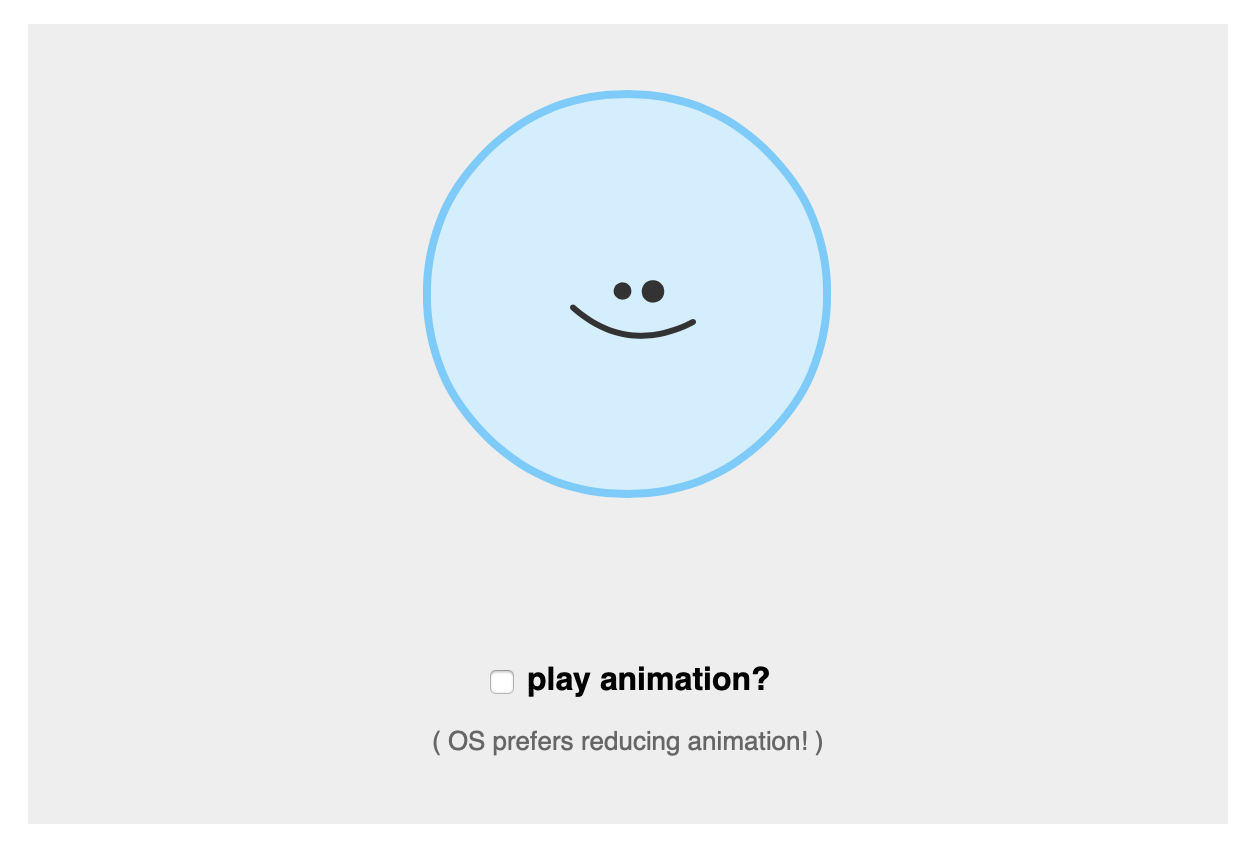
In addition to the animation not playing by default, you'll see the text OS prefers reducing animation! displayed as well. This is an indication that our animation not playing is a direct result of the accessibility setting for reducing animations being turned on. You can override this behavior by just checking the play animation? checkbox and your overridden state will persist and be the default behavior when you refresh the page. Pretty cool, right? In the following sections, let's take this example apart and understand what exactly is going at a technical level.
There are several parts to how our animation toggling behavior works. We are going to look at each part individually and then put them all together and see how the whole...whole works!
The animations we will deal with will be created either in CSS (Animations and Transitions) or in JavaScript (timer-based and Web Animation API). While each of these animation types will be implemented quite differently, our signal for turning these animations on and off will be similar. One approach that works well is one involving a CSS Custom Property that signals whether animations should play or not. We will use that signal in some obvious and not-so-obvious ways to stop an animation from playing.
First, our signal looks as follows:
body {
  --toggle: 1;
  --playState: "running";
}
We declare two custom properties. One is called toggle, and its initial value is set to 1. The second value is playState, and its value is set to running. These two values act as our indicator for ensuring animations on the page will play. To signal that animations on the page won't play, we change the 1 value to 0 and the running value to paused:
body {
  --toggle: 0;
  --playState: "paused";
}
While we can set the initial state in CSS directly as shown, you may want to rely on JavaScript for doing this. There isn't a right or wrong answer to which direction you should go, so the code for doing all of this in JavaScript looks as follows:
// stop animation
document.body.style.setProperty("--toggle", "0");
document.body.style.setProperty("--playState", "paused");

// play animation
document.body.style.setProperty("--toggle", "1");
document.body.style.setProperty("--playState", "running");
As we go deeper into understanding how our implementation works, you'll see how we use these lines of JavaScript to precisely control how our animations run or don't run.
The way we are going turn our CSS transitions on and off is by toggling the duration value. If the duration value is greater than 0 seconds, then the transition will run over the time specified by the duration, and we will see an animation. If we set the duration value to 0, then the transition will effectively live out its final state when triggered and not show an animation at all. The way we are going to represent this is as follows:
#myElement {
  transition: transform calc(var(--toggle) * .15s) ease-in-out;
}
Notice that we are using a calc function that multiplies the value for our toggle property and the existing duration: calc(var(--toggle) * .15s. By doing this, our duration when toggle is set to 1 is .15s for our transition. That is the equivalent of:
#myElement {
  transition: transform .15s ease-in-out;
}
Our transition will be visible and run over a duration of .15 seconds. When our toggle value is set to 0, the duration value is 0 as well. That looks sorta like this:
#myElement {
  transition: transform 0 ease-in-out;
}
By relying on this trick, we avoid having to maintain a list of all varieties of CSS-based transitions and tracking their original duration values. Our custom toggle property is the only thing we need to update, and every transition duration that relies on it gets updated automatically to either 0 or its original duration value. Pretty neat, right?
The way we turn all of the CSS animations on our page on and off is going to be much simpler (thanks to a great tip by Jakob_E) than what we saw with the transitions case. Whether a CSS animation plays or not is specified by the animation-play-state property. When that property has a value of running, the animation runs. When that property has a value of paused, the animation is...paused! As it turns out, those are the same values specified by our playState custom CSS property. This means, we can do something that looks as follows:
#myElement {
  animation: bobble 2s infinite var(--playState);
}
If you prefer declaring the animation-play-state explicitly and not part of the shorthand animation declaration, you can instead do this:
#myElement {
  animation: bobble 2s infinite;
  animation-play-state: var(--playState);
}
The end result is that your playState custom property will tell the animation-play-state property whether the animation should run or not. Simple.
When it comes to controlling whether our animation plays or not in JavaScript, things are even more easy. We just need to read the value of the toggle property on our body element and adjust our animation's code accordingly. The way we read the value of the toggle property is the only hard part in all this, and that is done by relying on getComputedStyle:
var bodyStyle = getComputedStyle(document.body);
var toggleValue = bodyStyle.getPropertyValue("--toggle");
When this code runs, the value of toggleValue will either be 1 or 0. You can use this value in your animation code by doing something similar to the following:
function animate() {
  if ((toggleValue === "0") || (toggleValue === " 0")) {
    //
    // My animation code goes here!
    //
  }
  requestAnimationFrame(animate);
}
animate();
Notice that we check if toggleValue equals 0 both without and with a leading space. This has to do with a quirk where some versions of browsers will respect the space defined as part of the CSS custom property declaration and the value. This thread goes into more detail on this behavior, so check that out if your curiosity runs deeper.
For some people, animations can trigger motion sickness, dizziness, headaches, nausea, and other unwanted effects. This is a serious medical issue, and you can read more about it here. To help alleviate these symptoms, many operating systems provide accessibility settings that greatly reduce the animations you would see when interacting with your device. For example, on macOS, the setting is called Reduce Motion:
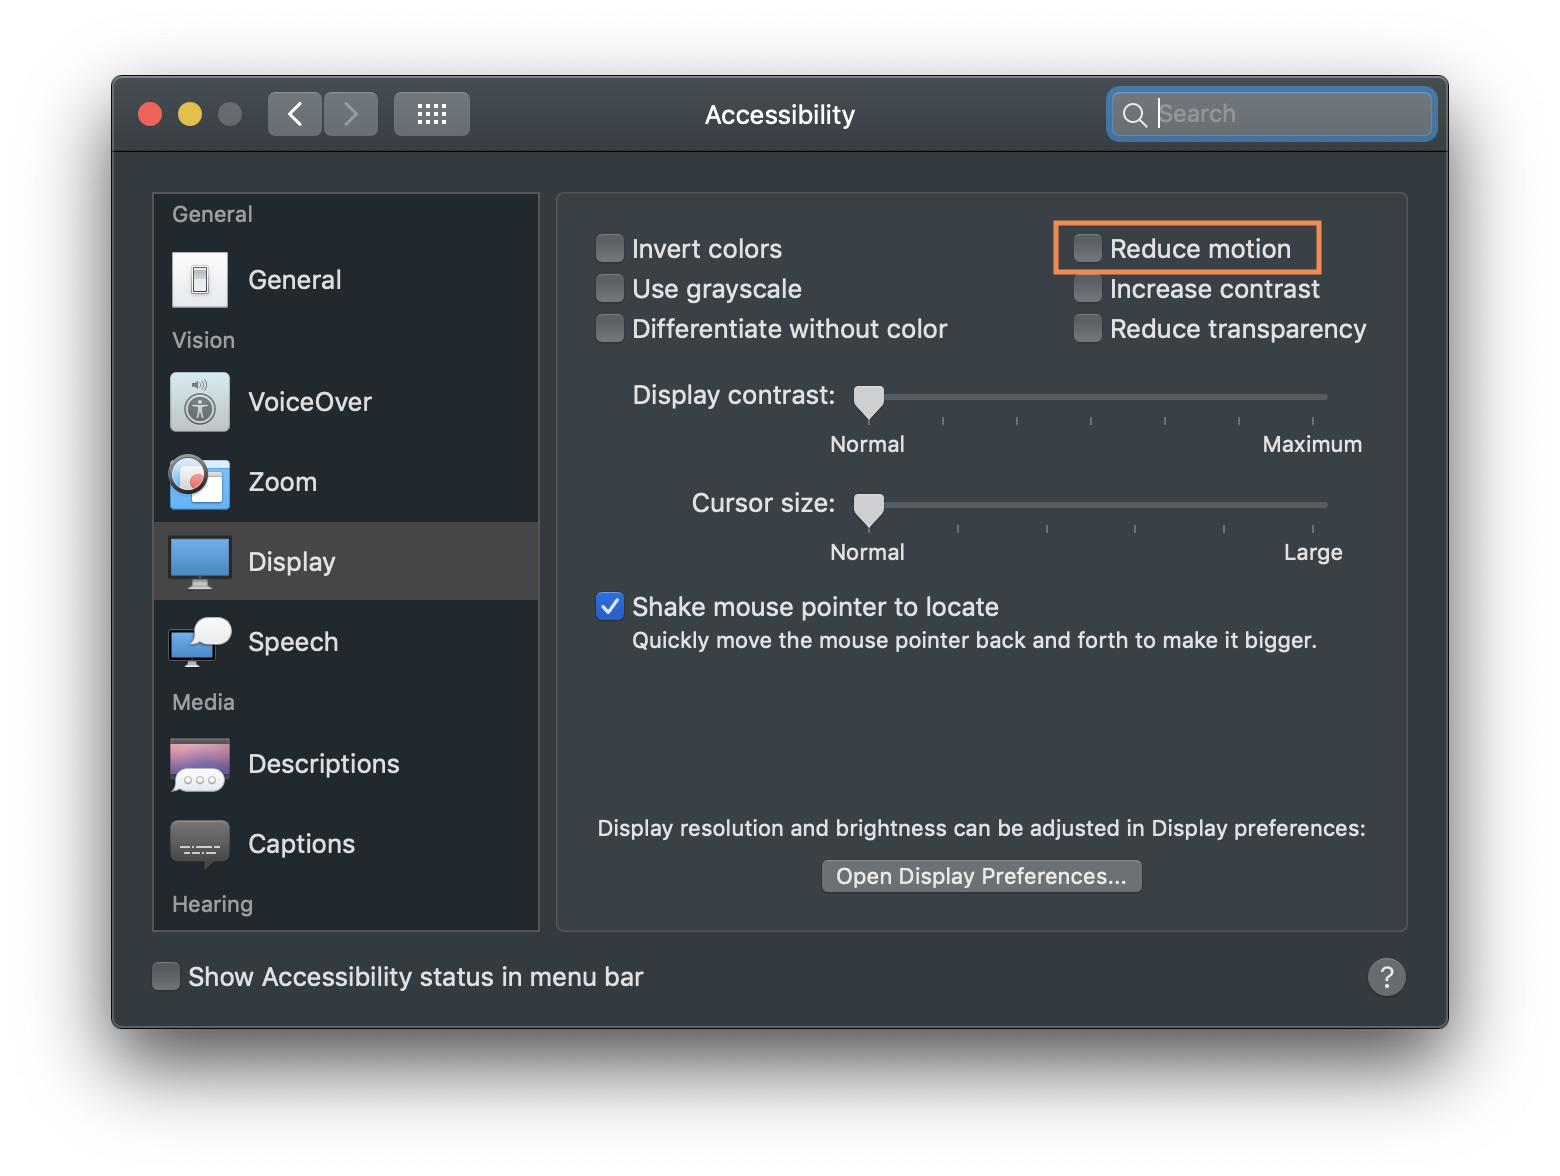
Different operating systems have equivalent settings in their respective Accessibility-related settings panels. Fortunately, these settings aren't just limited to the operating system. These settings are exposed to developers as well.
For us, the accessibility settings value for reducing or showing animations is exposed by the prefers-reduced-motion media query. If the query matches a value of reduce, then the user has enabled the accessibility setting to reduce animations. The following CSS shows how you can read this:
@media screen and (prefers-reduced-motion: reduce) {
  #reduceMotionStatus {
    display: block;
    font-size: small;
    color: #666;
  }
}
The cool thing is that you aren't limited to performing this check in CSS. You can use the matchMedia API and query the value of prefers-reduced-motion in JavaScript as well:
var reduceMotionQuery = matchMedia("(prefers-reduced-motion)");

if (reduceMotionQuery.matches) {
  document.body.style.setProperty("--toggle", "0");
} else {
  document.body.style.setProperty("--toggle", "1");
}
In this code, you can see how we use the result of prefers-reduced-motion to set the value of our toggle custom CSS property.
Now, there may be situations where someone decides to change this accessibility setting while your app is running. In CSS, any style rules inside the prefers-reduced-motion block are re-evaluated automatically, so you don't have to do anything extra there to handle this change. For JavaScript, you'll have to explicitly handle this situation. You can use an event listener to listen for changes and then react accordingly:
var reduceMotionQuery = matchMedia("(prefers-reduced-motion)");

function setAccessibilityState() {
  if (reduceMotionQuery.matches) {
    document.body.style.setProperty("--toggle", "0");
  } else {
    document.body.style.setProperty("--toggle", "1");
  }
}
setAccessibilityState();

reduceMotionQuery.addListener(setAccessibilityState);
In this snippet, when the user changes the accessibility setting for animations, the setAccessibilityState function gets called.
Before we move on to the next section, let's address the big question of what is the right behavior when someone specifies that they want to see fewer animations. The answer isn't always to disable all animations. Doing so may actually hinder the usability of your app greatly. This is where testing with real users who may have visual/motion-related disorders can be helpful. On iOS, when you enable the setting to reduce animations, what happens is that each animation effect is adjusted different. Zooming effects get turned into more subtle fades. Parallax effects, on the other hand, are fully disabled. The main takeaway is that you need to be thoughtful about how you handle a user's preference for reducing animations.
There is one thing we can mostly agree on, though. If you provide your own in-app settings for toggling animations on/off, you should use the user's system preferences to set the default state. If the user has indicated that they would like to see fewer animations, your app's default state is to reduce the animations you display. If the user decides to override the behavior inside your app, then you have a clear signal on what the user likes and you can just listen to your own app settings from this point on.
One last thing to mention before wrapping up is browser support. Currently, support for the prefers-reduced-motion media query is pretty low. Only Safari and Firefox support it right now, with support for other browsers coming eventually. This means you can't exclusively rely on this feature to provide users with the right behavior for reducing animations. Oh well.
In the previous sections, we saw all the various technical pieces that we can put together to provide support for toggling animations on and off. The example we started this tutorial with earlier (see in its own window) is one such implementation with some minor adjustments. First, take a moment to launch the example in your browser (Safari or Firefox if you want to also the test the animation accessibility settings) and play with the example a bit. There are a few things to highlight:
Let's quickly walk through our code and see how these features map to what is there! Starting at the top, this is the code that runs when the page loads:
var reduceMotionQuery = matchMedia("(prefers-reduced-motion)");
reduceMotionQuery.addListener(setMotionState);

var userSetting = sessionStorage.getItem("userAnimationState");

function setMotionState() {
  // user hasn't specified a preference
  if (userSetting === null) {
    // OS setting is supported by browser
    if (reduceMotionQuery.matches) {
      animationCheck.checked = false;
      document.body.style.setProperty("--toggle", "0");
      document.body.style.setProperty("--playState", "paused");
    } else {
      animationCheck.checked = true;
      document.body.style.setProperty("--toggle", "1");
      document.body.style.setProperty("--playState", "running");
    }
  } else {
    setStoredState();
  }
}
setMotionState();
It seems like there is a lot going on, but we are just doing some busy work to ensure we respect the user's stored preferences for whether animations should play or not. If there are no stored preferences, it means the user is visiting the animation for the first time or has never toggled the play animation? checkbox manually. In this situation, we perform one additional check to see if the user has specified that animations be reduced via their operating system's accessibility UI. Depending on the outcome of that check, we turn animations on or off by default.
If the user's preferences are stored, then we call the setStoredState function:
function setStoredState() {
  if (userSetting === "play") {
	animationCheck.checked = true;
  } else {
	animationCheck.checked = false;
  }

  setUserState();
}
All we do here is check what the stored value is and set the checked state for our checkbox accordingly. Simply checking or unchecking our checkbox doesn't actually change anything meaningful outside of what you see. The changes happen in setUserState which gets called next:
function setUserState(e) {
  if (animationCheck.checked) {
    document.body.style.setProperty("--toggle", "1");
    document.body.style.setProperty("--playState", "running");
    sessionStorage.setItem("userAnimationState", "play");
  } else {
    document.body.style.setProperty("--toggle", "0");
    document.body.style.setProperty("--playState", "paused");
    sessionStorage.setItem("userAnimationState", "stop")
  }
}
This code is responsible for setting our toggle and playState custom CSS properties to the correct values and ensuring we persist the updated state of the animation as well. When we manually toggle the play animation? checkbox on and off, it is actually this function that gets called directly:
var animationCheck = document.querySelector("#playAnimationCheckbox input");
animationCheck.addEventListener("click", setUserState, false);
All of the other functions we've seen (setMotionState, setStoredState) were just there to ensure our default state when the page loads is set correctly. Once a page has loaded, it is always setUserState that will keep getting called.
We been talking a lot about how we remember what the user last selected and ensure we persist that on subsequent visits. The way we do that is by using the Web Storage API. For testing purposes, the example uses session storage that loses all state once you close the browser. If you want to persist the data across browser sessions (which you probably should), replace all instances of sessionStorage with localStorage. Unless a user explicitly chooses to clear all cookies and stored data, this minor change will ensure that users get their chosen behavior when the revisit your content.
Providing our users with a way to turn animations on and off isn't just a nice feature. Given the major accessibility implications, it may be a critical feature that allows a group of people the ability to actually use your app. In this article, we looked at the various technical pieces you can put together to create a solution that allows you to adjust how your animations run (or don't run at all) across both CSS and JavaScript. Before I leave you to it, look at Webkit's Responsive Design for Motion article that does a great job talking about the prefers-reduced-motion media query and more on the accessibility benefits with using it.
Just a final word before we wrap up. If you have a question and/or want to be part of a friendly, collaborative community of over 220k other developers like yourself, post on the forums for a quick response!
