[JAVASCRIPT](https://www.kirupa.com/html5/learn_javascript.htm) [BOOK](https://www.amazon.com/exec/obidos/ASIN/0789758067/kirupacom) # Simple Video Chatting with WebRTC by [ Serge Herkül](https://twitter.com/_sergeh) | 16 October 2017 So...you read the [Accessing your Webcam in HTML](https://www.kirupa.com/html5/accessing_your_webcam_in_html5.htm) tutorial, and you are probably wondering what is next. Well, wonder no more! It's time to get your feet wet with something known as **WebRTC**. As with all cool and important things, WebRTC is an acronym standing for **Web Real-Time Communication**. Digging a bit deeper, it is a collection of communications protocols and APIs that enable real-time peer to peer connections within the browser. Simply put, WebRTC allows for direct data transfer between two devices. To see WebRTC in action, in this tutorial, we'll be building a 1-on-1 video chat as shown in the image below: ![](https://www.kirupa.com/html5/images/chat_screenshot.png) If you want something more than just a static image, you can test this out yourself by checking out [this live demo](https://scaledrone.github.io/webrtc/index.html). All you need is one more person on the other end. And with that, let's get started! #### About the Author Serge is a developer and entrepreneur from Estonia, focusing on product development and good user experience. He is the person pictured on the right in the above screenshot, and you can [find him on Twitter as _sergeh](https://twitter.com/_sergeh) :P ## WebRTC 101 Before we start to look at lines of code and markup, let's take a few seconds to understand the three major pieces involved with setting up our video chat solution. You major pieces are **signaling**, **ICE candidates**, and **STUN**, and let's look a bit deeper into what they are. ### Signaling Signaling is an essential WebRTC term and the only one you **need** to understand. For two devices in different networks to find each other they need to use a central service called a **signaling server**: ![](https://www.kirupa.com/html5/images/signaling_server.png) 
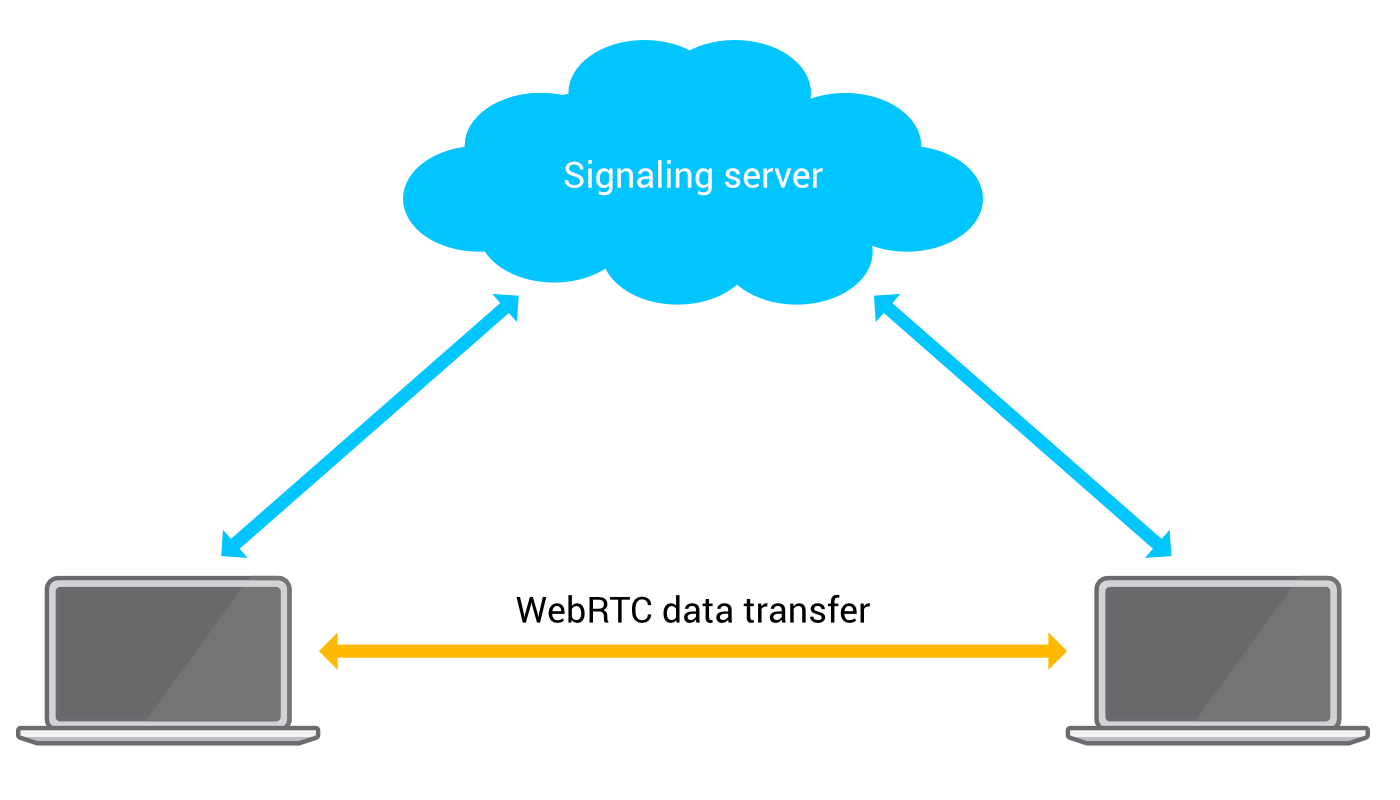
WebRTC does not have any signaling capabilities itself so an external method of transportation must be used. Any technique that allows for sharing data works - such as HTTP, texting, or even sending postcards. However, it's reasonable to write your own WebSockets Signaling server or use a similar Socket based implementation. ### ICE Candidates ICE stands for Interactive Connectivity Establishment, and it's used for establishing communication for VOIP, peer to peer, instant-messaging, and other kinds of interactive media. Typically an ICE candidate provides the information about the IP address and port from where the data is going to be exchanged. WebRTC peers exchange ICE candidates until they find a method of communication that they both support. After the connection has been established, ICE candidates can be traded again to upgrade to a better and faster communication method. There is more to ICE than what I've described here, so if you are curious to learn more, [go here](https://en.wikipedia.org/wiki/Interactive_Connectivity_Establishment). ### STUN STUN means Session Traversal Utilities for NAT. STUN is a protocol for assisting devices behind a NAT firewall or router with their packet routing. In practice, STUN helps to make setting up WebRTC connections more reliable. [Go here](https://en.wikipedia.org/wiki/STUN), to read more about STUN. ## Building the Example Now that we've gotten a brief overview of what all is involved, let's start by building our app. Create a new HTML document and add the following markup into it: ```js
Send your URL to a friend to start a video call
``` Take a few moments to walk through everything going on in this document. Once you've done that, let's walk through it together as well. First, we start by importing the **scaledrone.min.js** script which we will use for signaling: ```js . . . ``` We'll revisit this script later, but just know that we are including it. To display the video, we're going to be using two `video` elements: ```js . . . ``` One `video` element will show our local camera feed, and the other `video` element will play the video and audio feed from the remote peer. A little bit of CSS is used to set the video elements side by side and to add the page a bit of funk: ```css body { background: #0098ff; display: flex; height: 100vh; margin: 0; align-items: center; justify-content: center; padding: 0 50px; font-family: -apple-system, BlinkMacSystemFont, sans-serif; } video { max-width: calc(50% - 100px); margin: 0 50px; box-sizing: border-box; border-radius: 2px; padding: 0; background: white; } .copy { position: fixed; top: 10px; left: 50%; transform: translateX(-50%); font-size: 16px; color: white; } ``` Lastly, we're going to import the **script.js** file into which all of our JavaScript code goes: ```js . . . ``` Go ahead and create the **script.js** file in the same location as your HTML document, and add the following content into it: ```js // Generate random room name if needed if (!location.hash) { location.hash = Math.floor(Math.random() * 0xFFFFFF).toString(16); } const roomHash = location.hash.substring(1); // TODO: Replace with your own channel ID const drone = new ScaleDrone('2xmbUiTsqTzukyf7'); // Room name needs to be prefixed with 'observable-' const roomName = 'observable-' + roomHash; const configuration = { iceServers: [{ urls: 'stun:stun.l.google.com:19302' }] }; let room; let pc; function onSuccess() {}; function onError(error) { console.error(error); }; drone.on('open', error => { if (error) { return console.error(error); } room = drone.subscribe(roomName); room.on('open', error => { if (error) { onError(error); } }); // We're connected to the room and received an array of 'members' // connected to the room (including us). Signaling server is ready. room.on('members', members => { console.log('MEMBERS', members); // If we are the second user to connect to the room we will be creating the offer const isOfferer = members.length === 2; startWebRTC(isOfferer); }); }); // Send signaling data via Scaledrone function sendMessage(message) { drone.publish({ room: roomName, message }); } function startWebRTC(isOfferer) { pc = new RTCPeerConnection(configuration); // 'onicecandidate' notifies us whenever an ICE agent needs to deliver a // message to the other peer through the signaling server pc.onicecandidate = event => { if (event.candidate) { sendMessage({'candidate': event.candidate}); } }; // If user is offerer let the 'negotiationneeded' event create the offer if (isOfferer) { pc.onnegotiationneeded = () => { pc.createOffer().then(localDescCreated).catch(onError); } } // When a remote stream arrives display it in the #remoteVideo element pc.onaddstream = event => { remoteVideo.srcObject = event.stream; }; navigator.mediaDevices.getUserMedia({ audio: true, video: true, }).then(stream => { // Display your local video in #localVideo element localVideo.srcObject = stream; // Add your stream to be sent to the conneting peer pc.addStream(stream); }, onError); // Listen to signaling data from Scaledrone room.on('data', (message, client) => { // Message was sent by us if (client.id === drone.clientId) { return; } if (message.sdp) { // This is called after receiving an offer or answer from another peer pc.setRemoteDescription(new RTCSessionDescription(message.sdp), () => { // When receiving an offer lets answer it if (pc.remoteDescription.type === 'offer') { pc.createAnswer().then(localDescCreated).catch(onError); } }, onError); } else if (message.candidate) { // Add the new ICE candidate to our connections remote description pc.addIceCandidate( new RTCIceCandidate(message.candidate), onSuccess, onError ); } }); } function localDescCreated(desc) { pc.setLocalDescription( desc, () => sendMessage({'sdp': pc.localDescription}), onError ); } ``` The contents of this file will be responsible for creating our personalized room, communicating with the signaling server, and dealing with the RTC-related shenanigans as well. If you preview your HTML now, everything should work similar to the live example you saw earlier. ## Understanding the Code Now comes the fun part. We are going to learn how the code works the way it does. Before we walk through this together, take a few moments to walk through the code that we've added. Once you've done that, read on to walk through the interesting things together. ### Generating the Room Each video call will happen on a separate URL: ![](https://www.kirupa.com/html5/images/untitled.png) This allows us to start a video call and share a fairly unique link to invite someone else into our room. The way we generate a room is simple. When opening the page we'll first check if there is already a unique hash appended to the URL. If there is a unique hash, we are joining a specific video chat room. If there is no unique hash at the end of the URL, we will generate one. The code for doing this will look as follows: ```js // Generate random room name if needed if (!location.hash) { location.hash = Math.floor(Math.random() * 0xFFFFFF).toString(16); } const roomHash = location.hash.substring(1); ``` Next, we will create a configuration object that will help with making our WebRTC connection. Add the following code after what you already have for dealing with a room: ```js const configuration = { iceServers: [{ urls: 'stun:stun.l.google.com:19302' // Google's public STUN server }] }; ``` Our configuration object, aptly called `configuration`, will use Google's public STUN server that is freely available. Lastly, we have the following code to deal with error conditions: ```js function onSuccess() {}; function onError(error) { console.error(error); }; ``` This wraps up the initial setup for the code that will help with our video chatting. The real magic is going to happen next. ### Connecting the Signaling Server As explained before, a signaling server is used for the discovery and negotiation phase of WebRTC peers. To keep the tutorial short and more comfortable to follow we can use **Scaledrone** as our signaling server. This way we don't have to write any server-side code. If you wish to write your own signaling server, this tutorial will still work fine. Anyway, [Scaledrone](https://www.scaledrone.com/) is a real-time messaging service that works by letting users subscribe to rooms, it then broadcasts messages sent into a room to all subscribed users. The service is free to use for our purpose, so it works out really well. As you may recall, we already imported the Scaledrone JavaScript library in our HTML: ```js