# Displaying PHP Data in HTML
by [kirupa](https://www.kirupa.com/me/index.htm) | 25 March 2012
[Have questions? Discuss this HTML5 / JavaScript tutorial with others on the forums.](https://www.kirupa.com/forum/showthread.php?371538-Tutorial-Displaying-PHP-Data-in-HTML)
To say that PHP is popular is an understatement. Its flexibility to gracefully handle tasks as varied as working with databases to executing a small function and returning some result have made it one of the most popular server-side languages used in web development.
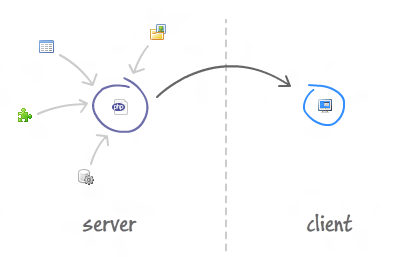
The thing to emphasize about PHP is that it is a *** server-side*** language. When a user visits a PHP page, the user's browser doesn't do anything outside of rendering whatever your PHP page returns. All the heavy lifting is done on the server itself:
For many of you, that isn't a problem at all. You do not mind that PHP dynamically generates the HTML that your browser then displays to you. As sites like wordpress and others have shown, you can certainly use PHP to generate clean and valid HTML.
There will be cases where an all-PHP solution isn't what you want. You may already have an HTML page, and all you want to do is simply use some data a PHP script returns.
## The Example
To better illustrate what I am talking about, take a look at the [ following example](https://www.kirupa.com/html5/examples/displayServerTime.htm):
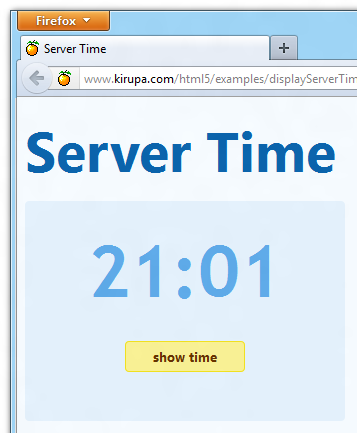
[ once you [ view the example](https://www.kirupa.com/html5/examples/displayServerTime.htm), click on "show time" to show the time ]
When you click on the ***show time*** button, a request is made to our PHP file, and the server's time is returned and displayed.
In this tutorial, I will explain how to re-create this example and explain everything that goes on to make it all work.
## Getting Started
For this tutorial, you will be creating two files:
1. **PHP page** containing a script that returns the time.
1. **HTML page** containing some JavaScript that reads and displays the time returned by our PHP page.
Make sure you have a server that is capable of running PHP scripts. Once you have that setup, let's get started with the next step - actually creating the PHP page.
## Creating the PHP Page
Find a directory in your server where both your PHP and HTML file will live. In this directory, create a new PHP file called ** servertime.php**. Once you have created this file, add the following code:
After you've dded this code, save the file and preview it in your browser. You should see a bizarre set of letters and numbers that look similar to the following:
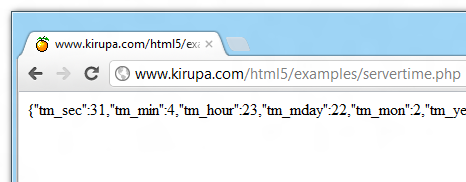
[ here is what [ my servertime.php](https://www.kirupa.com/html5/examples/servertime.php) looks like ]
Don't worry about what these values are right now. I'll explain that shortly after you get everything working.
## Creating the HTML Page
With your PHP script ready, all that is left is for you to create the HTML page. In the same directory your PHP file is in, create a new HTML file called **displayServerTime.htm**.
Add the following content to your HTML file:
Once you have added this HTML and JavaScript, save your displayServerTime.htm file. Preview it in your browser and click on the **show time** button. You should see the server's time displayed from your PHP file.
If you are not getting it to work, make sure your document looks identical to what you have in [ my version of this example](https://www.kirupa.com/html5/examples/displayServerTime.htm).
## Why Everything Works
Right now, you have a working example. You click a button and data from your PHP script gets magically loaded. In this section, let's examine why everything works so that you can reuse and extend the techniques shown here in your own examples.
### Basic Overview
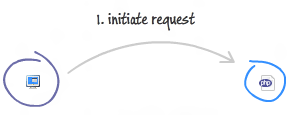
Before diving into the code line by line, let's just talk about what goes on at a high-level. You have your HTML page. There is some JavaScript that lives inside it. When you click the "show time" button, we initiate and make a request to load another page:
The another page we want to load is our PHP file. When our PHP is loaded, what gets loaded is not the raw code:

What gets loaded is the result of our PHP file executing whatever code was inside it. This means that what the PHP file sends is the result of it executing its code – the server’s time.
Once we receive the data back, we use simple DOM manipulation to get the server time displayed in our UI:

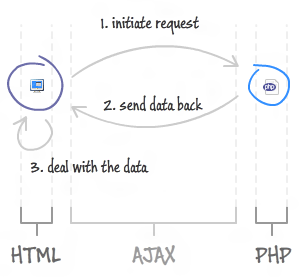
All of this back and forth between our HTML page and the server for loading some data has a common name that you may have heard of, and that is **AJAX**. Here is a more detailed diagram describing the three steps:
All of the code that we have simply puts the high-level English description you saw into something the server and your browser can understand.
### Initiating the Request
The code for initiating the request can be found inside our HTML page. More specifically, it can be found inside the `getServerTime` function that gets called when our "show time" button is clicked:
The code you see here is pretty standard if you’ve analyzed AJAX requests in the past, but let’s go through it line by line….starting at the top:
In our first line, we declare a variable called request that we initialize to a new `XMLHttpRequest` object. The `XMLHttpRequest` object contains a lot of the properties and functions we need to asynchronously load data from a remote file.
The second line is pretty straightforward:
I create a variable called `url` that stores the path to file we want to load. In our case, the file we want to load is our PHP file called `servertime.php`.
Ok, things are starting to get more interesting! The next line does a lot of the heavy lifting for making our request:
The `open` function specifies the type of HTTP request to make and what other attributes to tag along as part of our request. In our example, the HTTP method we are using to open the connection is a `GET`, the URL we want to open is stored by our `url` variable, and the `true` specifies that we want this request to be an asynchronous call.
When constructing your request, you need to specify the HTTP header to use. That is handled by the following line:
In our case, we are primarily dealing with **text/html** data, so we specify that as part of our request.
Earlier, I mentioned that we are requesting our data asynchronously. This means that you are not going to stop everything and wait for some data to be returned before we proceed with executing our code. Our code will continue to execute, and your application will remain responsive.
This is great for your user experience, and it only very slightly complicates our code. Because our data would instead be returned at some later point while your application is running, we need a mechanism for ensuring we react to our data when it does arrive. Our mechanism for handling this will rely on events.
To ensure we get notified when our data does get returned, we listen for an event called `readystatechange`. The code for listening to our `readystatechange` event is provided below:
Notice that we are listening for this event in our `request` object. Once this event gets fired, we call the `processData` function to deal with the data we just received. We'll look at the `processData` function shortly.
The last line of code we look as part of initializing the request is...
Everything we've done so far was building up to this moment where we send the request we've built. When this line gets called, your browser sends off a request to fetch data from our **servertime.php** file.
### Send Data Back
Now that our request has been sent off, the next phase in our intergalactic voyage to display some data from a PHP file is to send our data back to our HTML page.
The data we are hoping to send back is whatever gets returned by the **servertime.php** file, so let's very briefly look at what exactly this PHP file contains:
If you are familiar with PHP (or even if you aren't), the code here is pretty straightforward. In a nutshell, we are returning the server's time, and it looks as follows:
To look at this a little deeper, all we are doing is returning (via the `echo` keyword) the JSON-encoded time as stored by our `$localtime` variable. To get the server's time, I use the `localtime` function to return an associative array of time values - the array which gets converted into a JSON format by the ` json_encode` function.
I won't be going into great detail on PHP in this tutorial, but you can learn more by checking out the great documentation on [ localtime](http://php.net/manual/en/function.localtime.php), [ json_encode](http://www.php.net/manual/en/function.json-encode.php), and [ variables](http://www.php.net/manual/en/language.variables.basics.php). Next up is our final stop in our journey, dealing with the data.
### Deal with the Data
So...you've fired off the request, gotten some data back, and now you want to take the data and do something with it. Let's look at the code for handling this phase of the journey.
Once the data returned by our PHP file hits us, the `readystatechange` event we looked at a few sections ago will get fired. As a result, it will call the `processData` function:
Think of the `processData` function is an intermediary. All it does is takes the data that was returned, performs some minor validation, and passes it off to another function to properly deal with it.
Our validation is done by checking the ` readyState` and `status` properties:
When a request has succeeded, your ` readyState` property is set to 4, and the ` status` property is set to 200. A ` readyState` value of 4 indicates that all of the data has been received, and a status of 200 corresponds to the HTTP status code whose description is OK. We access both the ` readyState` and `status` properties by polling our event argument's `target` property (`e.target`) and assign the values to the `currentReadyState` and `currentStatus` variables.
We check if the request has succeeded with the following block of code:
Our `if` statement is the JavaScript manifestation of the paragraph where I described what to look for when a request has succeeded. If our `currentReadyState` and `currentStatus` variables store a 4 and 200 respectively, we are good. It's time to send in The Wolf...which in our case, is calling the `showTime` function with the data returned from our request:
The data returned from our request is stored in the `responseText` property which also lives inside `e.target`. The `responseText` property stores the JSON array data that you saw in your PHP file earlier. Just to emphasize that sentence again, "**The **`** responseText**`** property stores the JSON array data that you saw in your PHP file earlier.**" This is awesome.
The last chunk of code we will look at is our showTime function:
This function is responsible for displaying the data from the server in our HTML page. The data returned by the server (`e.target.responseText`) is passed in to this function and now referenced by the `response` variable.
The first thing we do is take our response, which is in the form of a text, and covert it back into a JSON object that is stored by the variable `time`:
You can easily convert a string into a JSON object by using the `JSON.parse` function, so that's what we used here.
The next two lines of the code are pretty straightforward:
Our JSON object is a series of object/property pairs, and the name of the properties was originally defined by the ` localtime` PHP function. All I am doing in our code is mapping between the weird `localtime` property names (`tm_hour` and `tm_min`) to something we can better understand - `hour` and `minute`.
To ensure that we always display two digits when it comes to our minute value, I do some simple number and string manipulation in the following lines:
Because you see only one digit when your minute value is less than 10, I check for when that happens and prepend a "0" character in front of our value.
The very last thing we do is send all of our data back to our UI:
The `myText` object refers to the HTML element in our document that will be showing the time. Initially, the element referenced by `myText` shows a question mark:
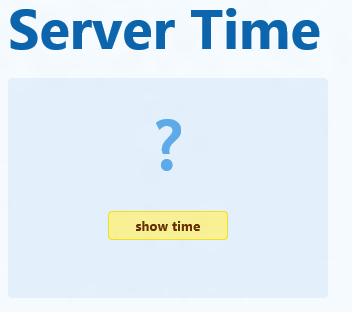
[ now you see a question mark... ]
As with almost all HTML elements that display some text, you can overwrite what gets shown by setting the ` textContent` property. Once we have parsed the time, we set the `textContent` property to whatever is stored by the `hour` and `minute` variables:
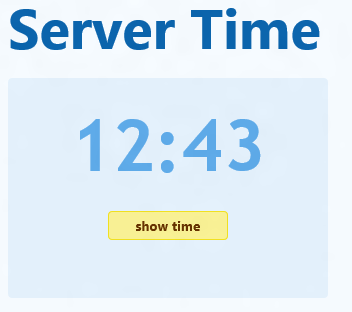
[ ...and now you see the time ]
And with that, we've come full circle to examining how to display data from a PHP file.
## Conclusion
Communicating data between a client and server is something that is more complicated than it seems. There are many ways to do all of this, and in this tutorial I showed one, very simple way. Hope you all liked this, and feel free to post on the forums if you have any questions!