# Creating, Removing, and Cloning DOM Elements
by [ kirupa](https://www.kirupa.com/me/index.htm) | filed under [JavaScript 101](https://www.kirupa.com/javascript/learn_javascript.htm)
This part may blow you away. For the following sentences, I suggest you hold onto something sturdy:
Despite what our earlier discussions about the DOM may have led you to believe, our DOM does not have to be made up of HTML elements that exist in markup. We have the ability to create HTML elements out of thin air and add them to our DOM using just a few lines of JavaScript. We also have the ability to move elements around, remove them, and do all sorts of God-like things. Let's pause for a bit while we let all of that sink in. This is pretty big.
Besides the initial coolness of all this, the ability to dynamically create and modify elements in our DOM is an important detail that makes a lot of our favorite websites and applications tick. When you think about this, this makes sense. Having everything predefined in our HTML is very limiting. We want our content to change and adapt when new data is pulled in, when we interact with the page, when we scroll further, or when we do a billion other things.
In this tutorial, we are going to cover the basics of what makes all of this work. We are going to look at how to create elements, remove elements, re-parent elements, and clone elements. This is also the last of our tutorials looking directly at DOM-related shenanigans, so call your friends and get the balloons ready!
Onwards!
## Creating Elements
It is very common for interactive sites and apps to dynamically create HTML elements and have them live in the DOM. If this is the first time you are hearing about something like this being possible, you are going to love this section!
The way we can create elements is by using the ` createElement` method. The way `createElement` works is pretty simple. We call it via our `document` object and pass in the HTML tag name of the element we wish to create. In the following snippet, we are creating a paragraph element represented by the letter `p`:
```js
let myElement = document.createElement("p");
```
The `myElement` variable holds a reference to our newly created element.
If we run this line of code as part of a larger app, it will execute and a `p` element will get created. Creating an element is the simple part. Actually raising it to be a fun and responsible member of the DOM is where we need some extra effort. We need to actually place this element somewhere in the DOM, for our dynamically created `p` element is just floating around aimlessly right now:
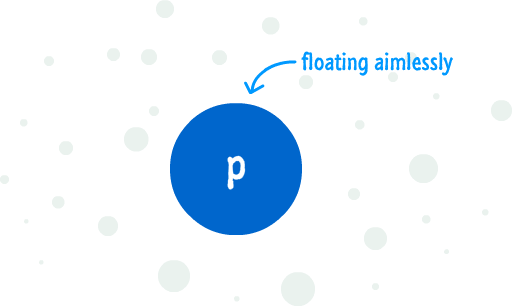
The reason for this aimlessness is because our DOM has no real knowledge that this element exists. In order for an element to be a part of the DOM, there are two things we need to do:
1. Find an element that will act as the parent
1. Use `appendChild` and add the element we want into that parent element
The best way to make sense of all this is to look at an example that ties this all together. If you want to follow along, create a new HTML document and add the following HTML, CSS, and JS into it:
```html
Creating Elements
Am I real?
```
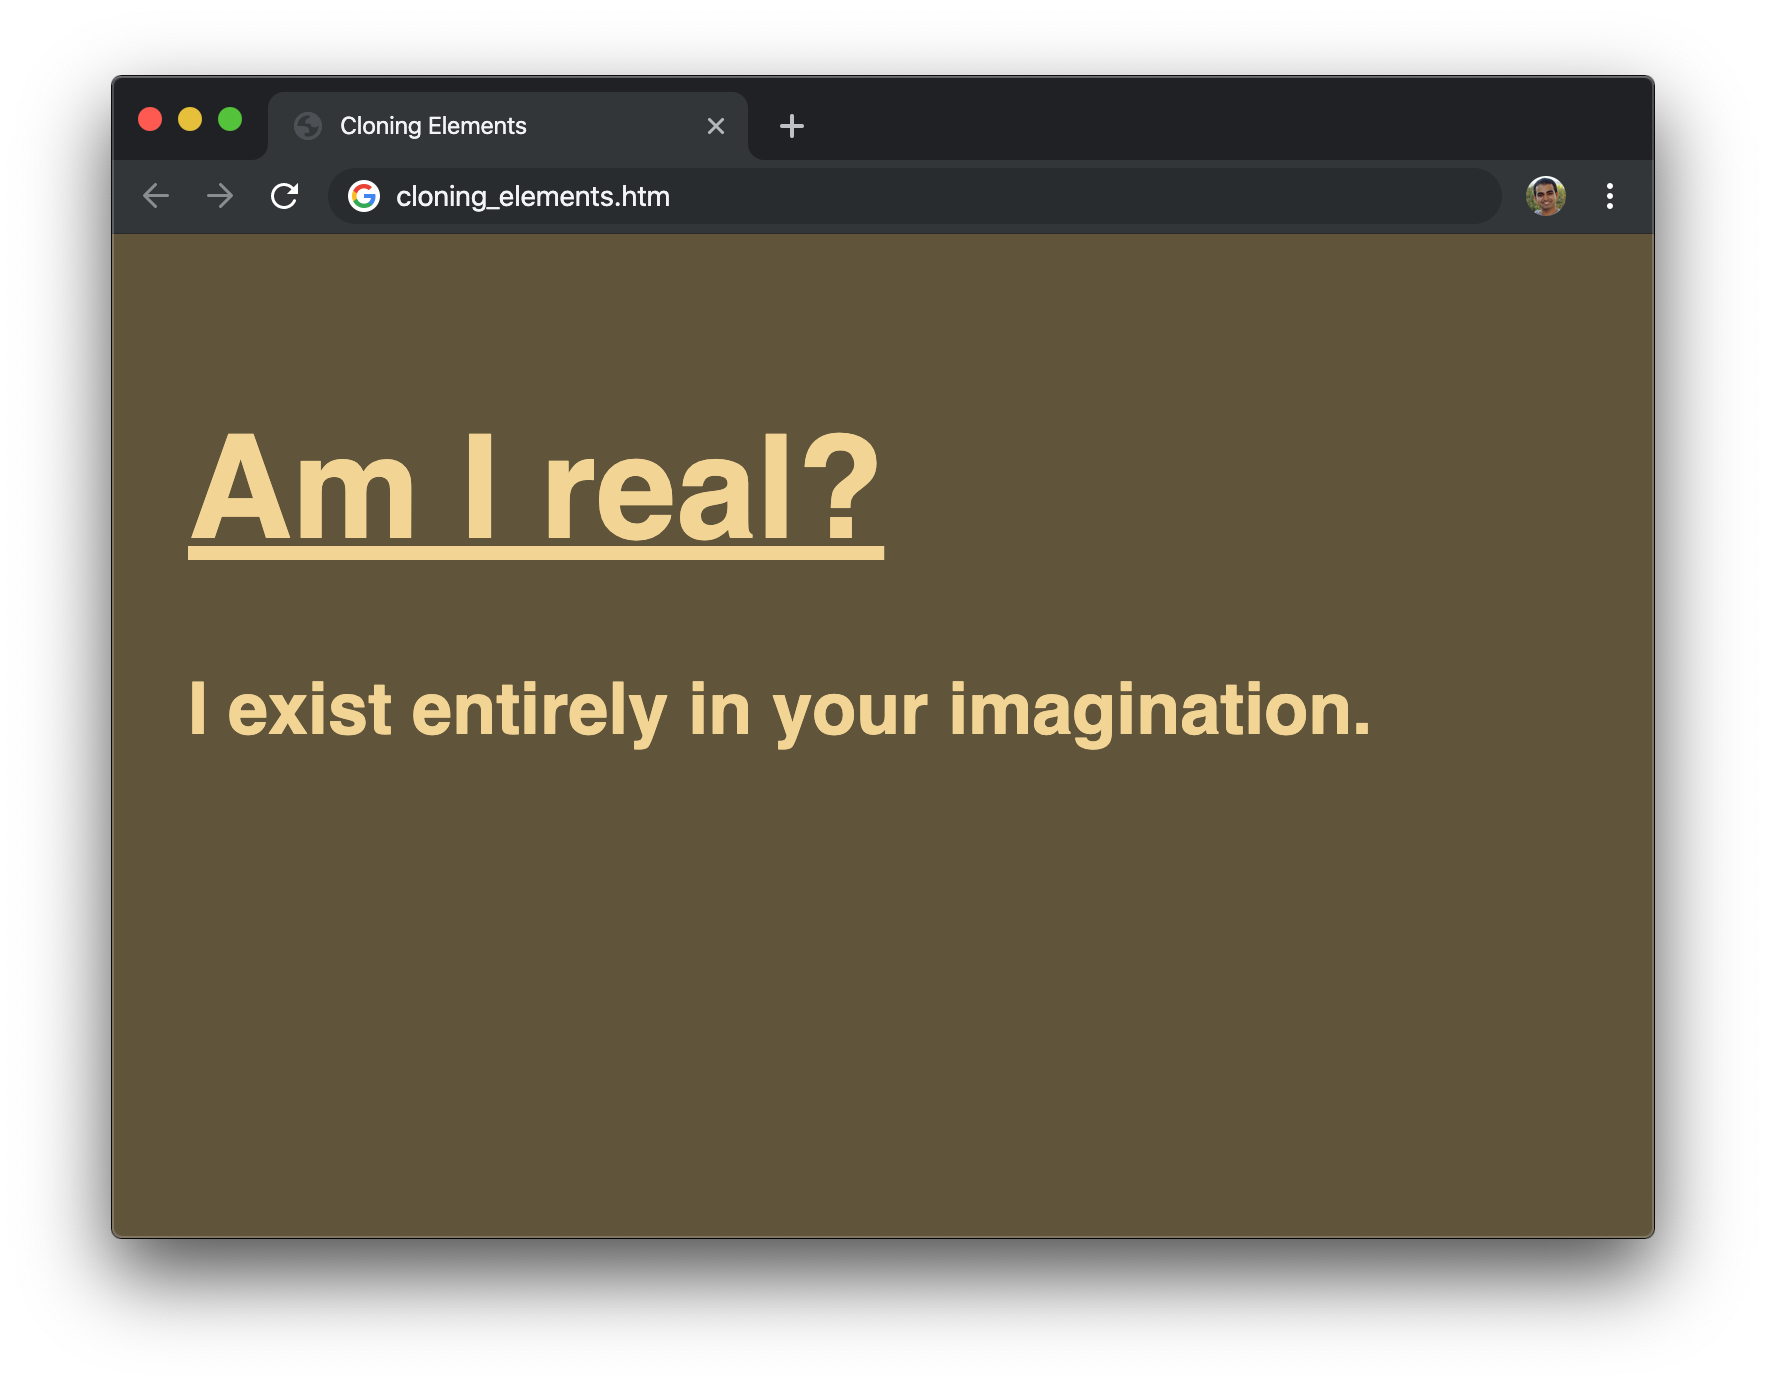
Save this file and preview it in your browser. If everything worked out, you should see something that resembles the following:
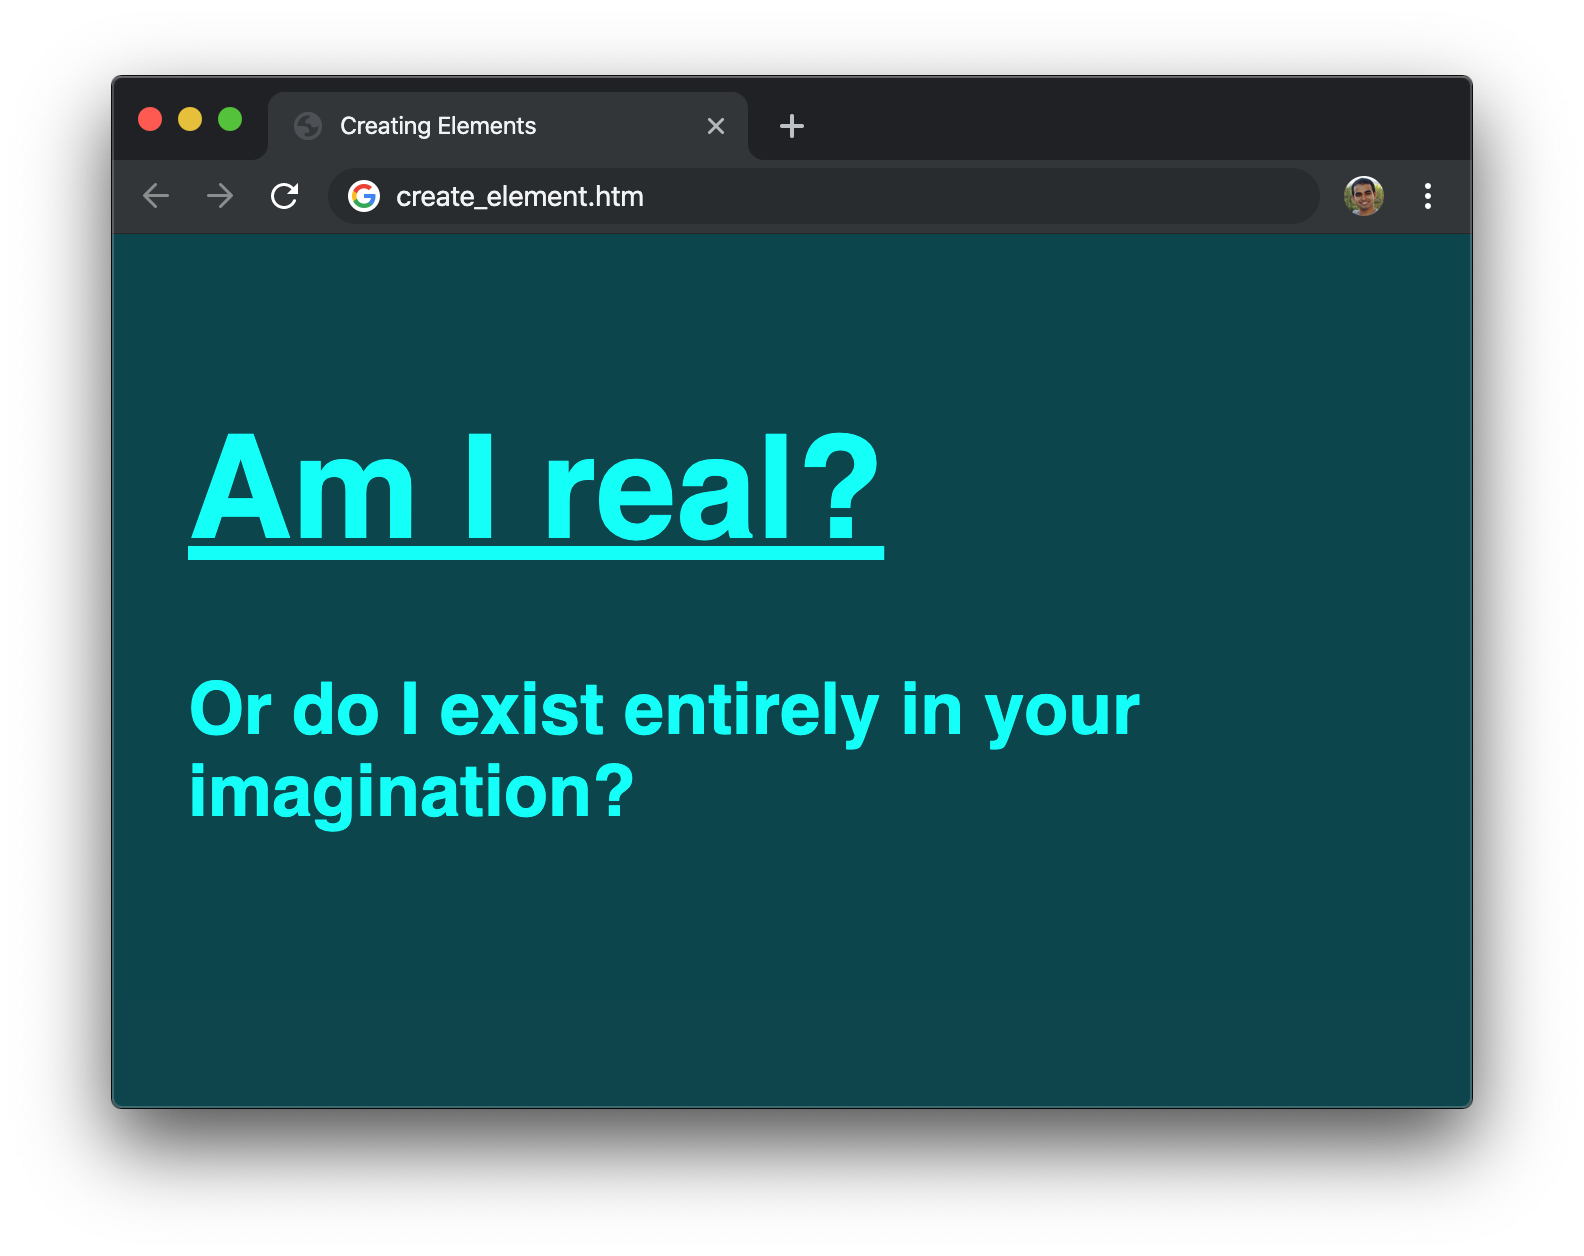
Now, we are going to take a step back and look at what exactly is going on in our example. If we look at our JavaScript, everything we need for creating an element and adding it to our DOM is located in-between the `script` tags:
```js
let newElement = document.createElement("p");
let bodyElement = document.querySelector("body");
newElement.textContent = "Or do I exist entirely in your imagination?";
bodyElement.appendChild(newElement);
```
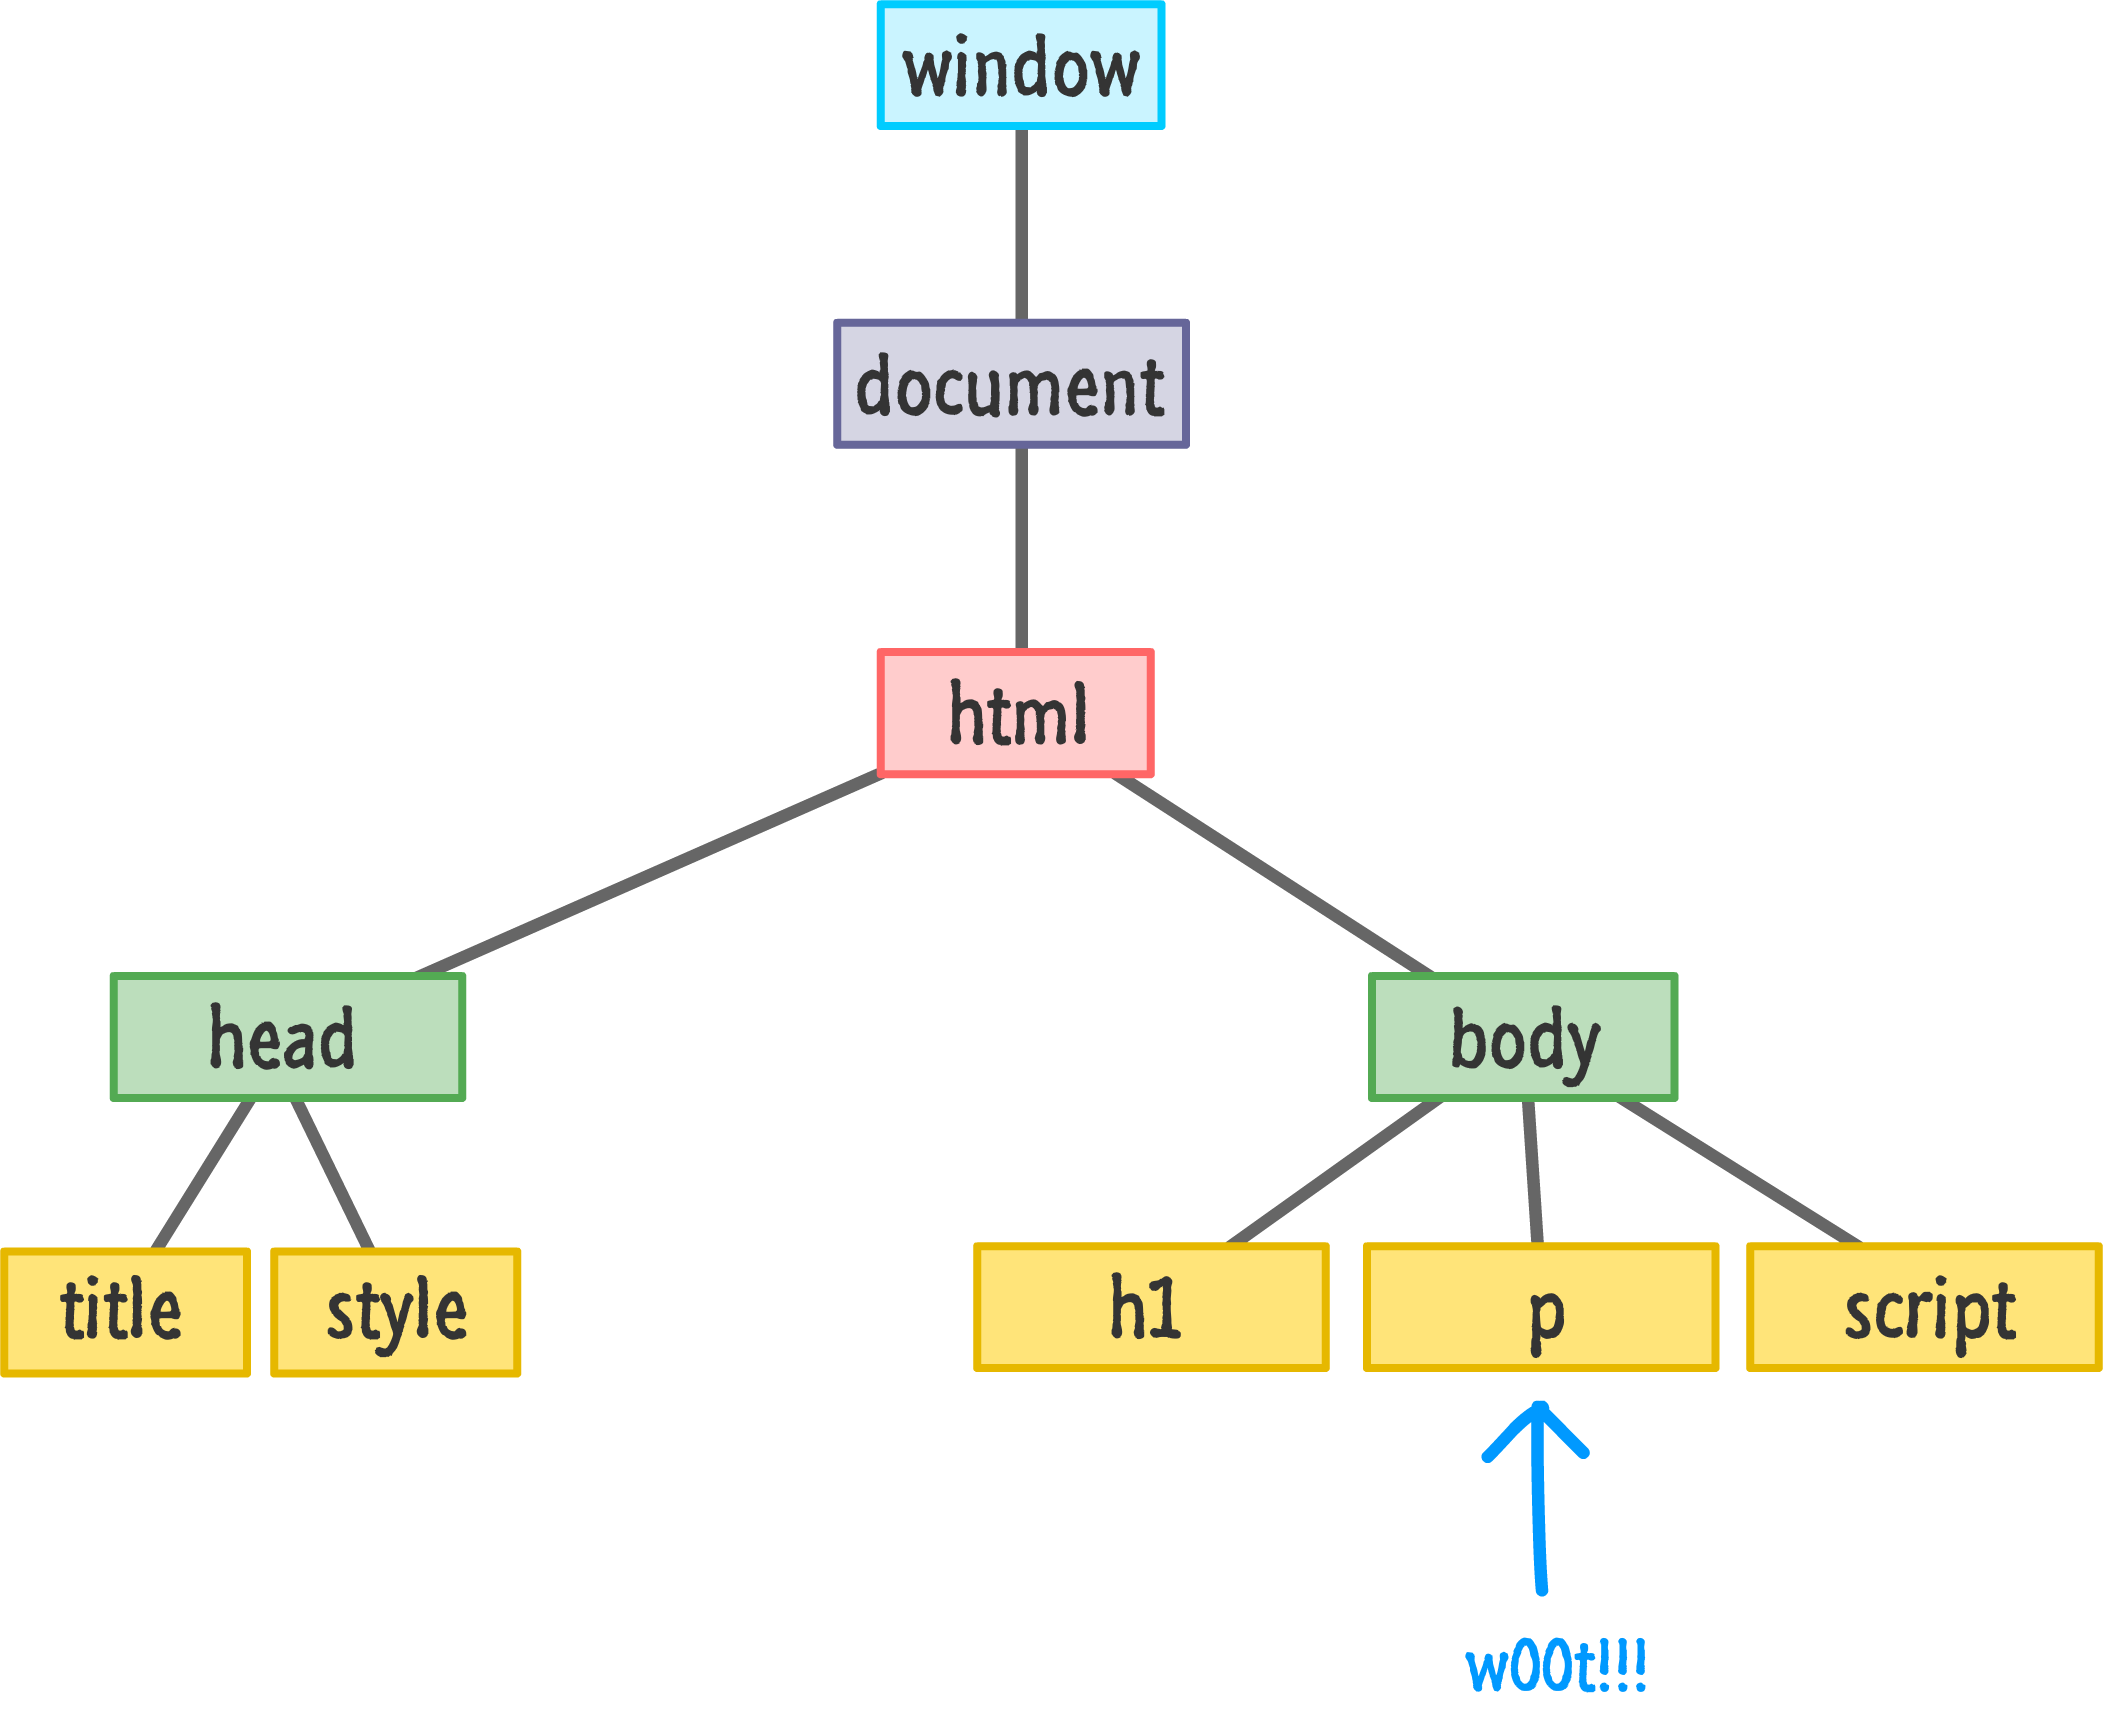
With `newElement`, we are storing a reference to our newly created `p` tag. With `bodyElement`, we are storing a reference to our `body` element. On our newly created element (`newElement`), we set the `textContent` property to what we ultimately end up displaying. The last thing we do is take our aimlessly floating `newElement` and parent it as a child of our `body` element by relying on good old `appendChild`.
Below is a visualization of what the DOM for our simple example looks like:
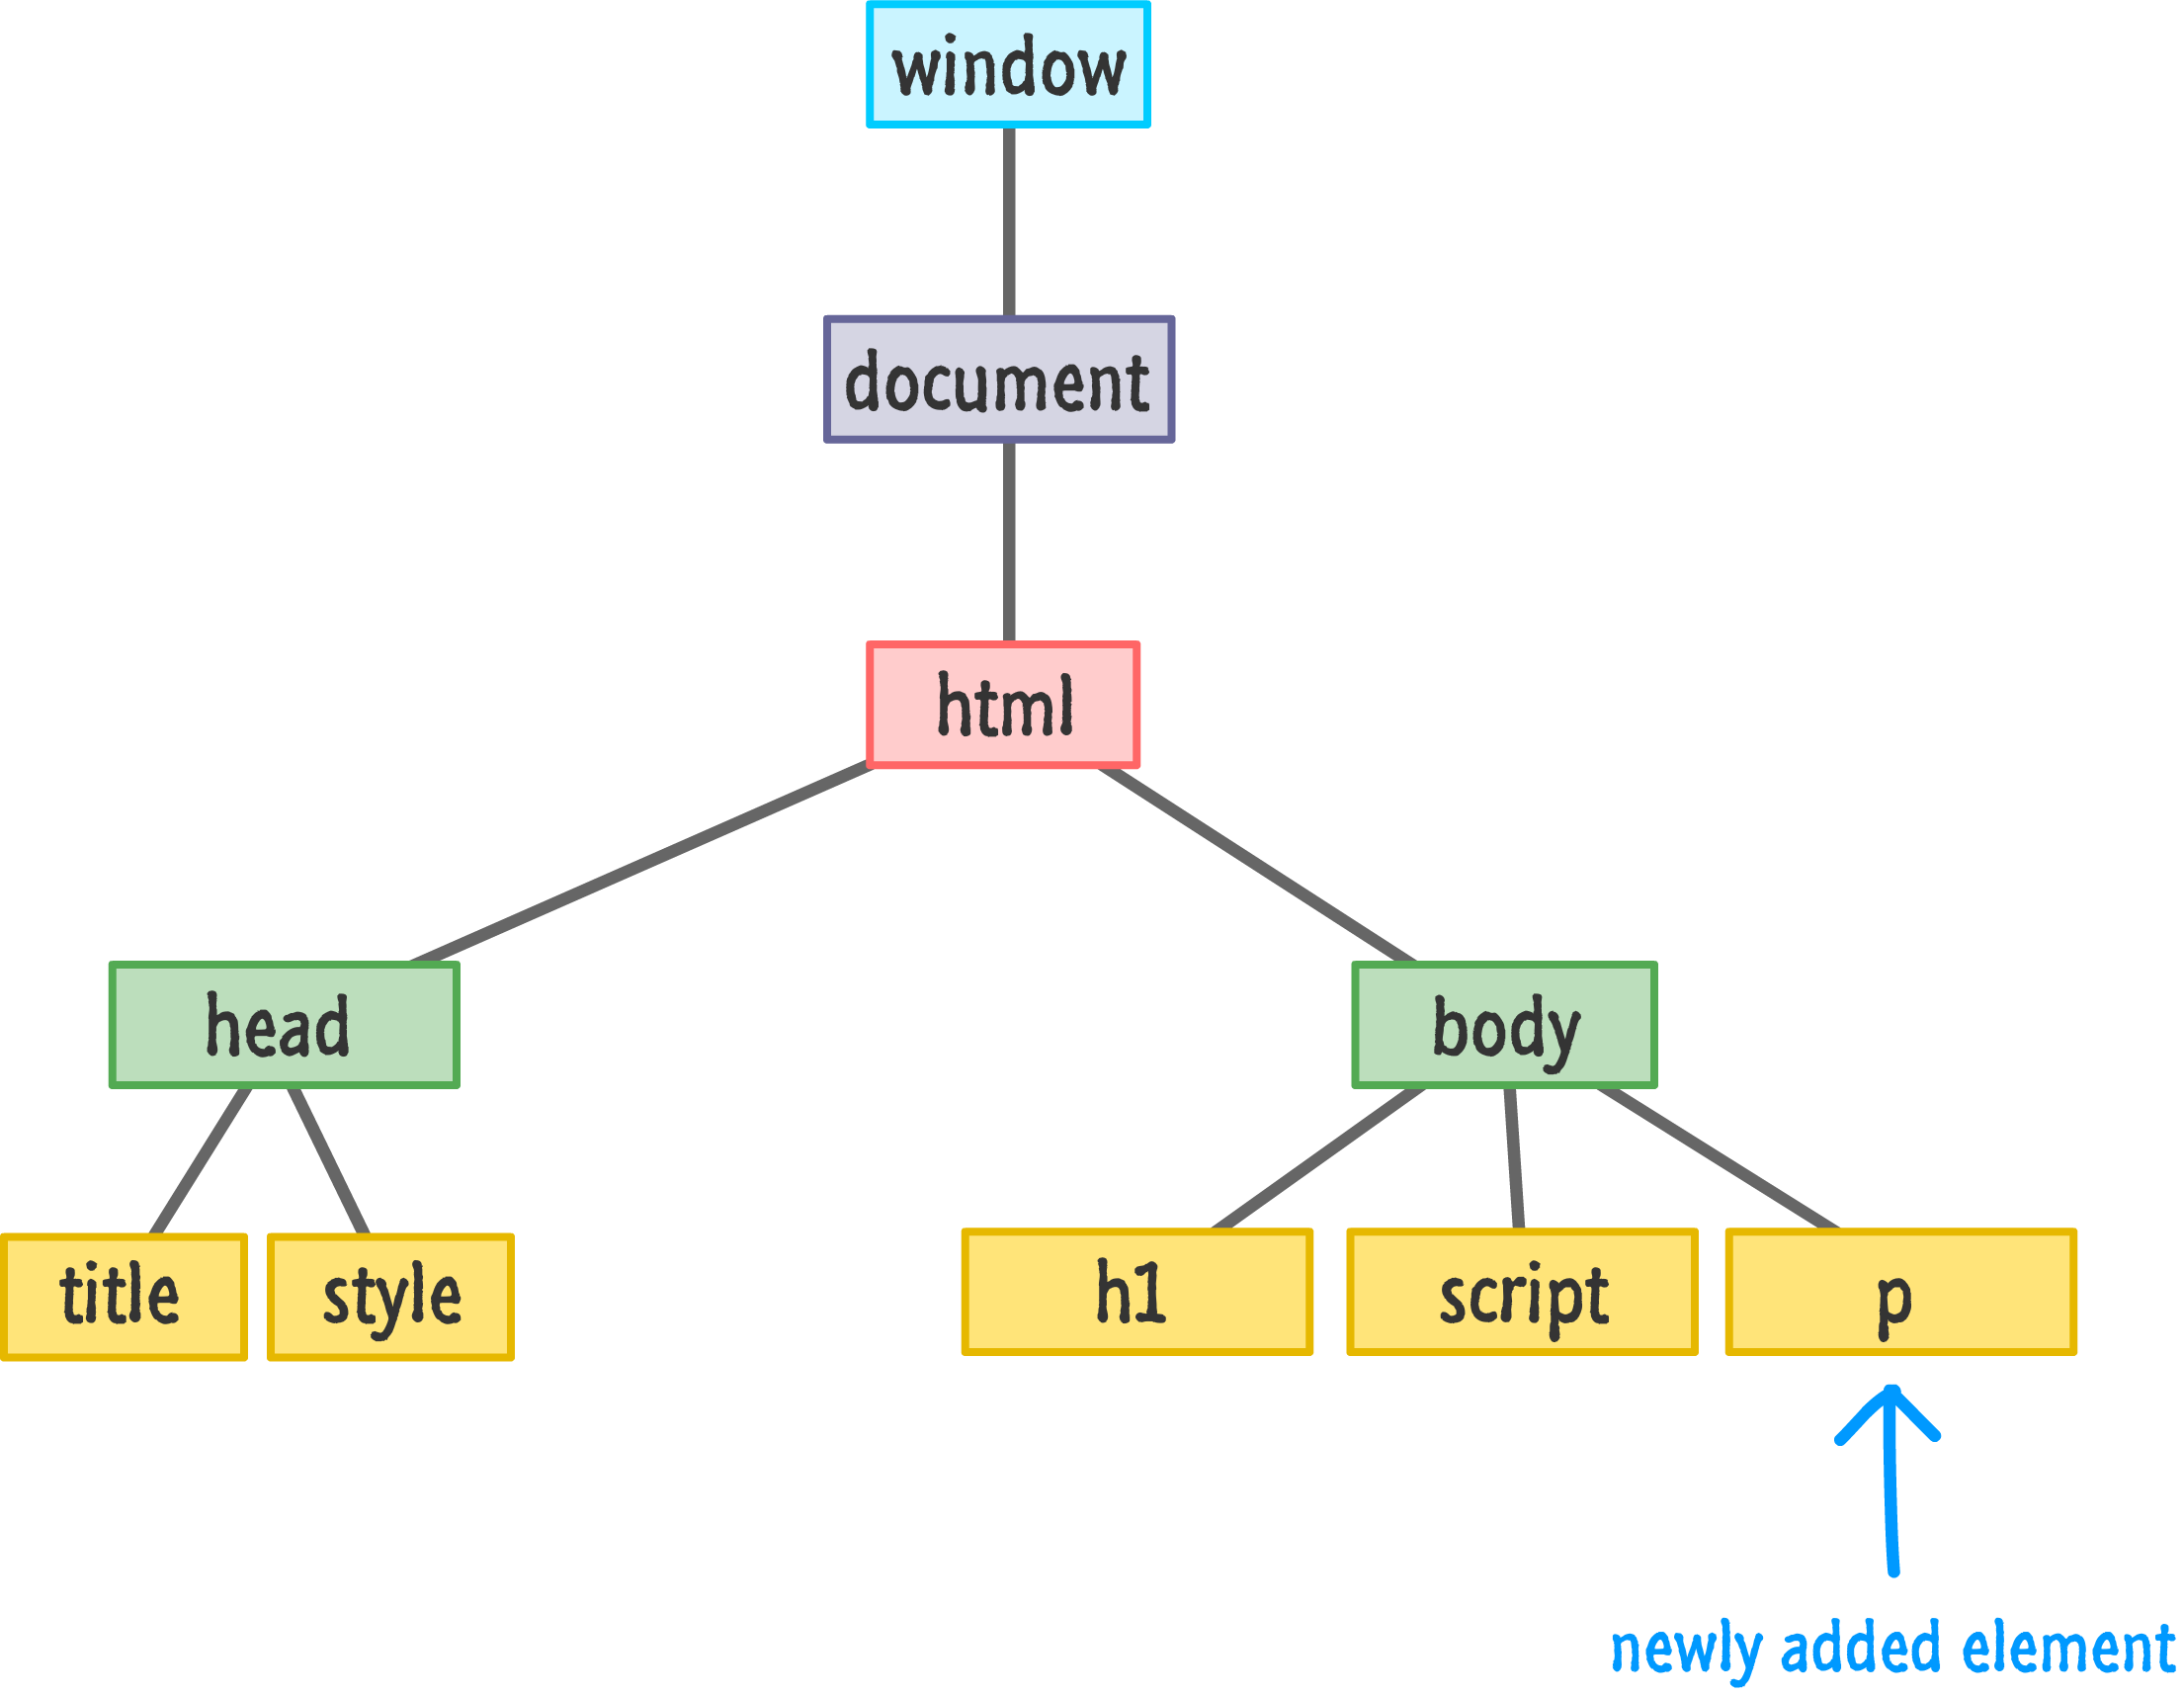
Now, a detail about the `appendChild` function is that it always adds the element to the end of whatever children a parent may have. In our case, our ` body` element already has the `h1` and `script` elements as its children. The `p` element gets appended after them as the youngest child. With that said, we do have control over the exact order where under a parent a particular element will live.
If we want to insert `newElement` directly after our `h1` tag, we can do so by calling the `insertBefore` function on the parent. The `insertBefore` function takes two arguments. The first argument is the element you want to insert. The second argument is a reference to the sibling (aka child of a parent) you want to precede. Here is our example modified to have our `newElement` live after our `h1` element (and before our `script` element):
```js
let newElement = document.createElement("p");
let bodyElement = document.querySelector("body");
let scriptElement = document.querySelector("script");
newElement.textContent = "I exist entirely in your imagination.";
bodyElement.insertBefore(newElement, scriptElement);
```
Notice that we call `insertBefore` on the `bodyElement` and specify that `newElement` should be inserted before our `script` element. Our DOM in this case would look as follows:
You might think that if there is an ` insertBefore` method, there must be an ` insertAfter` method as well. As it turns out, that isn't the case. There isn't a widely supported built-in way of inserting an element AFTER an element instead of before it. What we can do is trick the `insertBefore` function by telling it to insert an element **an extra element ahead**. That probably makes no sense, so let me show you the code first and explain later:
```js
let newElement = document.createElement("p");
let bodyElement = document.querySelector("body");
let h1Element = document.querySelector("h1");
newElement.textContent = "I exist entirely in your imagination.";
bodyElement.insertBefore(newElement, h1Element.nextSibling);
```
Pay attention to the highlighted lines, and then take a look at the following diagram that illustrates what is happening before our code runs and after our code runs:
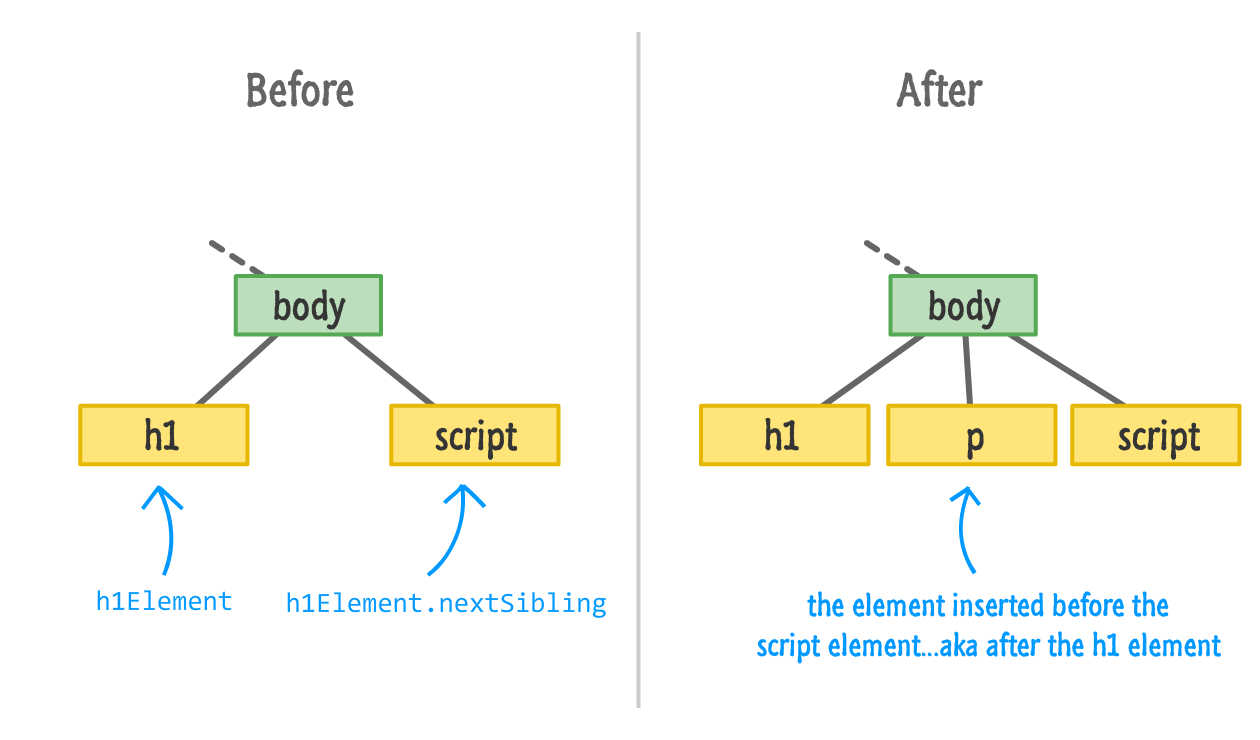
The `h1Element.nextSibling` call finds the `script` element. Inserting our `newElement` before our `script` element accomplishes our goal of inserting our element after the `h1` element. What if there is no sibling element to target? Well, the `insertBefore` function in that case is pretty clever and just appends the element you want to the end automatically.
#### Handy Dandy Function
If for some reason you find yourself wanting to insert elements after another sibling all the time, then you may want to use this function to simplify your life a bit:
```js
function insertAfter(newNode, referenceNode) {
referenceNode.parentNode.insertBefore(newNode, referenceNode.nextSibling);
}
```
In this function, `newNode` is the element you are adding and `referenceNode` is the existing DOM element you want to add the new element after.
You can even go all out and extend `HTMLElement` with this function to provide this functionality more conveniently to all your HTML elements. The [ Extending Built-in Objects Using JavaScript](https://www.kirupa.com/html5/extending_built_in_objects_javascript.htm) tutorial covers how to do something like that in greater detail. Note that extending your DOM is frowned upon by some people, so make sure to have some witty banter on the ready to lighten the mood if you ever are accosted by these "some people".
A more generic way of adding children to a parent is by realizing that parent elements treat children like entries in an array. To access this array of children, we have the `children` and `childNodes` properties. The `children` property only returns HTML elements, and the `childNodes` property returns the more generic nodes that represent a lot of things that we don't care about. Yes, I realize I am repeating myself, and you can check out the [ Traversing the DOM](https://www.kirupa.com/html5/traversing_the_dom.htm) tutorial for more details on more ways you have for pinpointing an element.
### Removing Elements
I think somebody smart once said the following: **That which has the ability to create, also has the ability to remove**. In the previous section, we saw how we can use the `createElement` method to create an element. In this section, we are going to look at `removeChild` which, given its slightly unsavory name, is all about removing elements.
Take a look at the following snippet of code that can be made to work with the example we have been looking at for some time:
```js
let newElement = document.createElement("p");
let bodyElement = document.querySelector("body");
let h1Element = document.querySelector("h1");
newElement.textContent = "I exist entirely in your imagination.";
bodyElement.appendChild(newElement);
bodyElement.removeChild(newElement);
```
The `p` element stored by `newElement` is being added to our `body` element by the `appendChild` method. We saw that earlier. To remove this element, we call `removeChild` on the `body` element and pass in a pointer to the element we wish to remove. That element is, of course, `newElement`. Once `removeChild` has run, it will be as if your DOM never knew that `newElement` existed.
The main thing to note is that we need to call `removeChild` from the parent of the child we wish to remove. This method isn't going to traverse up and down our DOM trying to find the element we want to remove. Now, let's say that we don't have direct access to an element's parent and don't want to waste time finding it. We can still remove that element very easily by using the `parentNode` property as follows:
```js
let newElement = document.createElement("p");
let bodyElement = document.querySelector("body");
let h1Element = document.querySelector("h1");
newElement.textContent = "I exist entirely in your imagination.";
bodyElement.appendChild(newElement);
newElement.parentNode.removeChild(newElement);
```
In this variation, we remove `newElement` by calling `removeChild` on its parent by specifying `newElement.parentNode`. This looks roundabout, but it gets the job done.
Now, there is a newer, shinier, and better way to remove an element. In this way, we just call the`remove` method on the element we wish to remove directly. This example looks as follows:
```js
let newElement = document.createElement("p");
let bodyElement = document.querySelector("body");
let h1Element = document.querySelector("h1");
newElement.textContent = "I exist entirely in your imagination.";
bodyElement.appendChild(newElement);
newElement.remove();
```
Now, why am I not beginning and ending this conversation around removing elements with the `remove` method? It has to do with browser support. This approach is still fairly new, so older browsers like Internet Explorer don't have support for it. If supporting Internet Explorer is important for you, then the other approaches we've looked at will work will.
If you are looking for a universally accepted approach for removing elements, despite some minor quirks, the `removeChild` function is quite merciless in its efficiency. If you want something direct, `remove` is your friend. Both of these approaches have the ability to remove any DOM element - including ones that were created in markup originally. We aren't limited to removing DOM elements we dynamically added. If the DOM element we are removing has many levels of children and grandchildren, all of them will be removed as well.
## Cloning Elements
This tutorial just keeps taking a turn for the weirder-er the further we go into it, but fortunately we are at the last section. The one remaining DOM manipulation technique we need to be aware of is one that revolves around cloning elements where we start with one element and create identical replicas of it:

The way we clone an element is by calling the ` cloneNode` function on the element we wish to clone along with providing a **true** or **false** argument to specify whether we want to clone just the element or the element and all of its children. Here is what the snippet of code for cloning an element (and adding it to the DOM) will look like:
```js
let bodyElement = document.querySelector(body);
let item = document.querySelector(".myItem");
let clonedItem = item.cloneNode(false);
// add cloned element to the DOM
bodyElement.appenChild(clonedItem);
```
Once our cloned elements have been added to the DOM, we can then use all the tricks we've learned to modify them. Cloning elements is such an important thing for us to get familiar with, let's go beyond this snippet and look at a fuller example:
```html
Cloning Elements
Am I real?
I exist entirely in your imagination.
```
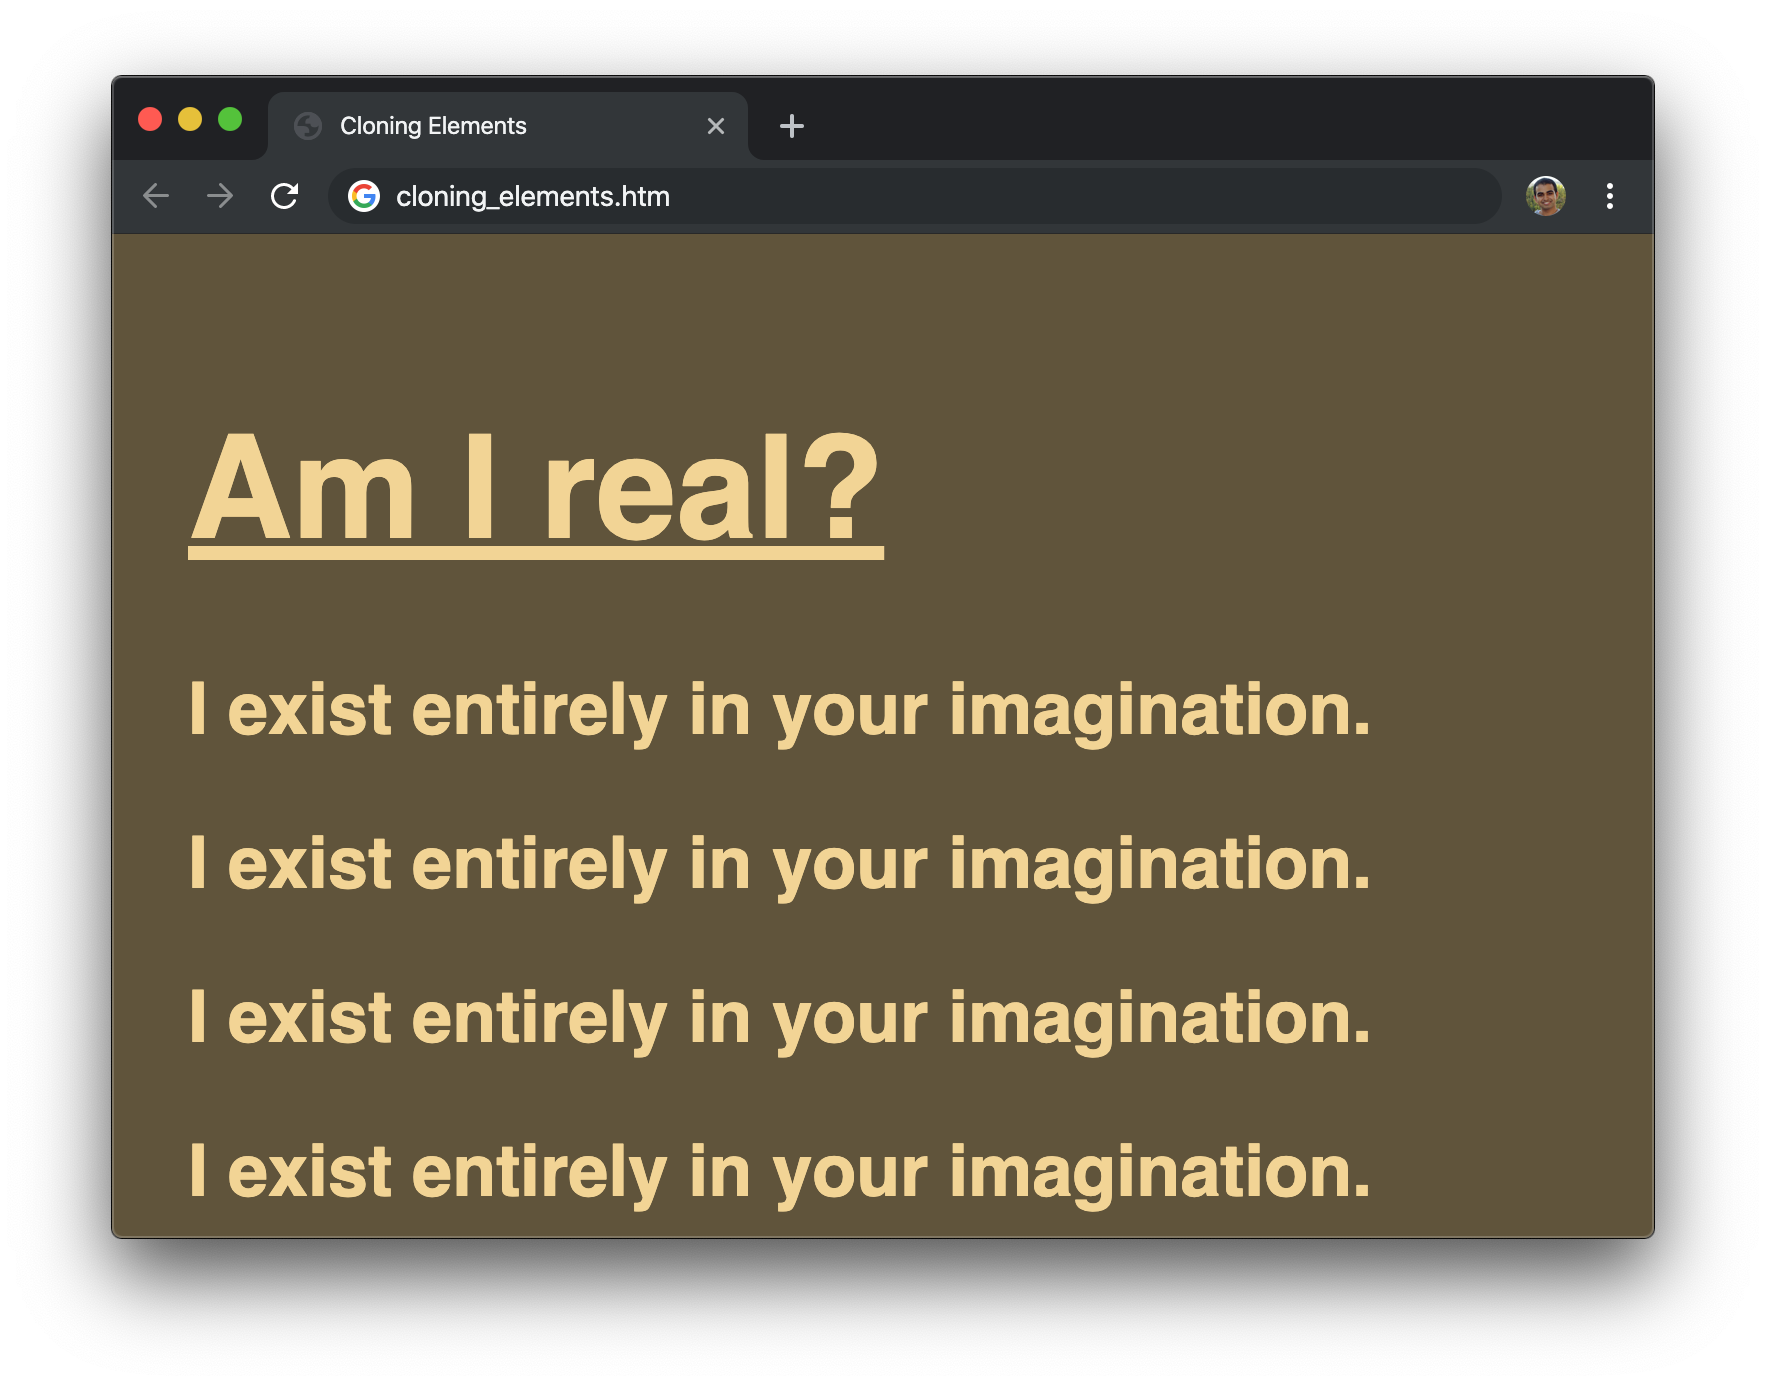
If you put all of this code into a HTML document and preview it in your browser, you'll see something that resembles our earlier example:
After a few seconds, though, you'll notice that this example is quite a bit different. The message keeps duplicating:
The secret to what is going on here lies in our code. Let's jump back to the code inside the `script` tags and take a moment to understand what is going on:
```js
let bodyElement = document.querySelector("body");
let textElement = document.querySelector(".message");
```
At the top, we have our `bodyElement` variable that references the `body` element in our HTML. Similarly, we have our `textElement` variable that references our `p` element with a class value of **message**. Nothing too special here.
Now, here is where things get a little interesting. We have our `setInterval` timer function that calls the `sayWhat` function every 1000 milliseconds (1 second):
```js
setInterval(sayWhat, 1000);
```
It is inside this `sayWhat` function where the actual cloning takes place:
```js
function sayWhat() {
let clonedText = textElement.cloneNode(true);
bodyElement.appendChild(clonedText);
}
```
We call `cloneNode` on our `textElement`. The result of us doing this is that a copy of our `textElement` is now created and stored as part of the `clonedText` variable. The last step is for us to add our newly cloned element to the DOM so that it shows up. Thanks to our `setInterval`, all of the code under `sayWhat` repeats to keep adding our cloned element to the page.
One thing you may have noticed is that what we are cloning is the following paragraph element:
```html
I exist entirely in your imagination.
```
What we specified in our code is the following:
```js
let clonedText = textElement.cloneNode(true);
```
We are calling `cloneNode` with the **true** flag to indicate we want to clone all of the children as well. Why? Our paragraph element doesn't seem to have any children, right? Well...this is where the distinction between *elements* and *nodes* comes into play. Our paragraph tag doesn't have any child *elements*, but the text wrapped by the `p` tag is a child *node*. This detail is important to keep in mind when you find yourself cloning something and finding that you don't exactly get what you want when you specify that children shouldn't get cloned.
## Conclusion
If there is anything you walk away from after reading all this, I hope you walk away with the knowledge that our DOM is something you can touch and extensively modify. We sort of talked about how everything in the DOM can be altered earlier, but it is here where we saw first-hand the depth and breadth of the alterations we can easily make using methods like `createElement`, `removeElement`, `remove`, and `cloneNode`.
With everything you've learned here, there is nothing preventing you from starting off with a completely empty page and using just a few lines of JavaScript to populate everything inside it:
```html
Look what I did, ma!
```
Just because you can do something like this doesn't mean you always should. The main problem with dynamically creating content is that search engines, screen readers, and other accessibility tools often have difficulty knowing what to do. They are more familiar with content specified in markup than they are with things created using JavaScript. Just be aware of that limitation if you ever decide to get over-enthusiastic with dynamically modifying your DOM.
#### Test Your Knowledge
Reading and passively following along will only teach you so much. You will learn the most by writing some code yourself. To test your knowledge around creating DOM elements, take the [Dynamically Create and Populate List Items](https://www.kirupa.com/html5/dynamically_create_populate_list.htm) challenge. It's a fun one!