# Animating Many Things on a Canvas
by [kirupa](https://www.kirupa.com/me/index.htm) | 16 March 2016
In the [ Creating a Simple HTML5 Canvas Animation](https://www.kirupa.com/html5/creating_simple_html5_canvas_animation.htm) tutorial (say that five times fast!), you learned all about drawing and animating something using the HTML `canvas` element. More specifically, you learned all about how to draw and animate a **single element**. Now, there is nothing wrong with that. Not every animation needs to have a lot going on, but you are definitely missing out on the whole canvas experience by not going a little crazy and animating a lot of things.
Take the following animation as an example:
Your browser does not support inline frames or is currently configured not to display inline frames.
In this example, you have not one, not two, but a hundred blue circles happily moving around to create the final animation that you see.
Knowing how to create animations involving many thing is an important skill for you to learn, for a lot of really cool visualizations revolve around making a lot of things animate in interesting ways. The way you are going to learn all of this is by deconstructing and breaking apart the animated blue circles example you see above.
Onwards!
#### Pre-requisite Reading
If this is your first foray into creating animations on the canvas, I strongly urge you to read the [ Creating a Simple HTML5 Canvas Animation](https://www.kirupa.com/html5/creating_simple_html5_canvas_animation.htm) and [ DOM vs. Canvas](https://www.kirupa.com/html5/dom_vs_canvas.htm) tutorials first. This deconstruction will assume you are very familiar with the basics covered there. If you've never worked with or created objects using JavaScript, you may want to brush up on my [ Objects and Classes](https://www.kirupa.com/html5/objects_classes_javascript.htm) tutorial as well.
With all that said, let's get started.
## Deconstructing the Example
Just like you can't break that which doesn't exist, you can't really have a deconstruction without an already-constructed example. Like I mentioned earlier, we are going to deconstruct the blue circles animation you see above. The full HTML, CSS, and JavaScript that makes up this example looks as follows:
```js
A Whole Lotta' Circles!
```
Take a few moments, read through the code, and try to understand what is going on. If you really want to get some Schrute Bucks, open [ this example](https://www.kirupa.com/html5/examples/circles_moving_circular_path2.html) (in a new browser tab) in your favorite browser debugging tool, set some breakpoints, and step through the main sections line by line. That's how real ninjas try to understand what is going on.
Once you are done looking at the code and/or imagining a sweet life as a ninja or looking up what a Schrute Buck is, let's walk through all of this code together and understand what is going on.
### Defining the Canvas
Let's start with the easy part - defining your `canvas` element that will display our animation. For this, you have to look at our HTML:
```
```
Our `canvas` element has an **id** value of **myCanvas**, and its **width** and height **attributes** are set to 500. This results in your canvas being a square with each edge being 500 pixels. Remember, you can't set the width and height of your canvas in CSS. Doing so will result in everything inside your canvas getting all stretched and looking weird. You have to specify the width and height inline on the canvas element like I've done.
Now, despite the special treatment for width and height, this doesn't mean that other CSS styling-related stuff can't be attached to the canvas. In our `style` block, I have a style rule defined to give our canvas a dotted border:
```
#myCanvas {
border: 1px #CCC solid;
}
```
At this point, if you were to take a snapshot of what this page would look like, here is what you would see:
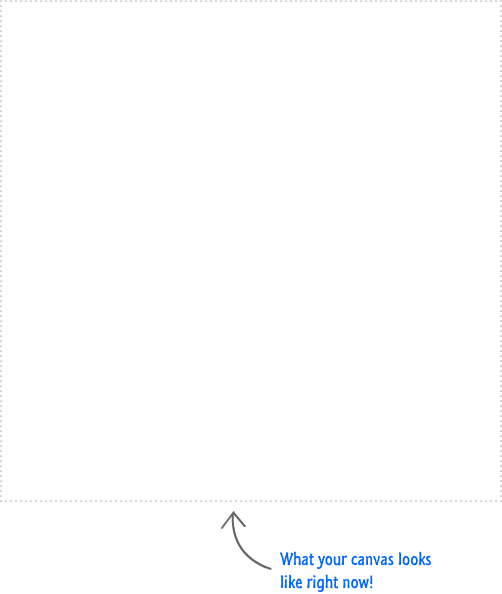
That's right. You would see nothing...except for the dotted border. The reason is that your `canvas`-based animation only knows one game, and that game is JavaScript. In the next few sections, we'll walk through the JavaScript and see how the lines of code result in some beautiful (totally hot!) blue circles animating around on the screen.
### Overview of our Code
The bulk of what this animation does lives in JavaScript. Everything from drawing the circles to moving them around is handled entirely by our code which you can see below:
```
var mainCanvas = document.getElementById("myCanvas");
var mainContext = mainCanvas.getContext('2d');
var circles = [];
function Circle(radius, speed, width, xPos, yPos) {
this.radius = radius;
this.speed = speed;
this.width = width;
this.xPos = xPos;
this.yPos = yPos;
this.opacity = .05 + Math.random() * .5;
this.counter = 0;
var signHelper = Math.floor(Math.random() * 2);
if (signHelper == 1) {
this.sign = -1;
} else {
this.sign = 1;
}
}
Circle.prototype.update = function () {
this.counter += this.sign * this.speed;
mainContext.beginPath();
mainContext.arc(this.xPos + Math.cos(this.counter / 100) * this.radius,
this.yPos + Math.sin(this.counter / 100) * this.radius,
this.width,
0,
Math.PI * 2,
false);
mainContext.closePath();
mainContext.fillStyle = 'rgba(185, 211, 238,' + this.opacity + ')';
mainContext.fill();
};
function setupCircles() {
for (var i = 0; i < 100; i++) {
var randomX = Math.round(-200 + Math.random() * 700);
var randomY = Math.round(-200 + Math.random() * 700);
var speed = .2 + Math.random() * 3;
var size = 5 + Math.random() * 100;
var radius = 50 + Math.random() * 100;
var circle = new Circle(radius, speed, size, randomX, randomY);
circles.push(circle);
}
drawAndUpdate();
}
setupCircles();
function drawAndUpdate() {
mainContext.clearRect(0, 0, 500, 500);
for (var i = 0; i < circles.length; i++) {
var myCircle = circles[i];
myCircle.update();
}
requestAnimationFrame(drawAndUpdate);
}
```
Before diving into the code, let me first describe what the code does in a very hand wavy fashion so that you will be better prepared for the details that you will see shortly.
Like I mentioned earlier, all of the JavaScript you see is responsible for drawing and animating the circles into the `canvas`. Now, you may be wondering if it really takes that much code to do something like this. After all, if you compare the amount of code here to the amount of code you had when animating a single element in my [ Creating a Simple HTML5 Animation](https://www.kirupa.com/html5/creating_simple_html5_canvas_animation.htm) tutorial....there is a lot of code here:

The answer is "yes", and the reason for all of this extra code is because dealing with many elements requires a little more bookkeeping than what you saw when dealing with a single element.
What our code does can be broadly summarized in the following five steps:
1. Get a reference to our ` canvas` element so that we can draw and animate into it.
1. Create a `Circle` object whose purpose is to link the circle that you see to a circle that exists in memory that only your browser sees.
1. Create a whole lot of Circle objects - each with their own unique set of properties such as initial position, size, movement speed, and so on.
1. Update the position of each Circle as part of your `requestAnimationFrame` loop running.
1. Clear your entire canvas area to start all over again.
I am taking really broad brush strokes in describing what our code does and omitting important details. Don't worry! You'll see those details elaborated on shortly.
#### Referencing our Canvas Element
Let's go through our steps starting at the top. The first lines of our code allow us to gain access to our `canvas` element and its API via the context object:
```
var mainCanvas = document.querySelector("#myCanvas");
var mainContext = mainCanvas.getContext('2d');
```
The first line allows us to access our `canvas` element by using [ querySelector](https://www.kirupa.com/html5/finding_elements_dom_using_querySelector.htm) and passing in our canvas's id value - **myCanvas**. You can also use the older ` getElementById` function if you want.
Our `canvas` element by itself isn't particularly interesting for what we are trying to do. What makes it interesting are the APIs it provides for drawing into it. You access that API by calling `getContext` on it and passing in the argument for the 2d API we want to use.
#### Declaring an Array to Store our Circles
The next variable we declare and initialize is our `circles` array:
```
var circles = [];
```
As its name implies, this array will eventually be used to store all of the individual `Circle` objects we create.
And with this, we are done with declaring the variables that we will be using through this animation. This part always seems a bit disjointed since these variables only make sense in the context they are eventually used in, so stay on your toes for when these variables make a guest appearance in the subsequent sections.
#### The Circle Object
With the basic variable declarations out of the way, the next thing we'll look at is the function that defines our `Circle` object. The `Circle` object is important because it helps keep track of every circle that ends up getting drawn on the canvas.
Remember, your `canvas` has no memory. It will simply draw whatever you tell it to draw. When you clear everything away to start a new frame, whatever was drawn before is completely lost. What we need is basically our own version of a retained mode graph that creates a virtual representation of what we are planning on drawing. We sort of saw this in the [Structuring Your Drawing Code](https://www.kirupa.com/canvas/structuring_your_drawing_code.htm) tutorial earlier.
To borrow a graphic I used in the [ DOM vs. Canvas](https://www.kirupa.com/html5/dom_vs_canvas.htm) article, we are creating a very lightweight way of combining the immediate mode-ness of the canvas with some of the advantages a retained mode system provides:
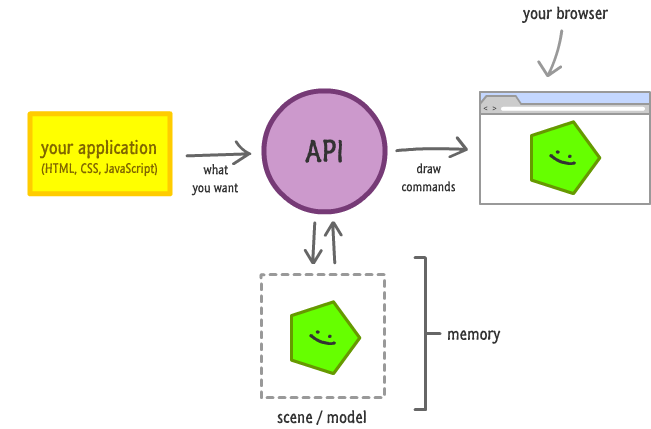
Our `Circle` object is an important part of this virtual representation since it contains all of the properties and methods you need in order to draw and animate the circle on each frame.
It is defined entirely by the appropriately named `Circle` function:
```
function Circle(radius, speed, width, xPos, yPos) {
this.radius = radius;
this.speed = speed;
this.width = width;
this.xPos = xPos;
this.yPos = yPos;
this.opacity = .05 + Math.random() * .5;
this.counter = 0;
var signHelper = Math.floor(Math.random() * 2);
if (signHelper == 1) {
this.sign = -1;
} else {
this.sign = 1;
}
}
```
This `Circle` function's primary job is to create little `Circle` objects that each contain the properties relevant to the circle that gets drawn on screen. As you can see, there really isn't much going on here except for a lot of properties that need to be declared and initialized on the `Circle` object itself.
To look at this in more detail, our `Circle` function takes five arguments. These arguments stand for the radius, speed, width, horizontal position, and vertical position - all important visual things that we will need when drawing our circle. These same five arguments are then made into properties unique to this object when you actually create it:
```
function Circle(radius, speed, width, xPos, yPos) {
this.radius = radius;
this.speed = speed;
this.width = width;
this.xPos = xPos;
this.yPos = yPos;
this.opacity = .05 + Math.random() * .5;
this.counter = 0;
var signHelper = Math.floor(Math.random() * 2);
if (signHelper == 1) {
this.sign = -1;
} else {
this.sign = 1;
}
}
```
Besides these arguments, a few more object properties we set are for the `counter` , ` opacity`, and `sign`. You'll see all of these properties used shortly...in the next section actually!
#### Creating our Circles
Finally! We get to see some action that ties together some of the random pieces of code you've seen so far. Jump on down a bit to the `setupCircles` function:
```
function setupCircles() {
for (var i = 0; i < 100; i++) {
var randomX = Math.round(-200 + Math.random() * 700);
var randomY = Math.round(-200 + Math.random() * 700);
var speed = .2 + Math.random() * 3;
var size = 5 + Math.random() * 100;
var circle = new Circle(100, speed, size, randomX, randomY);
circles.push(circle);
}
drawAndUpdate();
}
```
This code is responsible for creating each individual circle; giving each circle a random starting position, speed, and size; and calling the ` drawAndUpdate` function that will take all of these circles and start animating them. That's a lot of things these handful of lines do!
Let's look at creating each circle first. The following highlighted lines are responsible for defining all of the arguments and actually creating a ` Circle` object:
```
function setupCircles() {
for (var i = 0; i < 100; i++) {
var randomX = Math.round(-200 + Math.random() * 700);
var randomY = Math.round(-200 + Math.random() * 700);
var speed = .2 + Math.random() * 3;
var size = 5 + Math.random() * 100;
var circle = new Circle(100, speed, size, randomX, randomY);
circles.push(circle);
}
drawAndUpdate();
}
```
The bulk of this code lives inside a `for` loop:
```
for (var i = 0; i < 100; i++) {
.
.
.
}
```
Each time this loop gets called, a new ` Circle` object is created. Given the range of this particular loop, we will be creating 100 circles because all of this code will get executed 100 times.
Next up are the various variables that define the arguments we will be passing in as part of creating our `Circle` object:
```
var randomX = Math.round(-200 + Math.random() * 700);
var randomY = Math.round(-200 + Math.random() * 700);
var speed = .2 + Math.random() * 3;
var size = 5 + Math.random() * 100;
var radius = 50 + Math.random() * 100;
```
The `randomX` and `randomY` variables help determine where on your canvas the circle's initial position will be. Our canvas's size is a square of 500 pixels by 500 pixels, and we want to give 200 pixels extra all around to give our circles some ability to live outside the box - literally!
The next three lines define how fast our circle will move, its size, and its radius:
```
var speed = .2 + Math.random() * 3;
var size = 5 + Math.random() * 100;
var radius = 50 + Math.random() * 100;
```
Once you have all of these values, all that is really left is to create our `Circle` object. This is handled by the following line:
```
var circle = new Circle(radius, speed, size, randomX, randomY);
```
The way you create an object is by calling the object's constructor/function and using the ` new` keyword. That's exactly what we have done here, and as part of creating our objects, we pass in the arguments you spent the previous lines defining.
At the end of this, you have a brand new ` Circle` object:
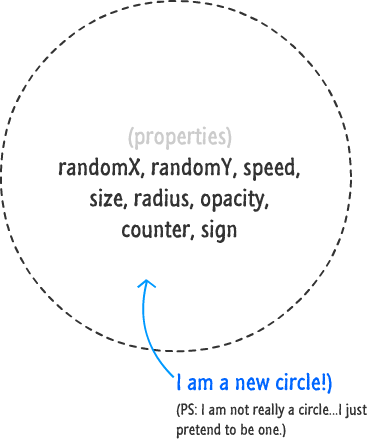
Once our `Circle` object is created, it gets stored in our `circle` variable. Immediately after that, we add this circle to the `circles` array that we created much earlier:
```
circles.push(circle);
```
At the end of the loop, our `circles` array will contain a reference to every `Circle` object we have created:
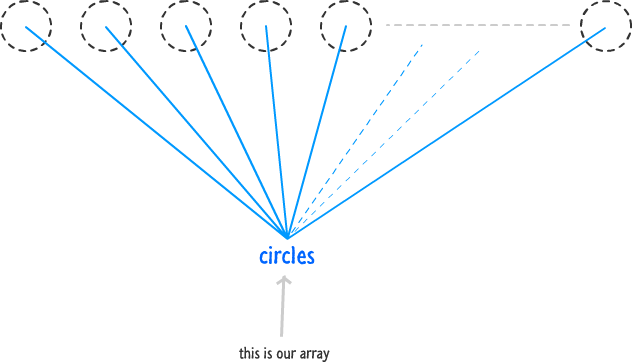
This is important because this array and its contents are the only link between the circles we want and what you see drawn on the screen. This is the light-weight retained mode graph I was referring to actually coming to life.
The final thing we do after all of our circles have been created is call the `drawAndUpdate` function:
```
drawAndUpdate();
```
This function, as its name implies, is responsible for taking our `circles` array, drawing each circle onto the screen, and rapidly updating them to create the animation that you eventually see. We'll look at this function next.
#### Drawing and Updating the Circles
At this point, we just finished creating our `Circle` objects and storing them in our `circles` array. The next stage is to look at our `drawAndUpdate` function...a function that you just heard about:
```
function drawAndUpdate() {
mainContext.clearRect(0, 0, 500, 500);
for (var i = 0; i < circles.length; i++) {
var myCircle = circles[i];
myCircle.update();
}
requestAnimationFrame(drawAndUpdate);
}
```
The `drawAndUpdate` function seems pretty simple, but it is actually awesome...and dangerous. At a high level, it is responsible for taking these `Circle` objects and their properties and turning them into the lovable blue circles that you see on your screen. More specifically, it does the following three things:
1. Clears your entire canvas drawing area to make room for a new frame.
1. Goes through each `Circle` object in the `circles` array and calls the `update` function on it. (We'll look at the `update` function shortly, so don't be worried if you haven't heard of it yet.)
1. Defines itself as your ` requestAnimationFrame` callback to create our animation loop.
Let's look at how these three things are mapped to our code. The first thing I do is clear our canvas so that new things can be drawn:
```
mainContext.clearRect(0, 0, 500, 500);
```
In case you are wondering why, the reason is that there is no concept of moving something around the `canvas` like you may see when moving DOM elements around. You have to explicitly clear all of your contents before drawing new things. Otherwise, you'll just be drawing on top of existing content...and that will look pretty bad.
After you clear your canvas, everything is set to draw your circles in a slightly new location. That needs to be done on each circle, so we use a ` for` loop and to take care of that:
```
for (var i = 0; i < circles.length; i++) {
var myCircle = circles[i];
myCircle.update();
}
```
This loop runs through every single element found in the `circles` array, and that element is our lovable `Circle` object. We just retrieve the `Circle` object and call the `update` function on it. Keep this function's memory under your hat, for we will look at in just a few moments.
The last thing our `drawAndUpdate` function does is ensure it calls itself:
```
requestAnimationFrame(drawAndUpdate);
```
To be less modest, this function hitches itself to the `requestAnimationFrame` bandwagon and ensures it gets called around 60 times every second...whether you like it or not.
#### Drawing and Updating the Circles (Part II)
We are almost nearing the end. The one last thing to mention about the `drawAndUpdate` function is that it probably doesn't live up to its hype. All it really did was clear your `canvas`, call the `update` function on every single circle, and then just call itself again. A highly trained cat could probably do that. If you were looking for closure, that function certainly wasn't going to provide it.
The big missing piece is really on how each circle gets drawn and displayed on the screen. That is handled by the mysterious `update` function that you saw mentioned earlier. This function looks as follows:
```
Circle.prototype.update = function () {
this.counter += this.sign * this.speed;
mainContext.beginPath();
mainContext.arc(this.xPos + Math.cos(this.counter / 100) * this.radius,
this.yPos + Math.sin(this.counter / 100) * this.radius,
this.width,
0,
Math.PI * 2,
false);
mainContext.closePath();
mainContext.fillStyle = 'rgba(185, 211, 238,' + this.opacity + ')';
mainContext.fill();
};
```
The first thing to note is that this function looks a little weird:
```
Circle.prototype.update = function () {
```
The reason is that this function is actually a prototype living on the Circle object. Discussing prototypes and why this function isn't just nested inside our constructor goes beyond the bounds of this tutorial (but well within the bounds of the [ one I listed as a pre-requisite](https://www.kirupa.com/html5/objects_classes_javascript.htm) earlier :P), but just know that every `Circle` object you create has the ability to call this `update` method. The properties and values your update method inherits and uses as part of its job are based on the particular `Circle` object that called it. That's all you need to know.
Inside this prototype, we start using the properties that you defined in the `Circle` function and populated with values in the `setupCircles` function. We start with the `counter` property:
```
this.counter += this.sign * this.speed;
```
The value of the `counter` property is being incremented by the product of the ` speed` and the `sign` properties. You can see the role the `sign` property plays more clearly here. If the value of `sign` is negative, your `counter` variable is decreasing. If it is positive, your counter variable increases!
The most important takeaway is this: **each time your ** `**update**`** function gets called and this code runs, your counter variable's value changes.** This value is what determines the position of your circle, so a smooth increase on decrease in this value will directly correlate to a smooth change in our circle's position. You'll see where next:
The next handful of lines help draw your circle:
```
mainContext.beginPath();
mainContext.arc(this.xPos + Math.cos(this.counter / 100) * this.radius,
this.yPos + Math.sin(this.counter / 100) * this.radius,
this.width,
0,
Math.PI * 2,
false);
mainContext.closePath();
```
The first and last line tell your context object to start drawing a path and to close the path you've drawn respectively. The real magic happens in the middle where the circle is being drawn. For details on how to draw a circle, check out the [ Drawing Circles on a Canvas](https://www.kirupa.com/html5/drawing_circles_canvas.htm) tutorial.
The main thing is to note how the `yPos`, `radius`, `counter`, and `width` properties play a role in making your circle work. Of these properties, your `counter` value is the one that changes each time the `update` function is called:
```
mainContext.beginPath();
mainContext.arc(this.xPos + Math.cos(this.counter / 100) * this.radius,
this.yPos + Math.sin(this.counter / 100) * this.radius,
this.width,
0,
Math.PI * 2,
false);
mainContext.closePath();
```
Notice how the `counter` variable is prominently used in setting your circle's horizontal and vertical drawing locations. This is the magic line that makes our animation work. Everything you've seen revolves around making this line happen.
The last thing we are going to do, before calling it a night, is specify the color and opacity of the circle. This is accomplished by the following two lines:
```
mainContext.fillStyle = 'rgba(185, 211, 238,' + this.opacity + ')';
mainContext.fill();
```
The `fillStyle` property on our context object specifies the RGBa (red, green, blue, alpha) values that make our circle look as blue as it does. You can learn more about RGBa values in the [ Reading RGB / aRGB Values](https://www.kirupa.com/hodgepodge/reading_argb_rgb_color_values.htm) tutorial. Once you have specified your colors, you actually apply it by calling the `fill` method on your context object.
At the end of this, your `drawAndUpdate` function gets called all over again. In fact, your `drawAndUpdate` function gets called sixty times every second, and our `update` function gets called a hundred times with each `drawAndUpdate` call. That's a lot of work getting done!
## Conclusion
At this point, we've looked at every single line of code that you have and visited and re-visited some important concepts that make this animation work. Animating many elements does require some extra work as you've seen. The bulk of our code, now that you've seen all of it, is in re-creating our retained mode graph that maps between all of the circles in memory to what actually gets shown on screen. Once you master that little detail, creating any kind of animation that involves many elements will become a breeze.