Table of Contents

You are probably really tired of me saying this, but fast DOM performance is one of the biggest feathers in React's cap. That doesn't mean you get all of that great performance for free. While React handles a lot of the heavy lifting, there are steps that you should consciously take to ensure your app isn't doing unnecessary work and slowing things down. One of the biggest steps revolves around making sure each component's render method is called only when it absolutely has to. In the next few sections, we'll look at why that is a problem and what you can do about it.
Onwards!
The render method's official job description is pretty simple. It just needs to show up on each component and help generate the JSX to return to whatever parent component called it. If we had to loosely describe the full workflow from components on one end and a fully finished app on the other end, it would look as follows:
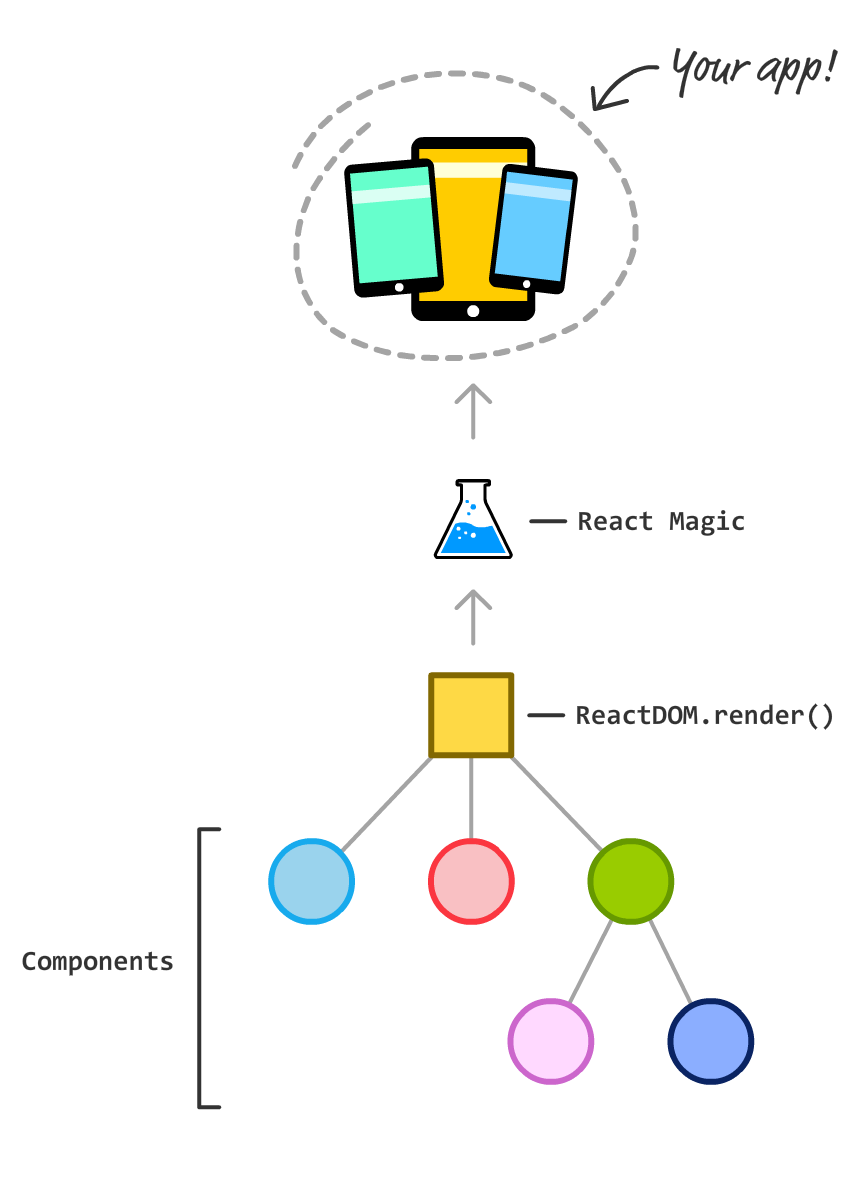
You have your finished app on one side. You have the components that make up the app on the other. Inside all of these components, you will see render methods returning bits and chunks of JSX getting combined with more bits and chunks of JSX from other components. This process repeats until you get the final JSX at the root of the component hierarchy where we have our ReactDOM.render call. From there, the React Magic happens that turns all of this JSX into the appropriate HTML/CSS/JS to display in our browser.
Now that you have a very basic idea of how React works, let's get back into the weeds where our components and their render methods live. In all of the React code we've written so far, you may have also noticed that we never had to explicitly call the render method on any component. That just sort of happened automatically. Let's get more precise here. There are three things that will cause a render method to automatically get called:
All three of these cases seem like good examples of when we want our component's render method to be automatically called. After all, all three of these cases could cause your visual state to change. Right?
The answer is, well...it depends! Very often, components find themselves in a situation where they are being forced to re-render even though the prop or state that is changing has absolutely nothing to do with them. There are situations where a parent component is correctly rendering or re-rendering, but that is localized to just that component. There is no need to ask the child components to re-render for something that doesn't affect them.
Now, I might be painting an alarming picture of unnecessary work that has been going on right under our noses. One thing to keep in mind is that a render method being called is not the same thing as the DOM ultimately getting updated. There are a few additional steps React takes where the DOM is diffed (aka the previous version compared with the new/current version) to truly see if any changes need to be represented. All of these few additional steps is work, and for more complex apps with a lot of components, there will be many MANY instances of a few additional steps that will start to add up. Some of this is additional work done by React's internals. Some of this additional work is just important things we do in our render methods, for we often have a lot of code there to help generate the appropriate JSX. Rarely is our render method returning a static piece of JSX with no evaluation or calculation happening, so minimizing unnecessary render calls is a good thing!
Now that we've looked at the problem, let's look at some approaches we can use to ensure we are calling a component's render method only when absolutely necessary. The following sections will walk you through this.
To help make sense of this, we are going to look at an example. It won't just be any example! We will be revisiting our sliding menu example we created earlier. If you have it handy, go ahead and open it up in your code editor.
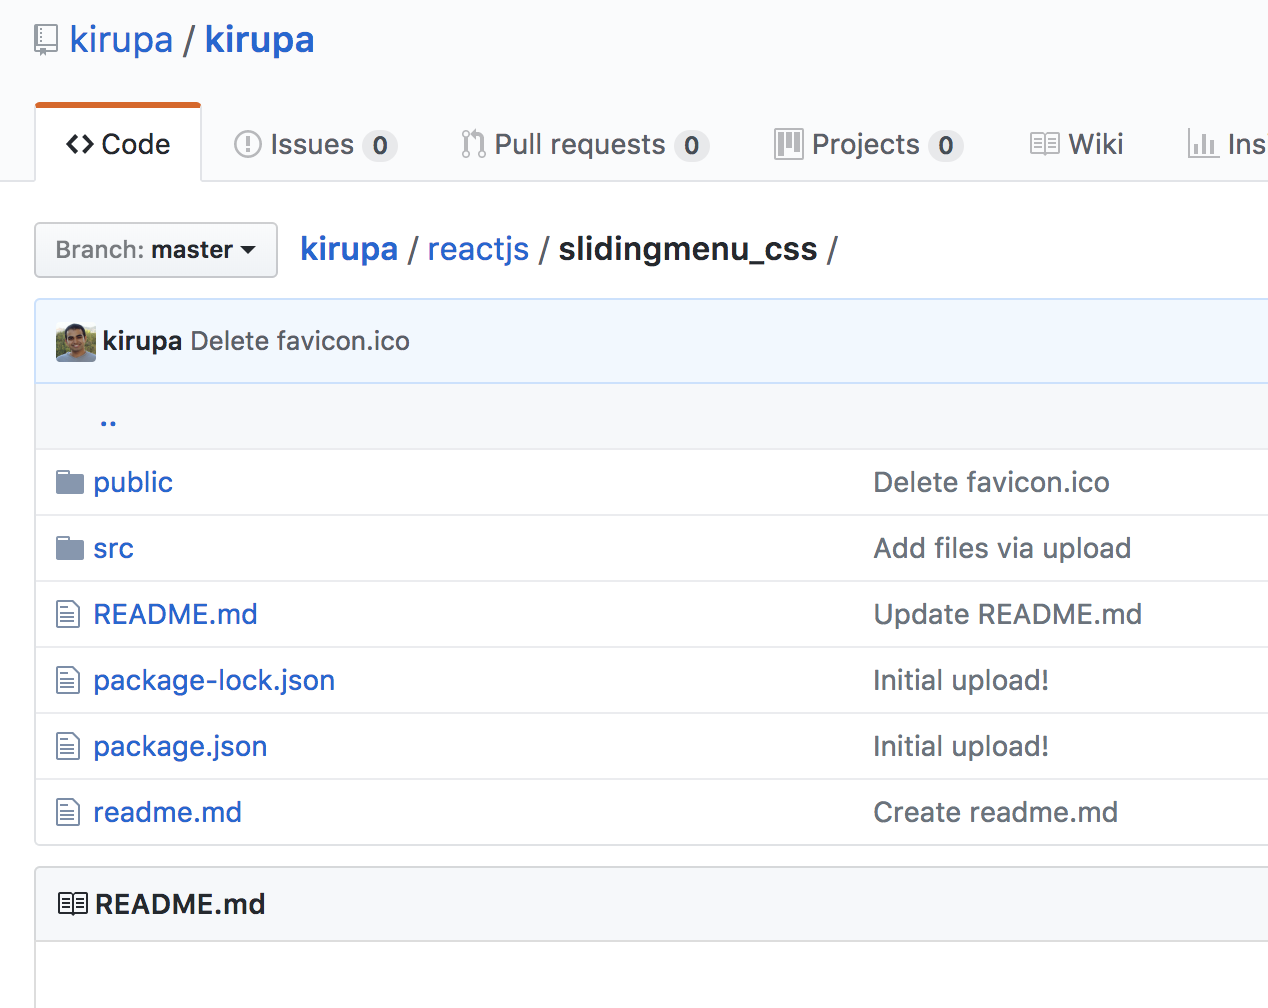
If you don't have the project handy, that's OK. Use create-react-app to create a new React project and overwrite everything in your src and public folders with the contents from the Sliding Menu Github repo:
Once you have the sliding menu project ready, run it in your browser to make sure that everything works...or still works :P
If you haven't completed the sliding menu tutorial, I highly encourage you to do so. While having the working project handy is all fine and good, knowing how the code works and some of the choices we made during implementation will be important. You can certainly follow along without understanding that tutorial, but don't say I didn't warn you if some of the code you are about to seems a bit out of place!
Looking at our example, to re-use a graphic you may have already seen, the component hierarchy for our sliding menu app looks as follows:
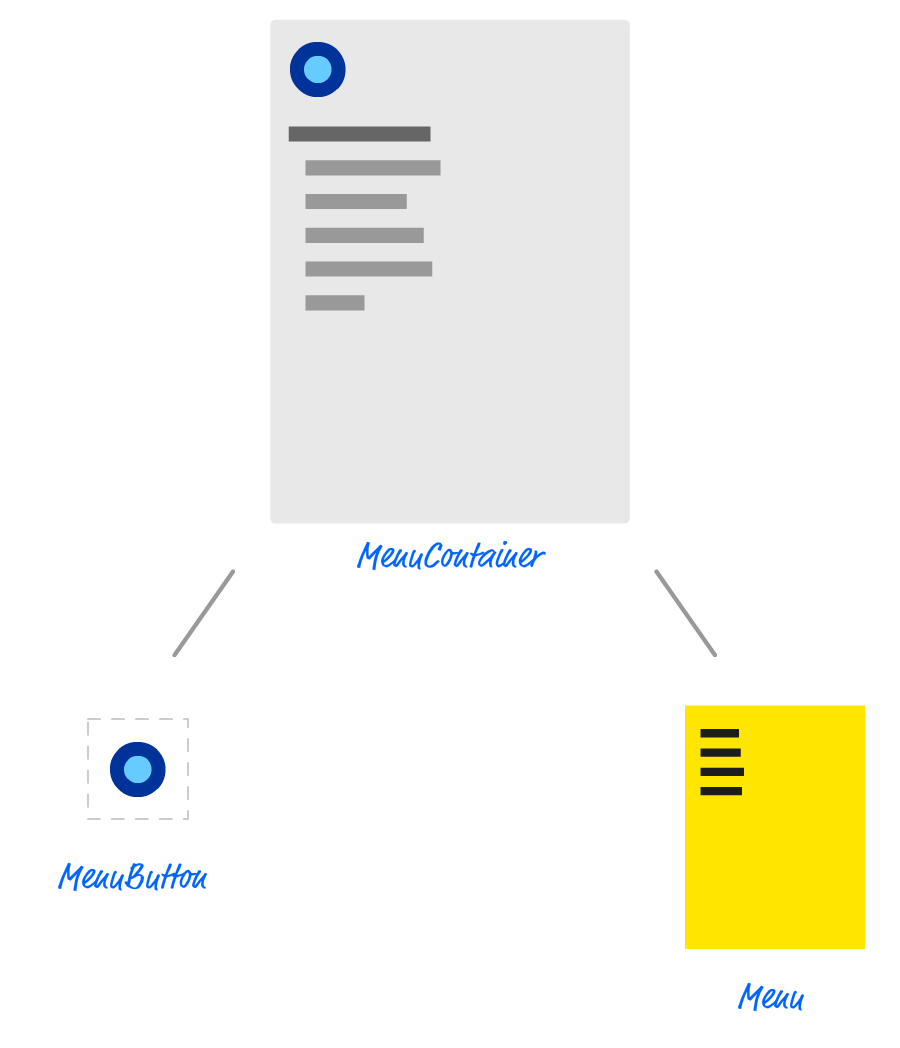
At the root we have MenuContainer, and it has two children - MenuButton and Menu. While not shown in the diagram, there is a ReactDOM.render call in index.js that exposes our MenuContainer to the DOM:
ReactDOM.render(
  <MenuContainer/>,
  document.getElementById("container")
);
When the button rendered by MenuButton is clicked, we set a boolean state property (called visible) in MenuContainer to true. This state property change triggers our Menu component to update a class value that activates the appropriate CSS to slide our menu in. Clicking anywhere in the menu dismisses the menu by undoing what was done by setting the state property in MenuContainer to false.
The first thing we want to do is see the render calls being made. There are many ways you can do this. You can set a break point in your code and inspect the results using your browser's developer tools. You can install the React Developer Tools add-on (for Chrome or Firefox) and inspect each component. You can also take a very simple approach and insert console.log statements inside the render methods you are interested in.
Because we only have three components in our sliding menu example, the console.log approach is an easy one that we will use for now. In your code editor, open MenuContainer.js, MenuButton.js, and Menu.js and scroll down to each component's respective render method. At the very top of this method, we are going to add a console.log call.
In MenuContainer.js, add the following highlighted line:
render() {
console.log("Rendering: MenuContainer");
return (
<div>
<MenuButton handleMouseDown={this.handleMouseDown}/>
<Menu handleMouseDown={this.handleMouseDown}
menuVisibility={this.state.visible}/>
<div>
<p>Can you spot the item that doesn't belong?</p>
<ul>
<li>Lorem</li>
<li>Ipsum</li>
<li>Dolor</li>
<li>Sit</li>
<li>Bumblebees</li>
<li>Aenean</li>
<li>Consectetur</li>
</ul>
</div>
</div>
);
}
Let's do something similar in MenuButton.js:
render() {
  console.log("Rendering: MenuButton");

  return (
    <button id="roundButton"
            onMouseDown={this.props.handleMouseDown}></button>
  );
}
Lastly, add the following highlighted line in Menu.js:
render() {
  console.log("Rendering: Menu");

  var visibility = "hide";

  if (this.props.menuVisibility) {
    visibility = "show";
  }

  return (
    <div id="flyoutMenu"
          onMouseDown={this.props.handleMouseDown}
          className={visibility}>
      <h2><a href="#">Home</a></h2>
      <h2><a href="#">About</a></h2>
      <h2><a href="#">Contact</a></h2>
      <h2><a href="#">Search</a></h2>
    </div>
  );
}
Once you have added these three lines, run your app in your browser. Once the app is up and running, bring up your browser's developer tools and take a look at what is printed in the console:

You may see warnings and other stuff displayed, but what we are looking for is the output of the console.log statements we added. When you first run your app, you'll see that all three of our components will have their respective render method getting called. This is expected, for it is the first time your app is being loaded.
Now, with your console still open, go ahead and click on the blue button to bring up the menu. Once you've done that, take a look at your console. You'll see the following new items (highlighted in green):
Rendering: MenuContainer
Rendering: MenuButton
Rendering: Menu
clicked
Rendering: MenuContainer
Rendering: MenuButton
Rendering: Menu
When the handleMouseDown event handler gets called, we print the text clicked to the console. It isn't important for what we are doing right now, but it does provide a nice separation between our series of render calls. With that said, notice that displaying our menu results in all three of our components' render methods getting called. Click on the menu to dismiss it. You'll see that all three render methods get called again! That doesn't seem right, does it?
Because we are toggling a prop on Menu and our state is stored on MenuContainer, those two components' render method being called makes sense...for now! But, why is our MenuButton component's render method getting called every single time?
Looking at MenuContainer's render call, we are calling our Menu component and passing in a prop whose value will never change:
<MenuButton handleMouseDown={this.handleMouseDown}/>
The value of our handleMouseDown method isn't something that changes between each time our menu is opened or closed. The reason is because our MenuContainer (aka the MenuButton's parent) has its render method called. If a parent's render method gets called, all the child components' render methods will get called as well. If you are keeping score, this is reason #3 we listed a few sections ago when talking about what causes a render method to be called automatically.
So, what options do we have for stopping our MenuButton component's render method from being unnecessarily called? As it turns out, we have two!
A while ago, we looked at the various lifecycle methods that React provides. One of them is shouldComponentUpdate. This method is called just prior to a render call from being made, and you can block the render method from being called by having our shouldComponentUpdate method return false. What we are going to do is use the shouldComponentUpdate method to do just that.
Inside our MenuButton component, add the following highlighted lines:
import React, { Component } from "react";
import "./MenuButton.css";

class MenuButton extends Component {
  shouldComponentUpdate(nextProps, nextState) {
    return false;
  }

  render() {
    console.log("Rendering: MenuButton");

    return (
      <button id="roundButton"
              onMouseDown={this.props.handleMouseDown}></button>
    );
  }
}

export default MenuButton;
Once you have done this, refresh your app to test your code. Pay attention to the console, and see what gets printed when you are showing and hiding a menu. Your output when your page loads and the menu is displayed for the first time will now be as follows:
Rendering: MenuContainer
Rendering: MenuButton
Rendering: Menu
clicked
Rendering: MenuContainer
Rendering: Menu
Notice that our MenuButton component's render method isn't called! That's great. Before we celebrate too much, what we've done is taken a hammer to our problem by always returning false when shouldComponentUpdate gets called. While that works for what we are doing, let's be a bit more careful to ensure we aren't accidentally preventing valid updates in the future if you were to modify MenuButton and how it gets used.
When we look at the shouldComponentUpdate method's signature, two arguments are passed in. One is for the next prop value, and the other is for the next state value. We can use these arguments to compare the present with the future and be a bit more intelligent about whether we allow our render call to be made or not. In the case of MenuButton, the only prop we are passing in is for the value of handleMouseDown. We can check to ensure this value doesn't change by modifying the shouldComponentUpdate method as follows:
shouldComponentUpdate(nextProps, nextState) {
  if (nextProps.handleMouseDown === this.props.handleMouseDown) {
    return false;
  } else {
    return true;
  }
}
This code ensures we don't unnecessarily call render if the value of handleMouseDown stays the same. If the value of handleMouseDown ever were to change, then we properly return a value of true to allow the render call to be made. There are a variety of other criteria you can use to specify whether the component's render method should get called, and what you do will depend entirely on the component in question. Feel free to get creative if you need to!
It's a common occurrence to have components in the line of fire where they are forced to re-render despite not having any relevant prop or state changes. Our MenuButton example is just one such occurrence. The solution is to call shouldComponentUpdate and check whether any prop or state changes have taken place. To avoid you having to make this check all the time, there is a special kind of component that handles this checking automatically for you. That component is PureComponent.
Up until now, all of our components were based on Component:
class Blah extends Component {
  render() {
    return (
      <h1>Hello!</h1>
    );
  }
}
To base our components off of PureComponent, all you have to do is this:
class Blah extends PureComponent {
  render() {
    return (
      <h1>Hello!</h1>
    );
  }
}
That's pretty much it. Once you do this, your component will be extra careful about calling render only when it determines that a change to either the prop or state has actually been made. To see this for ourselves, let's change our MenuButton to be a PureComponent instead of just Component.
In MenuButton.js, first delete our shouldComponentUpdate method. We don't need it any more. Once you have done that, make the following two highlighted changes:
import React, { PureComponent } from "react";
import "./MenuButton.css";

class MenuButton extends PureComponent {
  render() {
    console.log("Rendering: MenuButton");

    return (
      <button id="roundButton"
              onMouseDown={this.props.handleMouseDown}></button>
    );
  }
}

export default MenuButton;
We first import the necessary code from the React library to make PureComponent work. Next, we just extend our MenuButton from PureComponent. That's it. If you test your app now and inspect the console after displaying the menu, you'll see that our MenuButton component's render method doesn't get called when your menu decides to show up (or disappear).
The PureComponent seems pretty awesome, right? Why don't we just use it always and ditch Component altogether? You probably should! With that said, there are a few reasons that you may want to stick with Component.
First, what PureComponent does is perform what is known as a shallow comparison. It isn't a comprehensive check of everything that may have changed in your props or state between calls to re-render. For many cases, that is OK. For other cases, that may not be. Keep that in mind when using PureComponent. You may find that you need to write your own shouldComponentUpdate and handle the updating logic manually. You can't use PureComponent and specify shouldComponentUpdate at the same time. Nice try!
Second, besides the comparison logic, the bigger problem with using PureComponent is performance. Having each of your components check to see if props or state have changed, even if it is a shallow check, takes up some computation time. Remember, these checks happen every time your component decides to re-render or is asked to re-render by a parent. For complex UIs, that could happen frequently without you even realizing it.
TL;DR: This should probably have been mentioned at the top of this note, but what are you going to do? Basically, it's fine to use PureComponent instead of Component. Just be aware of the two (minor) side-effects.
Ensuring your app is performant requires constant vigilance. Profile your app's performance frequently, and definitely do so after each time you make a code change under the goal of optimizing performance. Each performance optimization you make adds complexity that just adds to your (or your team's) overhead of maintaining the code and making fixes in it for the lifetime of your app's existence. Be conscious of that and don't over-optimize. If your app works really well on the devices (especially the low-end ones) and browsers you are targeting, consider your job done. Take a break and don't do any extra work...for now!
Next tutorial: Introduction to Redux
Just a final word before we wrap up. If you have a question and/or want to be part of a friendly, collaborative community of over 220k other developers like yourself, post on the forums for a quick response!
