|
by
kirupa | 27 July 2007
In the
previous page, you
wrapped up this tutorial. In this page, let's take a look back at why you did
some of the things you did.
In this section, let's look back at parts of this
tutorial that I rushed through and take a step back to better understand why we
made some of the choices we did. Let's first take a look at the C# code I
hastily made you copy and paste:
In a nutshell, our C# code defines a program that simple returns a list of all
fonts currently installed on our system:
- using System;
- using System.Collections.Generic;
- using System.Text;
- using System.Collections.ObjectModel;
- using System.Windows.Media;
-
- namespace
FontPreviewer
- {
- class
FontCollection :
ObservableCollection<FontFamily>
- {
- public
FontCollection()
- {
- foreach (FontFamily
f in
Fonts.SystemFontFamilies)
- {
- this.Add(f);
- }
- }
- }
- }
Let's go through the code line by line:
- namespace
FontPreviewer
In the above line, you specify the namespace your
code belongs to. It is pretty important that your namespace name matches the
name of your WPF application's namespace. If you used a program like Visual
Studio / C# Express to add your new class file, the namespace information is
automatically provided for you.
- class FontCollection
: ObservableCollection<FontFamily>
In this line, I provide my class name -
FontCollection. Beyond just specifying the class name, more importantly, I am
extending my class by the ObservableCollection class. An ObservableCollection is
one of a number of classes that notify the UI when changes are made, and this
class
implements the INotifyCollectionChanged interface.
That last detail is important because one of the
goals of data binding is to separate your data source (Model) from your UI
(View). When updates are made to your data, you ideally want your UI to
automatically be notified of the change and update itself without you manually
targeting each UI/View and forcing it to do a refresh. The refresh and update
properties are not used in this tutorial because you do not add or remove fonts
while running your application.
- public
FontCollection()
This is just the name of our constructor. There
really isn't really more to say about this line except that it's name matches
the name of our class.
- foreach (FontFamily
f in
Fonts.SystemFontFamilies)
- {
- this.Add(f);
- }
In the above line, I go through each font in our
Fonts.SystemFontFamilies collection and add each FontFamily to ourselves:
this.Add(f). Even though I did not explicitly
define the Add method, I am able to use the Add method on our parent class
because our FontCollection class extends ObservableCollection which does contain
an Add method for us to use.
There is no hard set rule on what makes a valid data binding. All you need for a
data binding in WPF is a target and a source. In this tutorial, you encountered
two types of data binding. One type was the binding between a CLR data source
and a UI element. The other type of binding was where you bound properties of
one UI element to the properties of another UI element.
Let's examine the latter case of the UI property
to UI property binding in greater detail. In one part of your tutorial, you set
your TextBlock's FontFamily property to the Text
property used by a TextBlock. In many ways it seems a bit baffling that even
works.
On one hand, the font of your text is determined
by an object of type FontFamily. Your data from the Text property is of type
String. In procedural code in C#, you would have run into an error if you
attempted to set the FontFamily equal to the Text value. You are able to get
away with this, though, because of type conversions that go on in the
background.
Let's look at our
FontCollectionTemplate data template's XAML:
- <DataTemplate
x:Key="FontCollectionTemplate">
- <StackPanel>
- <TextBlock
Text="{Binding
Path=Source, Mode=OneWay}" x:Name="TextBlock"
FontFamily="{Binding
Path=Text, ElementName=TextBlock, Mode=Default}"
Padding="3,3,0,0"/>
- </StackPanel>
- </DataTemplate>
Notice that your binding already knows that what
it is looking for is of type FontFamily. The rest is just matching what you need
from your TextBlock's Text property. That matching works because there
is a type converter in FontFamily that takes String information and creates a
working FontFamily object.
For a sanity check, if you were to look in
Blend's FontFamily property for your textblock, notice what value is displayed:
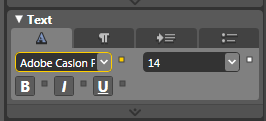
The value displayed in your FontFamily property is
the name of the font - a name that is represented in String format.
One thing to be careful is if you are binding to
an invalid value - such as passing in a value for which the target has no
default converter for - you will run into an exception. Data binding exceptions are not the
easiest of things to find and fix, so be careful when setting up your bindings.
After your ComboBox items began to be styled in the font they were displaying,
you may have noticed the performance of your combobox decrease drastically when
you tried expanding it for the first few times. For the solution and a better
explanation of the problem, my
blog
post on this topic should help you out.
If you are curious to look at my implementation of the Font
Previewer application, download and extract the final source
files for this project:
Just a final word before we wrap up. If you have a question and/or want to be part of a friendly, collaborative community of over 220k other developers like yourself, post on the forums for a quick response!

|


