
Given that many things that access the web have a battery these days, the applications you create may need to take them into account. For example, you may want to prompt the user if the battery level is really low. You may want to adjust how CPU intensive an animation is depending on whether the user is currently plugged in or not. You might just be bored because Netflix is currently experiencing an outage, and you just want to learn something while waiting for it to come back up.
Anyway, there are a lot of things you can do with the Battery Status API, so in this short article, we'll take a look at how to take advantage of it.
Onwards!
Currently, the Battery Status API only works in a handful of browsers. If you preview in any other browser, you will not see anything interesting. The code you will see is future-proof in that, when other browsers do support this API, things will just work.
Below is an example of the battery API at work (you can also view it in its own page):
Like I called out earlier, this only works in the latest versions of Firefox right now. If you are viewing this example in a different browser, you will just see the outline of the battery. You will not see an accurate battery status indicator that is green when plugged-in:
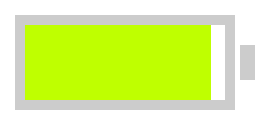
When you are unplugged, the indicator turns yellow:
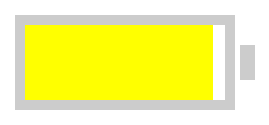
Both the current status as well as the status on whether you are plugged in and charging or not are updated in real-time. Pretty neat, ehh?
Below is the JavaScript, HTML, and CSS needed to make all of this work.
The code for working with the Battery Status API looks as follows:
var battery;

navigator.getBattery()
    .then(function (b) {
        battery = b;
        handleBattery();
    }
);

var batteryIndicator = document.querySelector("#indicator");

function handleBattery() {
    if (battery) {
        battery.addEventListener("chargingchange", updateBatteryNotification);
        battery.addEventListener("levelchange", updateBatteryNotification);
        updateBatteryNotification();
    }
}

function updateBatteryNotification() {
	// draw battery level
	batteryIndicator.style.width = battery.level * 100 + "%";

	// check if battery is charging
	if (battery.charging) {
		setClass(batteryIndicator, "charging");
	} else {
		setClass(batteryIndicator, "notCharging");
	}
}

function setClass(element, classToAdd) {
	element.className = classToAdd;
}
The code should be pretty self-explanatory. The navigator.getBattery() method returns a promise that contains a BatteryManager object:
var battery;

navigator.getBattery()
    .then(function (b) {
        battery = b;
        handleBattery();
    }
);
This BatteryManager object (now represented by the battery variable) contains events and properties that make dealing with battery-related issues easy.
Some of the events and properties you see here include:
What I've posted are just the properties and events this example needs. For a full list of everything the BatteryManager object contains, check out the MDN article about it.
The entire battery is created in HTML:
<div class="container">
	<div id="batteryBody">
		<div id="indicator">

		</div>
	</div>
	<div class="batteryEnd">
		<div>

		</div>
	</div>
</div>
The element with the id of indicator is the only element you need to be aware of, for it is referenced in our code to set the battery level.
While the battery may be created in HTML, it is the CSS that makes it actually look like a battery:
#batteryBody {
	float: left;
	width: 200px;
	height: 75px;
	border: 10px #CCC solid;
}
.container {
	width: 240px;
	margin-left: auto;
	margin-right: auto;
	margin-top: 50px;
}
.batteryEnd {
	float: left;
	height: 95px;
	width: 15px;
}
.batteryEnd div {
	width: 15px;
	height: 35px;
	margin-top: 30px;
	margin-left: 5px;
	background-color: #CCC;
}
#indicator {
	height: 100%;
	width: 50%;
}
#indicator.charging {
	background-color: #BFFF00;
}
#indicator.notCharging {
	background-color: #FFFF00;
}
One thing to note is that the charging and notCharging classes are added in the JavaScript to our indicator element. When they get added, the appropriate selector goes active - giving the battery indicator the green or yellow background color.
If you want to know more about some of the concepts used in creating this snippet, check out the following links:
Just a final word before we wrap up. If you have a question and/or want to be part of a friendly, collaborative community of over 220k other developers like yourself, post on the forums for a quick response!
