Table of Contents

The most important part of creating an animation is specifying the rate at which a property value changes from one value to another. Does the value get there directly at a constant rate? Does the value speed up initially and then slow down? Does the value instead start slowly and then speed up? Is there a bounce at the end? The answers to all of these questions are important details that you specify, and it is these details that really give life to your animation. Basically, this is something you can't ignore.
As important details that you can't ignore go, there is a proper name for them. In the case of animations, the name for specifying the rate at which properties change is called easing. You saw a fair amount of this in my Easing Functions in CSS3 tutorial, and I won't repeat a lot of the conceptual information you saw there. If this is your first foray into easing, I highly recommend you read and become familiar with the content in that tutorial first.
There are a few terms you are going to see throughout this tutorial, and while these terms may seem similar, they are different in subtle and important ways. Easing, as you saw above, refers to the entire situation where you modify the rate at which your animated properties change. When it comes to easing, you are going to see a fair amount of math. The mathematical formula you write to define the rate is known as an easing equation. These equations are often wrapped into something easily reusable and portable called an easing function.
If you yawned at the end of that last sentence, that makes two of us.
In this tutorial, we are going to focus on easing and using easing equations in JavaScript to alter the rate at which properties change. We are going to start real simple and create more complicated and expressive types of eases as we chug along.
Onwards!
Easing is not a scary word. You may not realize this, but if you ever created an animation in code, you have already specified an ease using an easing equation. It probably wasn't exciting and didn't stand out, but any time you have a property whose value is changing to create an animation, you have easing and the code that changes the value is part of your easing equation.
Let's look at an example from the introductory Animating in Code Using JavaScript tutorial. What you have is a blue donut that is sliding:
The relevant JavaScript for making this donut move looks as follows:
function moveThing() {
    currentPos += 5;

    theThing.style.left = currentPos + "px";

    if (Math.abs(currentPos) >= 900) {
        currentPos = -500;
    }

    requestAnimationFrame(moveThing);
}
What you have is your animation loop that is powered by requestAnimationFrame. Can you spot the line or lines of code where a value is changing to create an animation? If you spotted the currentPos variable that is being incremented by 5, then you win:
function moveThing() {
    currentPos += 5;

    theThing.style.left = currentPos + "px";

    if (Math.abs(currentPos) >= 900) {
        currentPos = -500;
    }

    requestAnimationFrame(moveThing);
}
You should run to the nearest kitchen / store and have a cookie to celebrate. I am going to go and do the same thing:
If you didn't guess the line of code correctly, you should have a cookie anyway. There is plenty of cookies to go around for everybody.
Getting back on track with the rest of our code, the currentPos variable is incremented by 5 each time your animation loop is called. This variable is what gets assigned to your element's left property:
function moveThing() {
    currentPos += 5;

    theThing.style.left = currentPos + "px";

    if (Math.abs(currentPos) >= 900) {
        currentPos = -500;
    }

    requestAnimationFrame(moveThing);
}
If you had to plot how the currentPos property changes while the animation is running through once, it would look as follows:
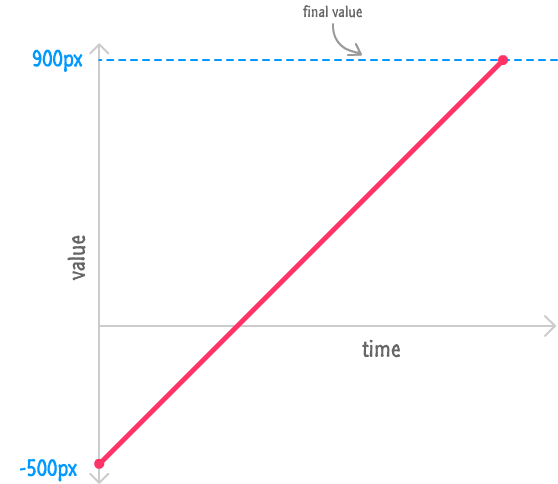
Your currentPos value resets to -500 at the beginning, and it increments by 5 each time your animation loop is called. The rate at which this value changes is constant throughout the lifetime of this animation. There is no speeding up or slowing down at any point. The easing for this animation is considered to be linear because the easing equation (currentPos += 5) makes that point very clear.
A linear ease is just one of a handful of easing types you can use for altering property values, and we'll look at it and the other easing types in greater detail in the following sections.
We looked at a linear ease briefly a few moments earlier, but let's go into a little bit more detail on this. With a linear ease, your property values change at a constant rate. There are many ways of accomplishing this, but the most common way is by using the += and -= assignment operators followed by a constant value as part of your easing equation.
In addition to the code you saw earlier with the currentPos variable, the following snippet of code gives another example of a linear ease at play:
var x = 0;

function animationLoop() {
	// increment x by 2 each iteration
	x += 2;

	// set our object's left property to x
	this.object.style.left = x + "px";

	// if x gets too large, reset it back to 0
	if (x > 600) {
		x = 0;
	}

	// call me, maybe...60 times a second!
	requestAnimationFrame(animationLoop);
}
Each time the animationLoop function gets called, the x variable's value increases by 2. The initial sequence of numbers would look like 0, 2, 4, 6, 8, 10, 12, and so on. While you may already know this, the value you increment or decrement doesn't have to be an integer. Sometimes, you will want your change to be less dramatic.
For very subtle changes, you can go into decimal territory where you are incrementing or decrementing using small decimal values. Below is an example where, in our easing equation, we decrease the value of the opacity variable by .05 each time this loop gets called:
var opacity = 1;

function animationLoop() {
	// set our object's opacity property to the opacity variable
	this.object.style.opacity = opacity;

	// decrease opacity unless it is already at 0
	if (opacity < 0) {
		opacity = 0;
	} else {
		opacity -= .05;
	}

	// loop!
	requestAnimationFrame(animationLoop);
}
While .05 may seem like a really small number to decrease a value by, never forget that your animation loop is running 60 times a second.
Now, easing with a linear ease is the easiest of the eases to use. I also find it to be the least useful in many cases. The reason is that very few things in life change value at a constant, linear rate. Robots do, but unless you are simulating robotic movement, you'll want to use a linear ease as part of something more realistic such as the eases you are going to see next.
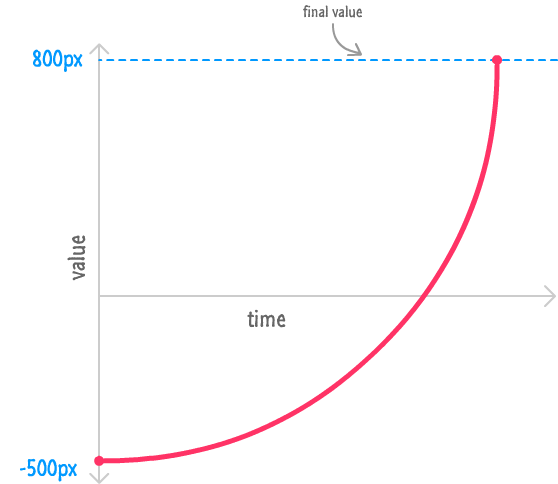
The first in our more realistic eases we are going to look at is the ease known as Ease Out. Here is our lovely assistant, the blue donut demonstrating what this ease looks like:
Notice how our blue donut moves in this case. It starts off really fast and then decelerates as it reaches the end. Plotting this movement with the horizontal position on one axis and the time in the other would look as follows:

Now, before we look at the code, there is an important and obvious point that needs to be made. The end result is what matters. Mathematically, there are many ways you can generate an ease that changes values as specified in this graph. One way is by using constant number that is divided by a value (x) that increments each time this animation loop is called: 1 / x. This is an important part of our easing equation for ease out.
In the following lines of code, you can see how this easing equation is being used to power the animation you saw earlier:
var currentPos = -500;
var incrementer = .01;

function moveThing() {
	incrementer += .0035;

	currentPos += (1 / incrementer);

	theThing.style.left = currentPos + "px";

	if (Math.abs(currentPos) >= 800) {
		currentPos = -500;
		incrementer = .01;
	}

    requestAnimationFrame(moveThing);
}
moveThing();
Of these relevant lines, these two lines define the entire easing equation in its most primal, awesome state:
incrementer += .0035;

currentPos += (1 / incrementer);
With each animation loop call, the incrementer variable gets slightly larger each time. Any number divided by a really small number is...a very large number. The opposite is true as well. A number divided by a large number results in a small number. As our incrementer value increases, the amount by which you adjust the current position starts getting smaller and smaller. This works out great for us because that ends up giving the desired result where your currentPos value increases really quickly at the beginning and starts slowing down towards the end.
Remember, when you are implementing an easing equation to simulate an ease out, you don't have to use my exact values. For example, change the 1 to a 2 and see how crazy fast the animation becomes. Alter the rate at which your incrementer changes and see how that affects your animation.
Go crazy. The best thing about math on your computer is that nobody gets hurt when things go wrong.
The opposite of ease out - its arch-nemesis, if you will - is when the property changes ease in. This is when your animation starts off slow and rapidly accelerates as it nears its end:
The graph for this kind of movement looks as follows:
Notice how our circle's position starts off pretty slow and then slowly gains speed. As it nears the end, it's rapidly accelerating. In mathematics, such a behavior is common when you have an exponential function in the form of a number greater than 1 whose power is gradually raised. An example of that horribly confusing sentence would be Math.pow(2, x). You can see a variation of this mathematical expression appearing in my easing equation in the following code:
var currentPos = -500;
var incrementer = .01;

function moveThing() {
	incrementer += 1;

	currentPos += Math.pow(1.05, incrementer);

	theThing.style.left = currentPos + "px";

	if (Math.abs(currentPos) >= 800) {
		currentPos = -500;
		incrementer = .01;
	}

    requestAnimationFrame(moveThing);
}
moveThing();
Notice that my particular easing equation looks as follows:
currentPos += Math.pow(1.05, incrementer);
1.05 is raised to the power of whatever value the incrementer variable contains. As incrementer's value increases, the result of this expression is an increasingly (exponentially to be precise!) larger value. This results in the effect that you see.
It took a little bit of experimenting to land on 1.05 and incrementing our incrementer variable by 1. Just like with the ease out case, you should feel free to experiment different values for these numbers (or the expression as a whole) to get the easing effect just right. There is no magical set of numbers that will universally work for all scenarios. Some level of tweaking is required when you are doing everything on your own.
My favorite kind of easing, and one you've seen a few times already in some of the earlier tutorials, is the trigonometric kind that uses the Sine or Cosine trigonometric functions. These functions are extremely good at one thing when it comes to animations. They allow you to create oscillations where property changes stay within a fixed range.
Take a look at the following example:
Notice that our circle is moving in a circular pattern. At first glance, the oscillation I referred to earlier might not be visible. The reason is that you don't have a single oscillation at play in this animation. You have two - one horizontal and one vertical.
Horizontally, the circle is oscillating between one range of values thanks to the Cosine function that is driving it. Plotting the horizontal position on one axis with time on the other results in a graph that looks as follows:
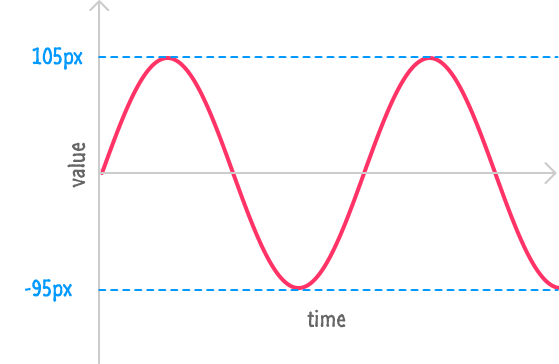
Vertically, our circle is oscillating between another range of values, and it is driven by the Sine function. Its value vs. time graph looks as follows:
Combining both of these oscillations together results in the circular motion that you see. All of this is made possible thanks to the repetitive nature of the Cosine and Sine functions. Let's explore this nature further.
The way these functions work is pretty simple. They each take a number (known as the angle) as their argument and they ALWAYS return a number between -1 and 1. It doesn't matter how large or small of a angle value you pass in. The result is always going to be a number between -1 and 1. You can take advantage of this behavior in clever ways - especially in an animation.
In JavaScript, the way you summon these mythical trigonometric creatures is via the appropriately named Math.cos and Math.sin functions. Just like their mathematical counterparts, they each take a number (aka the angle value) as their argument and output the result of what that number means in their world. All of this might make sense from an academic level, but all of this will make a lot more sense when we look at the code our animation uses.
I've highlighted the relevant lines below:
var angle = 0;

function moveThing() {
	angle += .05;

	xPos = 125 + 100 * Math.cos(angle);
	yPos = 5 + 100 * Math.sin(angle);

	theThing.style.left = xPos + "px";
	theThing.style.top = yPos + "px";

    requestAnimationFrame(moveThing);
}
Let's get the obvious facts out of the way first. The angle variable is incremented by .05 each time our loop gets called. The xPos and yPos variables calculate the current position by using a mathematical expression that involves our Math.cos and Math.sin functions.
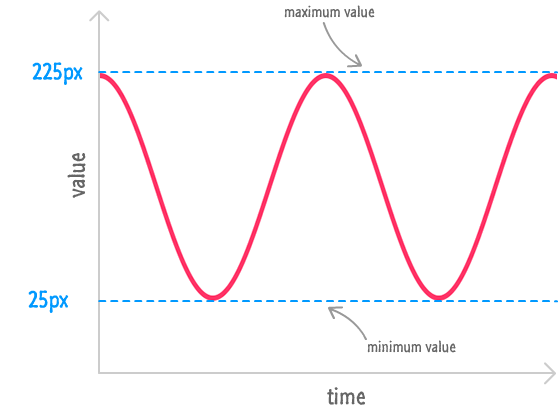
Diving a little bit deeper on the xPos and yPos variables, the 125 and 5 that you see are the offset values. No matter what is going on with the rest of that mathematical expression, your circle is going to be shifted by 125 pixels to the right and 5 pixels down. Continuing to move through our expression, the 100 that you see scales the output of our Math.cos and Math.sin functions by multiplying the result. This means, instead of dealing with a value between -1 and 1, the 100 * Math.cos(angle) and 100 * Math.sin(angle) expressions result in a value between -100 and 100.
Putting all of this together, our xPos value will oscillate between 25 (125 + (-100)) and 225 (125 + 100). Similarly, our yPos value will oscillate between -95 (5 + (-100)) and 105 (5 + 100).
The last detail to look at has to do with the angle itself. The speed the oscillation runs at is entirely determined by the rate at which you increase or decrease the angle value each time the animation loop gets called. Remember, both Cosine and Sine are periodic and repeat themselves after their angle argument hits a particular value. That particular value is around 6.28 or exactly 2 PI.
Here is an example of what Cosine looks like when plotted:
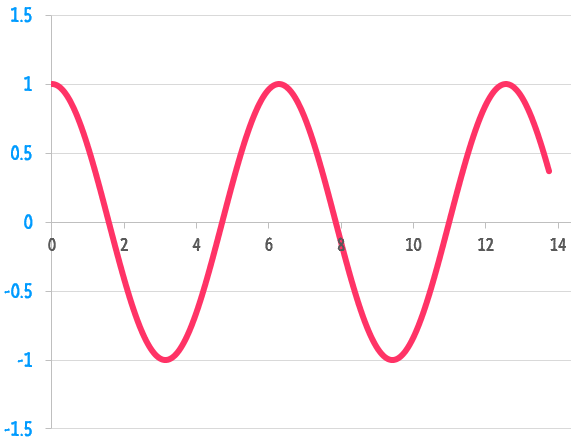
Notice that you can see one oscillation between 0 and 6.28, and you can see another oscillation between 6.28 and 12.56. This pattern repeats forever, and this is why it doesn't matter how large of a value you provide for the angle. Tying all of this to our example, the longer it takes for your angle variable to reach 6.28, the longer a single oscillation is going to take. The quicker your angle variable reaches 6.28, the faster your oscillation will be. You can see this for yourself by changing the .05 in angle += .05 to something larger or smaller.
Phew! The Cosine and Sine eases make the ease-in, ease-out, and linear eases look like walks in the park. Hopefully, as you will agree, the effort is totally worth it! So many cool things can be created by using Math.cos and Math.sin, and what I've shown is just a small sliver of what is possible.
By now, you are either completely exhausted and glad this tutorial is over or you are wondering where the other, more creative eases are. You know...the one that moves back a bit before zipping forward, the one that bounces back a little bit after reaching a final value, and so on. Those eases are going to make an appearance in Part II of this tutorial where you extend what you've learned and look at easing functions - more specifically, Robert Penner's easing functions.
If you are ready, onwards to Animating with Robert Penner's Easing Functions.
Just a final word before we wrap up. If you have a question and/or want to be part of a friendly, collaborative community of over 220k other developers like yourself, post on the forums for a quick response!
