Table of Contents

Learn how to target elements in the DOM using just a little bit of JavaScript, the querySelector function, and an honest-to-goodness CSS selector.
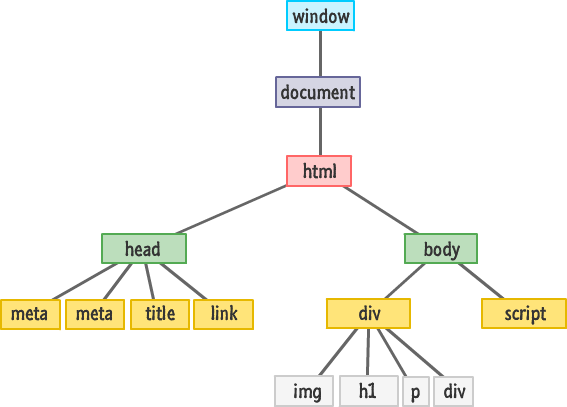
As you saw in the JavaScript, the Browser, and the DOM tutorial, your DOM is nothing more than a tree-like structure made up of all the elements that exist in your HTML document:
That detail is only sort of important. What is important is that you have all of these HTML elements floating around that you want to access and read data from or modify. There are many ways to find these HTML elments. After all, these elements are arranged in a tree-like structure, and if there is one thing computer scientists like to do is figure out crazy ways to run up and down a tree to find something.
I won't subject you to that torture...just yet. In this tutorial, you are going to learn how to use two built-in functions called querySelector and querySelectorAll to satisfy 95% of all your DOM searching needs.
Let's get started!
To help explain the awesomeness that querySelector and querySelectorAll bring to the table, take a look at the following HTML:
<div id="main">
	<div class="pictureContainer">
		<img class="theimage" src="smiley.png" height="300" width="150"/>
	</div>
	<div class="pictureContainer">
		<img class="theimage" src="tongue.png" height="300" width="150"/>
	</div>
	<div class="pictureContainer">
		<img class="theimage" src="meh.png" height="300" width="150"/>
	</div>
	<div class="pictureContainer">
		<img class="theimage" src="sad.png" height="300" width="150"/>
	</div>
</div>
In this example, you have one div with an id of main, and then you have four div and img elements each with a class value of pictureContainer and theimage respectively. In the next few sections, we'll set the querySelector and querySelectorAll functions loose on this HTML and see what happens.
The querySelector function basically works as follows:
let element = document.querySelector("< CSS selector >");The querySelector function takes an argument, and this argument is a string that represents the CSS selector for the element you wish to find. What gets returned by querySelector is the first element it finds - even if other elements exist that could get targeted by the selector. This function is pretty stubborn like that.
Taking the HTML from our earlier example, if we wanted to access the div whose id is main, you would write the following:
let element = document.querySelector("#main");Because main is the id, the selector syntax for targeting it would be #main. Similarly, let me specify the selector for the pictureContainer class:
let element = document.querySelector(".pictureContainer");What gets returned is the first div whose class value is pictureContainer. The other div elements with the class value of pictureContainer will simply be ignored.
The selector syntax is not modified or made special because you are in JavaScript. The exact syntax you would use for selectors in your stylesheet or style region can be used!
The querySelectorAll function returns all elements it finds that match whatever selector you provide:
let elements = document.querySelectorAll("< CSS selector >");With the exception of the number of elements returned, everything I described about querySelector above applies to querySelectorAll as well. That important detail changes how you end up actually using the querySelectorAll function. What gets returned is not a single element. Instead, what gets returned is an array of elements!
Continuing to use the HTML from above, here is what our JavaScript would look like if we wanted to use querySelectorAll to help us display the src attribute of all the img elements that contain the class value theimage:
let images = document.querySelectorAll(".theimage");

for (let i = 0; i < images.length; i++) {
	let image = images[i];
	alert(image.getAttribute(src));
}
See, pretty straightforward. The main thing you need to do is remember how to work with Arrays. The other (slightly weirder) thing is the mysterious getAttribute function. If you aren’t familiar with getAttribute and how to read values from elements, that’s totally okay. We’ll look at all that really soon. For now, just know that it allows you to read the value of any HTML attribute the HTML element in question may be sporting.
The thing that surprised me when I first used querySelector and querySelectorAll is that it actually takes the full range of CSS selector syntax variations as its argument. You don't have to keep it simple like I've shown you so far.
If you wanted to target all of the img elements without having to specify the class value, here is what our querySelectorAll call could look like:
let images = document.querySelectorAll("img");If you wanted to target only the image whose src attribute is set to meh.png, you can do the following:
let images = document.querySelectorAll("img[src='meh.png']");Note that I just specified an Attribute Selector as my argument to querySelectorAll. Pretty much any complex expression you can specify for a selector in your CSS document is fair game for specifying as an argument to either querySelector or querySelectorAll.
There are some caveats that you should be aware of:
The querySelector and querySelectorAll functions are extremely useful in complex documents where targeting a particular element is often not straightforward. By relying on the well-established CSS selector syntax, we can cast as small or as wide a net over the elements that we want. If I want all image elements, I can just say querySelectorAll("img"). If I only want the immediate img element contained inside its parent div, I can say querySelector("div > img"). Now, that's pretty awesome.
The querySelector and querySelectorAll functions are the new kids on the block. The past was dominated by the getElementById, getElementsByTagName, and getElementsByClassName functions that pretty much did exactly as their names describe. You may still see these functions used in older books, tutorials, and snippets online.
In general, you should just use querySelector and querySelectorAll. These two functions are easier to use and far more powerful than what you could do with the getElement* functions. Like a wise person once said, life is too short to spend time learning about old JavaScript functions.
Just a final word before we wrap up. If you have a question and/or want to be part of a friendly, collaborative community of over 220k other developers like yourself, post on the forums for a quick response!

:: Copyright KIRUPA 2024 //--