
Have questions? Discuss this Flash / AS3 tutorial with others on the forums.
Let's say you are driving your car, sitting in a bus, riding a bike, or participating in any other mode of transportation where things around you seem to be moving. As you look around, you will notice that things closer to you appear to move faster than things further away from you. Yes, really!
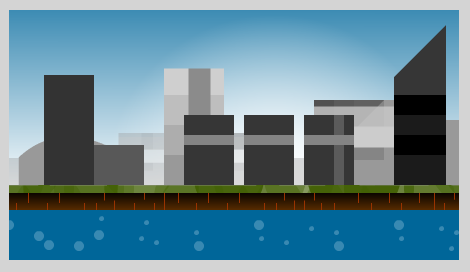
If you don't remember or don't believe, the Flash animation below provides a simple example of this:
[ press inside to the left or to the right to pan the scene ]
In the above animation, press and hold the mouse towards either the right half or the left half to pan the scene. As you are panning, notice that the things closest to you are moving faster. The things that are further away such as the buildings are moving slower.
There is a term for describing this visual effect. As you can probably guess, that term is parallax. You can learn all about it on wikipedia, but for our purposes, just know that parallax is what causes items further away from you to move slower than items closer to you.
In this tutorial, I will deconstruct a working example and show you how you can create a parallax effect of your own.
First, you will need to download the source for the example you see above. You can download the Flash CS5.5 and Flash CS4 source code here. Once you have downloaded and extracted the files, open either parallaxExample or parallaxExample_cs4.
Once you have opened this project, your artboard will show you a static version of the animation you see above:
Press Ctrl + Enter to make sure your animation plays as well when you click and press on either half of the animation. If everything seems to work, then you are ready for the next step...learning how to setup a parallax oriented world!
When you are re-creating the parallax effect, especially in a 2d environment like what we are doing, an important part is simulating depth. What you want to do is ensure that groups of objects that belong to a particular depth are placed in a movie clip of their own so that you can control their speed individually.
You can see this in my example by unlocking the movie clip called mainScene on the maincontent layer and looking inside the movie clip:
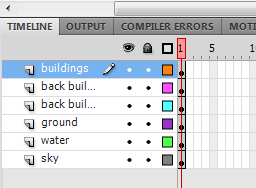
[ each movie clip is in its own layer ]
There are six layers, and each layer contains a movie clip. Each movie clip acts as a grouping for some part of my scene that I want to move as a group. You can toggle showing and hiding each layer to see how each movie clip helps create the final scene.
The following screenshots show an example of a few of those layers:

[ the sky is furthest away in our scene ]

[ the water is the nearest in our scene ]
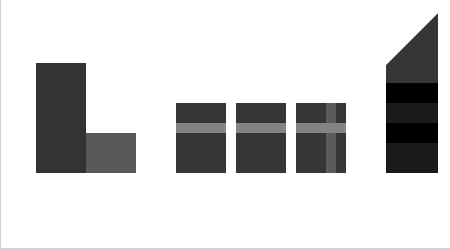
[ there are several layers of buildings at varying depths ]

[ the ground is just a bit further away than the water ]
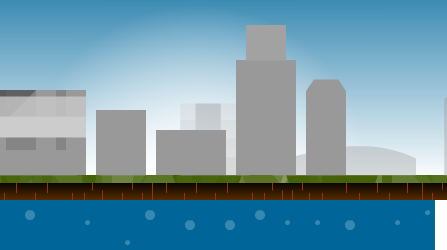
The important part once you've broken your scene by depth is to place them back on top of each other in the right order. Once all of these layers have been placed on top of each other, you can see the final scene as if there is no difference between the movie clips:
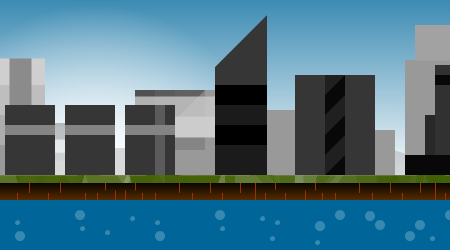
It isn't until you move each movie clip at a different speed that the separation between them becomes apparent.
As we get ready to look at the code, let's just take a step back and look at the movie clips and their instance names so that their hierarchy is clear.
On the main stage, you have a mask. The element that is doing the masking is called viewportMC, and the content being masked is a movie clip with the instance name mainScene.
If you unlock the masked layers, you'll see them individually better:
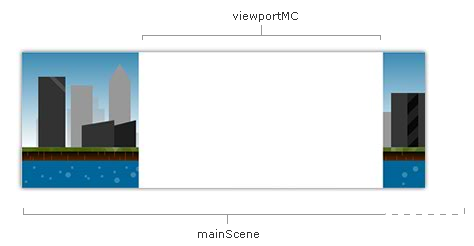
The mainScene movie clip acts as the parent for the child movie clips that make up your scene.
The full hierarchy is:
You will see this hierarchy when I am referring to the individual movie clips in the code shortly.
Now that you understand how the scene has been setup and how the various visuals have been stacked, all that is left is to look at the code that makes all of this work. The Parallax class is designated as the Document Class for our animation, so let's go ahead and open Parallax.as.
Our code is really broken into two parts. The first part deals with starting the scrolling when the mouse is pressed on the stage. The second part goes into detail on how to pan the entire scene. Let's look at both parts in greater detail.
The code for kickstarting the scrolling when you press down is contained in your constructor and the startScrolling and stopScrolling methods:
In a nutshell, this code allows you to start scrolling your scene when the mouse is pressed. Equally importantly, the code stops the scrolling when your mouse is released. This is entirely accomplished through some simple addition and removal of listeners for the ENTER_FRAME event. Let's look at how exactly that is done.
In the constructor, you have two event listeners to react to the mouse being pressed and released:
When the mouse is pressed, you listen for the MOUSE_DOWN event and specify the startScrolling method as its listener. When the mouse is released, you listen for the MOUSE_UP event and call the stopScrolling method when you hear that event.
This now leads us to the startScrolling and stopScrolling methods which act as event listeners for the MOUSE_DOWN and MOUSE_UP events:
When the startScrolling method is called, you add a listener for the ENTER_FRAME event. When the stopScrolling method is called, you remove the listener for the ENTER_FRAME event. The method that gets called each time this event fires is sceneLoop.
As you probably know, the ENTER_FRAME event gets fired a lot. Its rate of fire ideally corresponds to your frame rate, so in our case, it will get called 24 times a second. When you press down on your mouse, the sceneLoop function will start getting called. When you release the mouse, the sceneLoop funtion will stop getting called because you removed the event listener responsible for it!
What you've seen here is a simple way of creating the underpinnings for something that repeats a function constantly when pressed!
The code for panning the scene is contained largely inside the sceneLoop method with a few stray variables initialized in other locations such as the constructor.
The code here, especially some of the logic for testing the boundaries of the panning, may seem a bit bizarre. Let's take a step back and look that in detail first. Once you understand the logic, all of the code you see here will be easier to understand.
Let's represent our scene when you first launch your application in terms of the following diagram:

Note the positions of all the elements - especially relative to the viewport. Let's say you scroll all the way to the right. When your scene is at its right-most edge with no ability to scroll further, your diagram will look as follows:

Notice what has changed and what hasn't. The positions of mainScene, viewport, and starting point stay the same, but the position of the water and other elements have changed.
You may be wondering why mainScene's position doesn't change. After all, isn't it expected that the container of our scene do the moving? The reason is no. We move around mainScene's contents such as the water or sky movie clips, but we never move mainScene itself. The mainScene movie clip is merely provided as a container for you to move and adjust the initial position of your entire scene without having to manually adjust every layer in your scene individually.
To summarize what our code does to allow you to pan, it basically tries to:
Let's see how our code lives up to this.
The code for panning to the left is shown below:
The way we determine to pan to the left is by checking that the mouse is to the right-half of our viewport. That isn't a typo. If you are moving to the right, the world around you seems like it is moving to the left. The if statement at the top takes care of that:
The next line is relates to the diagrams you saw earlier. The currentPosition variable determines the position of our water relative to right-edge of our viewport:
Just remember that the value for your startingPoint and viewportWidth will never change. They are included to account for the initial offset where your scene may not be starting from the left-most edge.
The following diagram shows you what both values actually measure:

The currentPosition variable keeps a running tally of where your water movie clip is, and we pick on the water movie clip because that is the one that is going to hit either the left edge or right edge first. We want to account for the most constrained element in our scene when designing this.
With the currentPosition value, we use the next line to ensure that our water movie clip doesn't get scrolled too far:
The way we do that is by making sure the currentPosition plus an arbitrary buffer number is less than the overall width of our water movie clip. If our position is greater than the width itself, you'll see something awkward like the following where the water abruptly ends and shows empty space:
[ ewwwwwww! ]
That just looks pretty bad. The arbitrary buffer, the 10 in our case, represents the number of scrollable pixels that will still exist despite you no longer able to scroll further. The reason for the buffer is to ensure, again, that you never get into a situation where you see the edges of your scene as shown in the above image.
With all of this said, it is time for the lines of code you were probably most interested in seeing:
These lines represent the various scene elements and the amount at which you want to move them. As you can notice, the items are arranged in increasing order of distance. The closest item, the water, is being moved the fastest. The item that is furthest away, the sky, is being moved the slowest.
This variation in the speed at which things are moving is what gives you the parallax effect.
The code for panning your scene to the right is shown below:
This code is far more straightforward. In our if statement, we make sure the left-most position of our water movie clip is less than the value of our startingPoint. Remember, the initial x position of the water movieclip is 0. The initial x position of its parent, the mainScene, is represented by the startingPoint.
What we are doing with the if statement is ensuring that we don't stop scrolling until the left most part of the water movie clip hits the left-most boundary of our viewport:

The distance between the left-most boundary of the viewport and the starting position, as shown in the above diagram, is the absolute value of the starting position itself. The number 10 is added, just like in the previous section where you are panning to the left, as a buffer.
The last thing to look at is where we specify the speed at which things pan to the right:
The speed at which things are moved is determined by the element's distance. The water moves the fastest, and the sky moves the slowest. This is identical to what you saw before. The only difference is that the direction of movement is reversed.
The parallax effect is something very simple to explain, but representing it in a way that makes it easy for you to modify can be a little tricky. The most difficult part of this is understanding the relationship of the parent and children when it comes to the position. I am sure you will agree that if I omitted mainScene altogether and just placed all of the child elements on the main stage and masked under the same viewportMC movie clip, things would have been a lot simpler.
While the end result would have been simpler, there is added value in the cleanliness provided by using a container movie clip like mainScene to make working with the large number of children easier. You'll especially appreciate this when adjusting the starting position to something other than 0,0.
Just a final word before we wrap up. If you have a question and/or want to be part of a friendly, collaborative community of over 220k other developers like yourself, post on the forums for a quick response!
