|
by
kirupa | 16 June 2011
Have questions? Discuss this Flash tutorial with
others on the forums.
A nice effect I often see in movie intros is
one where individual letters in a block of text are faded
out. There is just something fascinating about it. Below is an example of what I am referring to:
[ after about
30 seconds, all of the letters will have been gone! ]
Notice that each letter fades out - leaving absolutely
nothing of the original text towards the end. By the end of
this tutorial, you will learn how to create this effect.
Because this effect contains many little steps spanning both
design as well as code, I feel it would be helpful to get a
quick glimpse of the steps involved before you dive into the
details of them:
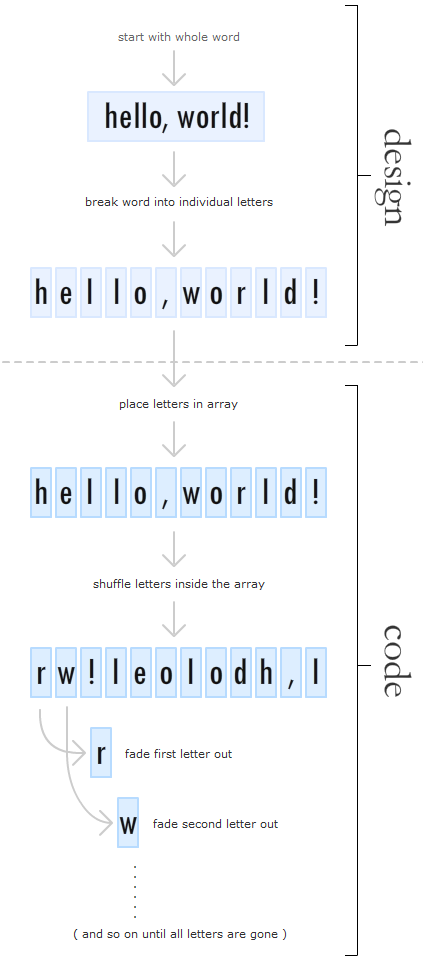
The diagram does omit some small but crucial details, but
it should give you a preview of what to expect. Let's start
by designing the text.
The
first thing we are going to do is get our text ready:
- Launch either Flash CS4 or CS5 and create a new
ActionScript 3 project.
- Resize your stage to be 350 pixels wide and 150
pixels tall:

[ resize your stage to be 350 x 150 ]
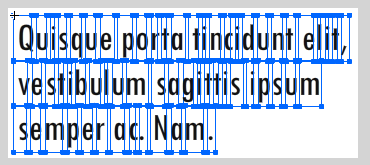
- Once your stage has been resized, let's
add some text to make it look less empty. Use the Text
tool to add the following text:
Quisque porta tincidunt elit, vestibulum sagittis ipsum
semper ac. Nam.
Your stage should now look as
follows:
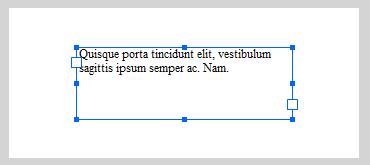
[ my text has been entered ]
- Next, make sure your text is displayed in
the Classic engine as opposed to the TLF engine. You can
verify this by selecting your text field and looking in
the Properties Panel where the Text Engine property
lives:
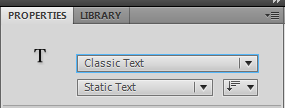
[ set your Text Engine to the older Classic Text ]
If you don't see Classic Text
displayed, go ahead and select Classic Text from the
drop-down.
- Now, all that is left is to make our text
look nice. Feel free to spruce it up so that it looks
just the way you like. For reference, here is what my text looks
like:
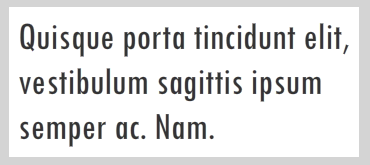
[
40pt, Tw Cen MT Condensed, #333333, full of win ]
- Once you are happy with what your text
looks like, let's place all of this inside a movie clip
so that you can reference it via code easily. Select your text field and press F8 or go to
Modify | Convert to Symbol. The Convert to
Symbol dialog will appear.
Inside this dialog, make sure
your Type is set to Movie Clip, and give
your clip a generic name like textMovieClip:
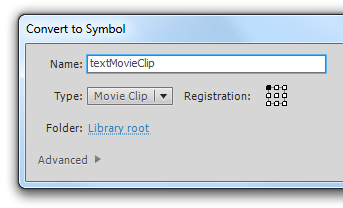
[ convert your text into a Movie Clip ]
Click OK once you are done to
dismiss this dialog and to convert your text into a movie
clip.
- Right now, your text is now wrapped up by
the movie clip. What we want to do next is go inside our newly
created movie clip and have direct access to our text again.
Right click on your movie clip and select Edit
in Place. You will now be inside your movie
clip:
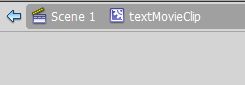
[ the breadcrumb bar tells you that you are inside the movie
clip now ]
- You will now have access to your text
field again. What we are going to do next is break
apart our text and distribute each character to its own
layer.
First, right click on your text object and
select Break Apart. Once you have done
that, you'll see that each character now is separate:
[ break the text into the individual letters ]
Next, select all of the
characters if they aren't selected already. Right click on
the selected characters and select Distribute to
Layers. After a few seconds, look at your timeline.
You will see that each character now has its own layer:
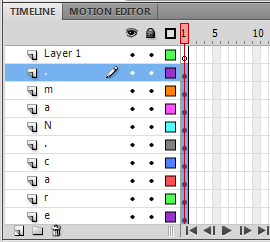
[ each letter will have is own layer ]
- You are almost done with the design
portion of this exercise! Tunnel back out to Scene 1 by
clicking on the Scene 1 link in the breadcrumb bar:
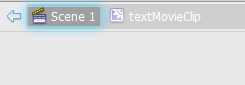
[ let's leave the movie clip and go back to our root ]
- All that is left is to give our movie
clip containing your text an instance name. Select the
movie clip, look in the Properties Panel, and give it
the instance name textClip:
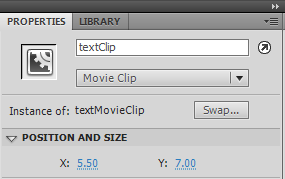
[ give your movie clip the instance name textClip ]
If you haven't done so already,
go ahead and Save this file. Give it any name you want, but
just remember where you saved it for you will be adding more
files in the same directory as this file really soon.
You just finished the "designing" part of this tutorial
where you took some text, broke the text into individual
letters,
and molded it into a shape that you can easily work
with using code. We'll have to now shift gears from doing
things visually to doing things using code...on the next
page!
Onwards to the
next page!
|


