In this tutorial, I will show how to create a blurry tween
effect in Flash. Indeed the logic behind that effect is very simple,
but as is often the case, it's the most simple problems that
take the longest time.
In case
you are wondering what I am referring to when I say "blurry
tween effect" or animated blur, the following example should
help you out:
[ an example
of what you will create ]
Here is How
The following steps will help you to re-create the effect
seen in the above image:
-
First, choose an image to use for the
tutorial. If you don't have an image, you can use the
following image that I will be using:

[ I have
used the logo of Galatasaray's 100. year ]
-
We need to blur that image using an
image editor. I'll be using Photoshop since it is fairly
popular, but you can use any program that will apply a
blur filter/effect to the image.
In Photoshop, to add a Gaussian Blur, go to Filter |
Blur | Gaussian Blur. From the Gaussian Blur dialog box,
enter the value of 5 for the radius. For a more blurry
look, enter a larger number:
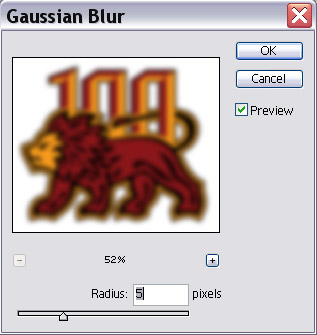
[ I used 5
pixel radius but you dont have to use the same ]
-
After you applied your filter effect,
save the image by going to File | Save for Web.
-
It is time to work in Flash now. When
you open Flash, import both your original image
and the blurred image onto the stage by going to File |
Import. You should have two images in your stage now.
Be careful to put them in different
layers. The blurred image should be on the upper layer,
and your original image should be on the bottom layer. You can change the layers of the images by cutting
and pasting them into a new layer:
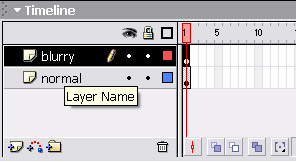
[ It is very
important to put images in different layers ]
-
Now, we need to convert the blurred
image (which should be on the top layer) into a symbol.
Right click on your image and select "Convert to
symbol..." You can also select the image and go to
Modify | Convert to Symbol.
The Convert to Symbol dialog box appears. I named the
movie clip as "mc_blurry", but you can pick any name you
want:
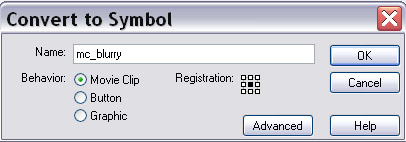
[ Be sure
to convert the image to a movieclip ]
-
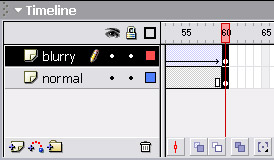
On your timeline, click on frame 30 and
place a keyframe
on both layers. Then click the upper layer (which
contains the blurry image) to select it and insert a motion tween
by going to Insert | Timeline | Create Motion Tween.
After adding the motion tween,
click on frame 60 and place a keyframe on both layers
again. You should now have a keyframe in each layer at
Frames 30 and 60.
[ insert a
keyframe on both layers at Frame 60
]
-
Select Frame 1 in your timeline and click on the
blurry movie clip. On the property inspector,
there is a section labeled "Color: ". Choose "Alpha" and
move the indicator to "0". This alpha parameter is the
indicator of the movie clip's opacity. Repeat the same
step for the movie clip on frame on Frame 60:
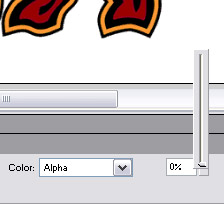
[ Alpha is
the indicator of the opacity of the selected movie clip ]
-
You are done! Press Ctrl + Enter or File
| Publish Preview | HTML to view the animation in Flash
or in your browser.
Why it works?
By doing a motion tween which changes the opacity of the
movieclip, we achieved in a blurring effect in
Macromedia Flash. Because the upper layer contains the
blurred version of the original image, changing its opacity
meant changing the opacity of the blur effect. That effect
ended up making you think that the original image is getting
blurry.
If you want a smoother animation change
the fps into 30 frames per second. Also click the layer,
which the blurry movieclip is included, and look at the
property inspector to change the "ease" indicator to
100. At the end, click Ctrl+Enter to see result of this
tutorial
Here is the zip folder of both .fla and .swf of that
tutorial:


