|
by
kirupa | 14 June 2009
Flash has had what are known as filters for quite a
while. Filters are basically pre-made visual effects you can
apply to your movie clips, and you probably know them more
commonly as just Blur, Drop Shadow, Glow, Bevel, etc. The
most common way for you to use filters is via the Filters
category in your Properties panel:
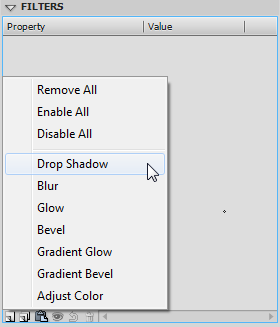
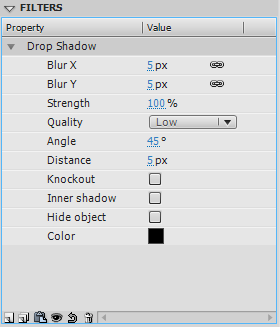
You can quickly point, click, and modify any properties
your filter exposes for you:
Like many things, there are times where you will use
filters entirely via the UI as seen in the screenshots above. There will be other times when
you will want to apply a filter programmatically using just
code. In this quick article, I will discuss the latter case
where I will show you how to add a
Drop Shadow filter and set its properties using ActionScript
3 (AS3).
For applying a
Drop Shadow filter, the following shows the least amount of
code you will need to make all of this work:
- function
init()
{
- var
dropShadow:DropShadowFilter
=
new DropShadowFilter();
-
-
myMovieClip.filters
=
new
Array(dropShadow);
- }
- init();
All you need to do to use the above code is replace
myMovieClip with the
instance name of the movie clip you are interested in using.
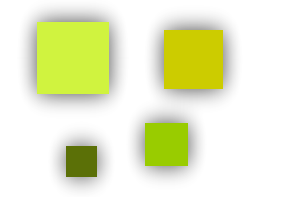
Since I am lacking creativity, I decided to apply the drop
shadow using the above code to a few colored squares. Here
is what the result looked like:

With just twp lines of code, you were able to get up and
running with a default drop shadow filter applied to a movie
clip you specified. Let's look at the code in greater
detail:
- var
dropShadow:DropShadowFilter
= new
DropShadowFilter();
In this line, I declare and initialize my dropShadow
object. Notice that this object is of type DropShadowFilter,
and I initialize to a new DropShadowFilter() object with no
additional arguments passed in to the constructor. If some
of the terms I used seem unfamiliar to you, feel free to
look through the
Classes in ActionScript 3 article later.
- myMovieClip.filters
= new
Array(dropShadow);
In our final line of code, I am setting our movie clip
instance's filters property
to an array that contains dropShadow. The reason I am
passing in the value as an array is because your movie clip
can have many filters applied to it simultaneously.
Therefore, you cannot just set the filters property to an
individual filter.
By using an array, I can append more filters on to my
movie clip very easily:
- myMovieClip.filters
= new
Array(filter1,
filter2,...,filterN);
Well, that is all there is to applying a drop shadow to
an element.
Surely, you didn't think that is all there would be to this
article, did you? Earlier, I posted a screenshot of all of
the various tweaks you can do to a filter, which
conveniently turned out to be our drop shadow filter:
Fortunately, you can easily set all of these properties
in code as well. The following is an example of the two line
code you saw above, except this time, all of the properties
are explicitly listed:
- function
init()
{
- var
dropShadow:DropShadowFilter
=
new DropShadowFilter();
- dropShadow.distance
=
0;
- dropShadow.angle
=
45;
- dropShadow.color
=
0x333333;
- dropShadow.alpha
=
1;
- dropShadow.blurX
=
10;
- dropShadow.blurY
=
10;
- dropShadow.strength
=
1;
- dropShadow.quality
=
15;
- dropShadow.inner
=
false;
- dropShadow.knockout
=
false;
- dropShadow.hideObject
=
false;
-
- myMovieClip.filters
=
new Array(dropShadow);
- }
- init();
By modifying the values to these properties, you can
alter what the drop shadow on your movie clip looks like.
For example, my earlier four squares when run through the
filter with the above properties looks as follows:
I will not detail what each of these properties do, for
the Adobe documentation does a great job of that, so check
them out here:
http://help.adobe.com/en_US/AS3LCR/Flash_10.0/flash/filters/DropShadowFilter.html
This was a
fun, short article, so I hope you enjoyed it. The only thing
to keep in mind is that filters can be taxing on the CPU
when used egregiously, so be careful of that when
programmatically going crazy with their properties.
In case you are curious to see what my version of the
example you have been seeing screenshots of looks like,
download the source files from the following link:
Just a final word before we wrap up. If you have a question and/or want to be part of a friendly, collaborative community of over 220k other developers like yourself, post on the forums for a quick response!

|


