|
by
kirupa | 10 February 2008
In the
previous page, you gave our ink canvas a name so
you can reference it via code, and you also learned
how to change your stroke size and color. In this
page, let's continue looking at more modifications,
tips, and tricks.
The final drawing
attributes-related modification we will be looking
at is turning your pen/pencil into a highlighter.
The highlighter looks like any other stroke, but the
difference is that any highlight you make goes under
any stroke you made while in pen mode:

The change for going from a pen to a highlighter
is surprisingly very simple. The code for doing this
is:
- DrawingAttributes
inkAttributes
=
new
DrawingAttributes();
-
- inkAttributes.IsHighlighter
=
true;
-
- DrawingBoard.DefaultDrawingAttributes
=
inkAttributes;
You can use the same approach I mentioned earlier
for changing both the stroke size and color, for a
highlighter is simply a pen that draws below your
other strokes. The color is also slightly muted and
more transparent to simulate actual highlighting.
For example, the following is a highlighter where
the tip is 10 pixels square with a yellow highlight
color similar to the effect you see in the above
image:
- DrawingAttributes
inkAttributes
=
new
DrawingAttributes();
-
- inkAttributes.IsHighlighter
=
true;
-
- inkAttributes.Height
=
10;
- inkAttributes.Width
=
10;
-
- inkAttributes.Color
=
Colors.Crimson;
-
- DrawingBoard.DefaultDrawingAttributes
=
inkAttributes;
All of the drawing attributes changes are
additive. You can mix and match them as you please,
and the final output will express whatever attribute
combination you set. What you saw on this and the
previous page are some of the common
attribute-related changes you can make. Let's take a
slight deviation and look at some related things you
do that go beyond the realm of simple attribute
manipulation. Don't worry, for they are just as simple!
In real life, when you press down hard on
your pencil when drawing, your strokes become darker
and thicker. That level of realism
is also provided by your InkCanvas control. The only
catch is that you need to find a device that first
reports pressure values. Most standard mice do not
report the pressure when you are clicking and
dragging, but many stylus devices do. For example, I
used a
Wacom Intuous 3 tablet to test this feature out,
and it seemed to work quite well.
One thing to keep in mind is that the pressure
information is automatically taken into account when
drawing your strokes. You can disable pressure by
setting the
IgnorePressure flag on your ink canvas to
false, but let's
assume that you didn't override the default and have
pressure sensing turned on. What is cool is that the
pressure value is something you can actually access!
To get pressure values, you need to first assign an event
handler to any of your ink canvas control's Stylus
events. The standard mouse-oriented events will not
work. For continuous pressure updates, it is useful to
have an event handler defined for
StylusMove:
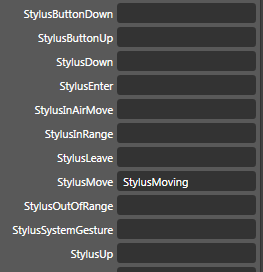
For my StylusMove event, I define an event handler called
StylusMoving, and the actual code in the event
handler for reading the pressure information is:
- private
void
StylusMoving(object
sender,
StylusEventArgs
e)
- {
-
StylusPointCollection
originalPoints
=
e.GetStylusPoints(DrawingBoard);
-
- float
currentPressure
=
originalPoints[0].PressureFactor;
- }
Notice that the event handler takes a
StylusEventArgs
value as its argument, and objects of type
StylusEventArgs have the
GetStylusPoints method that returns a
collection of the stylus points. The pressure
information is stored for each individual point, and
since GetStylusPoints returns a collection of
points, you can access the first point for an idea
of what your pressure value will be. Remember, this
value updates each time as you move your stylus
around the canvas, so you'll get numerous updates
for anything you draw.
Alright - we've made some good progress so far.
There are still more things about the ink canvas
that are interesting, so let's move on to
the
next page.
Onwards to the
next page!
|


