|
by
kirupa | 31 January 2010
In the
previous page, you added references and copied
some code to make your application work. That's
pretty cool, but this page is much cooler. In this
page, we'll look at the code in greater detail.
Getting the application to work is only one part of
this tutorial. The last and most important part is learning
why the code works the way it does. At a very high
level, there are several things that our code
actually does:
- Displays the Save As dialog.
- Opens a pathway to the file that gets
created.
- Begins the process of writing the XML data.
- Closes the pathway to the file once all of
the data has been written.
Let's start zooming in on the various layers
starting with the Save As dialog.
The code that deals with the Save
As dialog is covered in the following four lines
plus another line that I will show later:
- SaveFileDialog
saveFileDialog
=
new
SaveFileDialog();
-
- saveFileDialog.DefaultExt
=
"xml";
- saveFileDialog.Filter
=
"XML Files
(*.xml)|*.xml|All Files (*.*)|*.*";
- saveFileDialog.FilterIndex
=
1;
The first thing I do is declare and initialize my
saveFileDialog
object whose type is
SaveFileDialog. Through my saveFileDialog
object, I can set the properties that allow me to
customize the dialog that appears. The main
customizations I made are ones that define what
extension to save my file as by default:
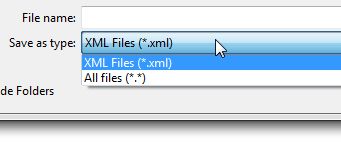
[ the supported file extensions list ]
As you can tell, the two file extensions that you
can pick for your file are .xml or anything that you specify
*.*.
The supported list of the extensions is controlled by the following lines of code:
- saveFileDialog.DefaultExt
=
"xml";
- saveFileDialog.Filter
=
"XML Files
(*.xml)|*.xml|All Files (*.*)|*.*";
- saveFileDialog.FilterIndex
=
1;
In the first line, I specify the default
extension to be xml. As you will see shortly, the
first line isn't really all that important. The
second line is one of the more interesting ones
you'll see ever in your life.
The Filter property takes a vertical pipe
delimited string that alternates between describing
the extension and defining the extension itself:
- saveFileDialog.Filter
=
"XML Files
(*.xml)|*.xml|All Files (*.*)|*.*";
In our case, the description is
XML Files (*.xml),
and the associated extension is
*.xml. I repeat that
format for All Files (*.*)
whose extension is *.*.
All of this is well and good, but none of the
lines of code you saw actually launch the dialog.
The display of the dialog is made when you call the
ShowDialog() method on your saveFileDialog object
as:
- saveFileDialog.ShowDialog();
The ShowDialog() method returns true if the Save
button has been clicked and false if the window was
closed or Canceled. Since all we care about is
really the Save case, I am combining the
ShowDialog() and checking for true in the same line
in our code:
- if
(saveFileDialog.ShowDialog()
==
true)
- {
-
using
(Stream
stream
=
saveFileDialog.OpenFile())
-
{
-
StreamWriter
sw
=
new
StreamWriter(stream,
System.Text.Encoding.UTF8);
-
sw.Write(GetGeneratedXML().ToString());
-
sw.Close();
-
-
stream.Close();
- }
- }
If you stop right after you call ShowDialog,
an empty file will be created for you with the name
you specified. What you need to do is now open the
file and write the XML data that you want into it.
Onwards to the
next page!
|


