|
by
kirupa | 19 December 2009
In the
previous page, you added the FallingSnow
behavior that does the magic needed to animate the
snowflakes you added earlier. Unfortunately, it
doesn't do that just yet, for there is one vital
step that is missing - actually adding the behavior.
To add the
behavior, go back to MainPage.xaml and make sure
your artboard with the snowflakes is visible. Looks
in your Assets panel at click on the Behaviors node:
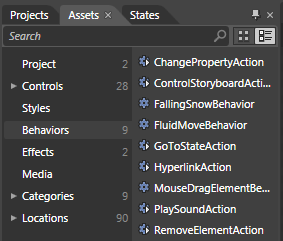
[ click on the Behaviors node in the Assets Library
]
Notice that one of the
behaviors you see there is called
FallingSnowBehavior! If you don't see it, be sure to
build your project from the Project menu or press
Ctrl + Shift + B.
Select the
FallingSnowBehavior entry and drag-n-drop it onto
your LayoutRoot directly on the artboard or via the
Objects and Timeline panel:
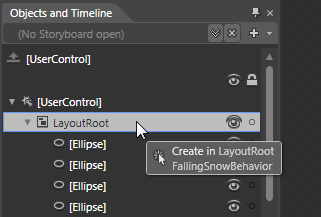
[ drag and drop the behavior into your LayoutRoot ]
After you have dragged
and dropped this behavior onto your LayoutRoot,
press F5 or go to Project | Run to run your
application. If the stars and planets are aligned
just right, and they should be right now, you will
find your snowflakes happily falling to the ground!
Take a break.
Relax. Play a fun little game of
Demolition City.
Ok, let's
continue. While you have a working version of the
falling snow effect right now, we aren't quite done
with this tutorial. A large part of what you did
involved simply copying and pasting some code and
dragging and dropping something in Blend without me
providing any information on how everything fits in.
In a nutshell, here is our original problem -
there are a lot of snowflakes that currently live
inside a container that need to be animated to
simulate falling snow.
There are a handful of
ways you can accomplish that. One way that was
presented to you in this tutorial is by using a
behavior that you attach to your container itself,
and this behavior contains everything needed to go
through each snowflake and animate it. I describe
behaviors in greater detail in my
Introduction to Behaviors tutorial, but to
summarize, a behavior is nothing more than some code
you attach to an element.
Once a behavior is
attached to the element, it has full freedom to
manipulate the element and access any of its
properties at will. It's beautifully parasitic when
you think about it. The FallingSnowBehavior is
designed to only work on a container/layout panel,
and all layout panels have the ability to give you
access to all of its children. The children in our
case are the snowflakes that live inside it.
Our behavior, when it
attaches to this layout panel (named LayoutRoot),
instantly starts to go through its children and
begins to perform the magic needed to make each
snowflake fall. This magic is defined in code, so
brace yourself - I'm going to explain how the code
works.
All of the code we
care about lives in
FallingSnowBehavior.cs, so be sure to have it
opened and let's get started:
- public
class
FallingSnowBehavior
:
Behavior<Canvas>
With behaviors, while
they can be placed on any DependencyObject (a fancy
word for a whole
lotta things), you can be more specific and
constrain them to only be applicable to certain
types of elements. In our case, we only want the
behavior to work on layout panels that are Canvasses, so I specify
Canvas here.
In case didn't notice
this the first time through, if you go back to
MainPage.xaml, notice that you can't actually drop your
dragged FallingSnowBehavior behavior from the Asset library onto
anything besides LayoutRoot, our Canvas. This line
is what specifies that constraint.
- private
static
Random
randomNumber;
This line is fairly
straightforward. I am declaring a static Random
object called randomNumber. This will be used to
generate the random values that each snowflake will
have to give it (mostly) unique speed and radius.
- protected
override
void
OnAttached()
- {
- base.OnAttached();
-
- randomNumber
=
new
Random();
-
- this.AssociatedObject.Loaded
+=
new
RoutedEventHandler(ApplicationLoaded);
- }
Every behavior will have this OnAttached method,
and this method gets called when the behavior is
properly hooked up to a parent and ready to go.
Think of it as an official entry point for any code
that you want to have excecuted.
Inside this method, the
two lines you added are:
- randomNumber
=
new
Random();
-
- this.AssociatedObject.Loaded
+=
new
RoutedEventHandler(ApplicationLoaded);
The first line initializes the randomNumber
object you declared earlier. The second line is a
bit more interesting.
When applications in Silverlight and WPF are run,
a large amount of things are turned on inside the
application. Not everything gets turned on at the
same time, and you may run into cases where one part
of your app is kicking and ready to go while another
part that it depends on is still asleep. In these
cases, your application will probably crash.
One way of avoiding this is to ensure that you
only execute when everything has fully been loaded
and turned on. That is handled by the Loaded event
that I attach to the behavior's parent - known to
friends as
this.AssociatedObject. The behavior's parent
in this case is actually our friendly Canvas called
LayoutRoot.
As with most events, it needs to be associated
with an event handler that will fire when the event
fire. This Loaded event is no different, and it is
associated with the ApplicationLoaded event handler
that I will describe...on the
next page!
Onwards to the
next page!
|


