|
by
kirupa | 17 February 2009
A very popular control
for displaying a list of things in Silverlight and
WPF is the listbox control. It is one of my favorite
controls and in this article, I will introduce the
listbox to you and show you how you can use Blend to
insert and modify items into your listbox easily.
If you have never
played with a listbox before, check out the example
I have posted below:
In the above example,
scroll through the list of items, select items,
click on them, etc. Just get a feel for what a
listbox is capable of doing, and by the end of this
tutorial, you will have learned how to create
something like what you see above.
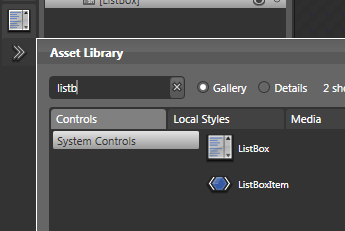
Create a new Silverlight 2
(or WPF) project in Expression Blend 2 SP1. Launch
the Asset Library and, since the search field will
have focus by default, begin typing the word
listbox:
[ your Asset Library is a one-stop shop for all
things controls and more ]
The listbox control
will make its appearance very shortly. Once it
appears, select it. Your Asset Library would
disappear, and the Listbox icon will appear directly
above your Asset Library chevron:

[ the selected control is displayed above your Asset
Library icon ]
Double click on the
icon, and a listbox will be inserted for you at its
default size on your artboard. Feel free to resize
and reposition it as you will:
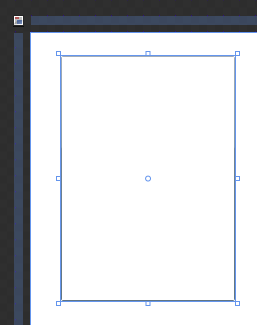
[ a listbox without any items looks pretty plain ]
As you can see, a
listbox inserted at its default size looks a bit
plain....almost too plain! Don't worry. The
plainness will be reduced once your listbox begins
to store some items. Let's look at how to do that in
the next section.
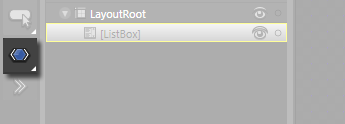
To
add items to your listbox in Blend, make sure your
listbox is the active container. You can do
that by looking in your object tree and
double-clicking on the listbox. Once you
double-click on the listbox, a yellow outline will
appear around it:
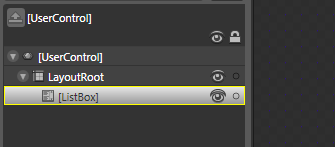
[ double click on the listbox to make it the active
container ]
The yellow
outline indicates that this element will be the
default location for inserted elements. So, let's go
ahead and insert a few items. More specifically,
let's insert a ListBox item.
To insert a listbox
item, launch your Asset Library again and search for
listboxitem.
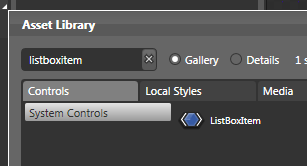
[ search for the ListBoxItem control ]
Just like before with
the listbox, select the listbox item to both close
the Asset Library as well as make the listbox item
the active control:
[ your ListBoxItem now has a seat above the Asset
Library icon ]
Double click on the
ListBoxItem icon that appears in your toolbox. Once
you double-click, notice that your listbox now
displays an item:

[ your listbox item can now be seen inside a listbox
]
Keep double-clicking
on the ListBoxItem icon to insert more items into
your listbox. Notice that the items you insert into
your listbox also appear in your object tree:
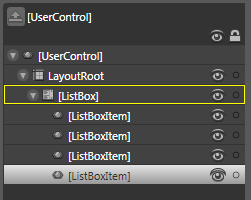
[ your object tree provides a running tally of items
currently in your listbox ]
You can select a
listboxitem either in your object tree or directly
from your listbox by just clicking on it. Once you
have selected your listboxitem, you can use the
Properties Inspector to modify any of the
listboxitem's properties. To change the text of your
listboxitem, look at the Content property under the
Common Properties category:
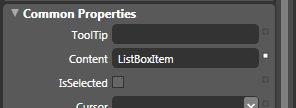
[ the Content property allows you to change what is
displayed ]
Change the content
from ListBoxItem to whatever text you would like to
display. You can do this for all of the listbox
items that you currently have in your listbox:
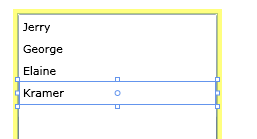
[ my listbox items no longer display default values
]
One thing to note is
that your Listbox is actually layout panel. It just
happens to lay things out on top of each other and
display a scrollbar when scrolling is required.
Nowhere does it expect only listboxitems to be
contained inside it.
You can insert any
element you want into your listbox, and depending on
the element, something predictable or unpredictable
will happen:

[ your listbox is quite flexible in what it will
allow one to display ]
I hope this brief article
provided an overview of how to add items to your
listbox. There is a lot more you can do with
listboxes, and future tutorials will cover many of
those topics in greater detail.
Just a final word before we wrap up. What you've seen here is freshly baked content without added preservatives, artificial intelligence, ads, and algorithm-driven doodads. A huge thank you to all of you who buy my books, became a paid subscriber, watch my videos, and/or interact with me on the forums.
Your support keeps this site going! 😇

|


